| Author |
 Topic Search Topic Search  Topic Options Topic Options
|
rize2 
Guest

Joined: November 27 2011
Location: Midvale
Status: Offline
Points: 691
|
 Post Options Post Options
") Thanks(0) Thanks(0)
 Quote Quote  Reply Reply
 Topic: Acrylic nano project Topic: Acrylic nano project
Posted: November 15 2012 at 6:19pm |
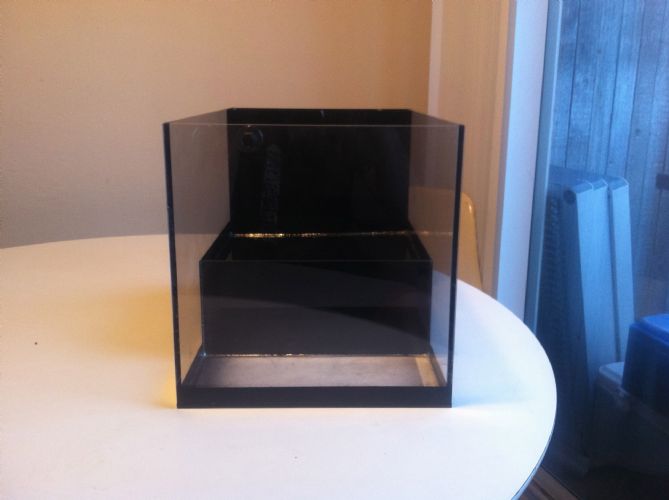
I thought it would be fun to build a little aquarium, so I finally did it. I used 1/4 inch acrylic, and it is about 10 gallons, with a 1 gallon ATO inside. Unfortunately I didnt take any pictures while I was putting the acrylic together. Here's a picture, please note that this is my first time ever touching acrylic so the seams arent the best and I chipped some of the slots that allow the water to flow into the back. 
Heres a picture showing underneath the shelf before I painted. The water is for the ATO is under the shelf
Now that I finished the aquarium, I've been try to figure out what to do for the rock scape. Due to the shape I'm thinking of doing a 3D background on both the back vertical piece of acrylic and the short one in the front. I found a way to do it on another forum:
http://www.reefcentral.com/forums/showthread.php?t=1300282
Does anyone know how to do this rock/foam method?
Edited by rize2 - November 16 2012 at 8:29pm
|
 |
Elite-Aquatics
Pet Store


Joined: March 21 2011
Location: North Ogden
Status: Offline
Points: 764
|
Post Options
Thanks(0)
Quote Reply
Posted: November 15 2012 at 8:41pm |
Looks pretty good 
|
|
Premium aquarium filtration!
|
|
rize2
Guest
Joined: November 27 2011
Location: Midvale
Status: Offline
Points: 691
|
Post Options
Thanks(0)
Quote Reply
Posted: November 15 2012 at 10:45pm |
 Elite-Aquatics wrote: Elite-Aquatics wrote:
Looks pretty good |
Well thank you!
|
|
Ryanscott
Guest
Joined: April 05 2012
Location: layton
Status: Offline
Points: 925
|
Post Options
Thanks(0)
Quote Reply
Posted: November 16 2012 at 1:20am |
seems pretty easy . he just zip tied rock to egg crate then filled it with foam. i havent done it but there is one thing i would do to improve it. i imagine that after all the rock had become live again the foam would stick out like a soar thumb . i would get coarse grained sand and sprinkle it in the cracks of the rocks and in other spots where you could see the foam to better conceal it . im going to get a little tank to try this.
just curious , how much did you spend on the little tank and how does the auto top off work ? it looks awesome by the way and a built in auto top off is a really cool feature .
|
|
Ryanscott
Guest
Joined: April 05 2012
Location: layton
Status: Offline
Points: 925
|
Post Options
Thanks(0)
Quote Reply
Posted: November 16 2012 at 1:24am |
|
lol just read farther on it and he did what i said i would change lol. it looks like a good idea.
|
|
BillyC
Guest

Joined: June 17 2011
Location: Clearfield
Status: Offline
Points: 1829
|
Post Options
Thanks(0)
Quote Reply
Posted: November 16 2012 at 2:44am |
|
Wow that's impressive! Looking forward to see you fill it up.
|
|
SKYLAR89
Guest

Joined: May 06 2012
Location: West Valley Cit
Status: Offline
Points: 79
|
Post Options
Thanks(0)
Quote Reply
Posted: November 16 2012 at 9:05am |
|
Wow that looks sweet!
|
|
rize2
Guest
Joined: November 27 2011
Location: Midvale
Status: Offline
Points: 691
|
Post Options
Thanks(0)
Quote Reply
Posted: November 16 2012 at 10:51am |
Thanks for the kind words everyone. I'm pretty happy with it, but I hope to build myself some more and get better at working with the acrylic.
Ryanscott wrote:
just curious , how much did you spend on the little tank and how does the auto top off work ? it looks awesome by the way and a built in auto top off is a really cool feature . |
I spent around 60 for the acrylic from delvies. And about 20 more on the weld-on, applicator and the edge scraper.
Heres a top down picture of the rear chambers
The left chamber is where I'll pour the fresh water. It is the size to fit a mini-jet 606 down there. as far as mounting the float switch in the other chamber I'm still not sure exactly how I'm going to do that. The ATO float switch I have on my other tank is from autotopoff.com and is mounted on a piece of acrylic. I'm going to have to find a way to mount the switch right to the wall because space will be tight.
I have the back chamber measured to fit a media basket with a tunze 9002 attached to it. With my main pump sitting under the tunze.
My lighting plan is to go with a 6" MakersLED designer heatsink, 12 LEDs run by a DIM4
|
|
rize2
Guest
Joined: November 27 2011
Location: Midvale
Status: Offline
Points: 691
|
Post Options
Thanks(0)
Quote Reply
Posted: November 17 2012 at 3:47pm |
So after doing more reading into the rock and foam method above, they use marco rocks. I have two questions about the rock: 1. I found a website, marcorocks.com. Is this the only place to get that rock? 2. In the thead they mention cooking the rock, and talk a little about curing it. I'm wondering what those do and how to do it.
Thank you!
|
|
Ryanscott
Guest
Joined: April 05 2012
Location: layton
Status: Offline
Points: 925
|
Post Options
Thanks(0)
Quote Reply
Posted: November 17 2012 at 3:57pm |
|
Im sure you could use just dead rock and break it up with a hammer instead of the macrorocks. It would be alot cheaper IMO
|
|
rize2
Guest
Joined: November 27 2011
Location: Midvale
Status: Offline
Points: 691
|
Post Options
Thanks(0)
Quote Reply
Posted: November 17 2012 at 4:10pm |
Ryanscott wrote:
Im sure you could use just dead rock and break it up with a hammer instead of the macrorocks. It would be alot cheaper IMO |
I'll probably end up doing that. Do you still cook/cure it before using dead rock? I always just bought live rock so i'm not experienced with dry rock at all.
Jake
|
|
Ryanscott
Guest
Joined: April 05 2012
Location: layton
Status: Offline
Points: 925
|
Post Options
Thanks(0)
Quote Reply
Posted: November 17 2012 at 4:13pm |
|
I have always just rinsed it and put it in. I haven't had any problems with it.
|
|
BillyC
Guest
Joined: June 17 2011
Location: Clearfield
Status: Offline
Points: 1829
|
Post Options
Thanks(0)
Quote Reply
Posted: November 17 2012 at 4:23pm |
rize2 wrote:
Ryanscott wrote:
Im sure you could use just dead rock and break it up with a hammer instead of the macrorocks. It would be alot cheaper IMO |
I'll probably end up doing that. Do you still cook/cure it before using dead rock? I always just bought live rock so i'm not experienced with dry rock at all.
Jake |
I would soak it in freshwater for a few days. Then dump out all the water and soak it again. This will get rid of a lot of the crap that rocks leach out like silicates.
|
|
rize2
Guest
Joined: November 27 2011
Location: Midvale
Status: Offline
Points: 691
|
Post Options
Thanks(0)
Quote Reply
Posted: November 20 2012 at 12:23pm |
|
Anybody have experience using foam and know what kind works best?
|
|