| Author |
 Topic Search Topic Search  Topic Options Topic Options
|
jfinch 
Guest


Joined: March 06 2003
Location: Pleasant Grove
Status: Offline
Points: 7067
|
 Post Options Post Options
 Thanks(0) Thanks(0)
 Quote Quote  Reply Reply
 Topic: DIY Phosphate Reactor Topic: DIY Phosphate Reactor
Posted: October 04 2006 at 11:41pm |
The DIY forum is my favorite forum here and it has really been dying off the last few months so I'm hoping to do my part in reviving it  . I had a few hours to kill last night and I've been battling cyano lately so I decided to build a fluidized phosphate reactor. Hope someone else finds this helpful or interesting... . I had a few hours to kill last night and I've been battling cyano lately so I decided to build a fluidized phosphate reactor. Hope someone else finds this helpful or interesting...
This was kind of a spur of the moment project so most of the stuff I just had on hand, but ymmv. The main reaction chamber is an 11" length of 3" acrylic tubing. I was lazy so I made the flanges square rather then round. Here's the build pictures.
The bottom, 1/8" white acrylic (it's what I had laying around), being glued to the tube.
This is the flange top setup. I used double sided tape to stick two 1/4" thick flange pieces together and then drilled through both pieces for the flange bolts using a 3/16" bit. I then used a 2 1/2 inch hole saw to drill a hole in the center of only one flange (the one glued to the tube).
I'm now using a 1/4" tap to add threads to the bottom flange:
I always use the "pins" method when gluing acrylic. You can see three straight pins keeping the tube lifted off the flange. A needle bottle is used to wick Weld-on 4 cement into the space between the tube and flange. I let it sit like this for about 2 minutes before removing the pins and letting the pieces "melt" together.
I was pretty sloppy from trying to take the above picture but as you can see it's a pretty good bubble free joint.
For the top flange I drilled a 7/8" hole in the center to fit the inlet piping. I also drilled a 5/8" hole for the outlet piping. This picture shows the 5/8" hole being tapped for a 3/8" John Guest fitting.
The center hole will not be tapped, I'll just use a 1/2" plastic nipple, an o-ring and a couple fittings as a bulkhead fitting. This picture shows the general layout of these fittings. I'm using cpvc fittings and pipe because it's smaller then regular pvc.
The flange top goes between these two sections and looks like this when tightened. The o-ring ensures a leak free seal.
The 3/16" holes in the top flange are enlarged to 5/16" for clearance of the 1/4" nylon flange bolts. The John Guest fitting is then screwed into place. A rubber gasket for some toilet fitting found in Lowes is used as a gasket between the flanges. Here's an upper view before adding the flange bolts.
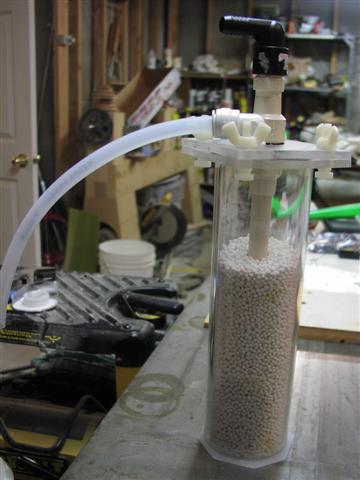
Here is a side view of the mostly finished product. The water is feed into the center pipe which fluidizes the media in the reactor and finally it exits out the 3/8" fitting.
And finally, here it filled with media. I'm using activated alumina, but iron oxide hydroxide would be a better choice. I will likely use this reactor for activated carbon too.
How well does it work? Awesome. Here's a short video of me rinsing the media with tapwater showing how a fluidized reactor should look (notice the beads slowly moving up and down in the reactor). www.xmission.com/~jfinch/music/fuidized.mov
Edited by jfinch - October 04 2006 at 11:43pm
|
|
|
 |
Gahlenfr
Guest
Joined: December 01 2005
Location: United States
Status: Offline
Points: 1061
|
Post Options
Thanks(0)
Quote Reply
Posted: October 04 2006 at 11:56pm |
Awesome job Jon  I need to build one of those for activated carbon. How did you cut the circle for the flange lid? EDIT Sorry, I needed to look more closely at the picture  Large hole saw would do the trick and give a clean cut!
Edited by Gahlenfr - October 05 2006 at 12:09am
|
|
tileman
Guest
Joined: November 05 2003
Location: Murray
Status: Offline
Points: 5368
|
Post Options
Thanks(0)
Quote Reply
Posted: October 05 2006 at 12:02am |
|
Hey Jon, Let me know when a house in your neighborhood goes up for sale...
|
|
335G Reef
TOTM.
http://www.advancedaquarist.com/2015/2/aquarium
ReefKeepers TOTM Feb. 2012
http://reefkeeping.com/joomla/index....k-of-the-month
&
|
|
Mike Savage
Guest

Joined: July 15 2005
Location: Murray
Status: Offline
Points: 19173
|
Post Options
Thanks(0)
Quote Reply
Posted: October 05 2006 at 12:19am |
That was excellent
Thanks Jon.
|
|
|
|
jfinch
Guest
Joined: March 06 2003
Location: Pleasant Grove
Status: Offline
Points: 7067
|
Post Options
Thanks(0)
Quote Reply
Posted: October 05 2006 at 8:49am |
|
Thanks guys.
|
|
|
|
Tyrosinase
Guest

Joined: February 10 2005
Location: United States
Status: Offline
Points: 165
|
Post Options
Thanks(0)
Quote Reply
Posted: October 05 2006 at 11:57am |
|
Is there a reason, other than aesthetics, as to why we should shoot to get bubble free joints?
|
|
jfinch
Guest
Joined: March 06 2003
Location: Pleasant Grove
Status: Offline
Points: 7067
|
Post Options
Thanks(0)
Quote Reply
Posted: October 05 2006 at 12:22pm |
Not only does it look better, but I think a bubble free joint is a stronger joint too.
|
|
|
|
fj40fax
Guest

Joined: November 04 2004
Location: United States
Status: Offline
Points: 1261
|
Post Options
Thanks(0)
Quote Reply
Posted: October 05 2006 at 12:57pm |
|
What are you using to run the water through, any powerhead I can think of would be way too much for AC?
Fax
|
|
Fax 318-3632
90g 2x250W 14kK MH
Sump, Fuge, G3, UV, O3, ACIII
Pleasant Grove, UT Across State Street from the Purple Turtle
Adjustments and Massages for Frags!
|
|
fj40fax
Guest
Joined: November 04 2004
Location: United States
Status: Offline
Points: 1261
|
Post Options
Thanks(0)
Quote Reply
Posted: October 05 2006 at 1:10pm |
|
Another question. Why use the wing nuts if you have threads in
the bottom flange? Can't you just use the thumb screws from the
top?
Fax
|
|
Fax 318-3632
90g 2x250W 14kK MH
Sump, Fuge, G3, UV, O3, ACIII
Pleasant Grove, UT Across State Street from the Purple Turtle
Adjustments and Massages for Frags!
|
|
jfinch
Guest
Joined: March 06 2003
Location: Pleasant Grove
Status: Offline
Points: 7067
|
Post Options
Thanks(0)
Quote Reply
Posted: October 05 2006 at 1:11pm |
|
I'm using my "utility" pump, an Iwaki 40. This pump supplies water for my calcium reactor and phosphate reactor but most of it goes into the skimmer. A valve somewhere on the inlet allows you to reduce the flow. I haven't tried AC yet, but I think it'll work ok (I didn't add any AC in with the alumina because I'm pretty sure the AC would have floated out at the velocity needed to fluidized the alumina).
Edited by jfinch - October 05 2006 at 1:17pm
|
|
|
|
jfinch
Guest
Joined: March 06 2003
Location: Pleasant Grove
Status: Offline
Points: 7067
|
Post Options
Thanks(0)
Quote Reply
Posted: October 05 2006 at 1:16pm |
Why use the wing nuts if you have threads in the bottom flange? Can't you just use the thumb screws from the top?
Yes I could just screw the thumbscrews down from the top. That's what I did with my calcium reactor. I've found that nylon screws tend to be tight in acrylic so short screws are the way to go. But the nylon thumbscrews I had were too long and I was too lazy to cut them (I know... that's pretty lazy isn't it). So I just screwed 'em in from the bottom and used wingnuts on the top.
|
|
|
|
fj40fax
Guest
Joined: November 04 2004
Location: United States
Status: Offline
Points: 1261
|
Post Options
Thanks(0)
Quote Reply
Posted: October 05 2006 at 1:33pm |
|
I had a bag of carbon attached to the drain from the display on my 20
one time and the movement of the carbon rubbing on itself turned
everything in the tank black. My poor sponges still have a black
layer inside causing them to look gray and that was over a year ago,
probably 2.
|
|
Fax 318-3632
90g 2x250W 14kK MH
Sump, Fuge, G3, UV, O3, ACIII
Pleasant Grove, UT Across State Street from the Purple Turtle
Adjustments and Massages for Frags!
|
|
fj40fax
Guest
Joined: November 04 2004
Location: United States
Status: Offline
Points: 1261
|
Post Options
Thanks(0)
Quote Reply
Posted: October 05 2006 at 2:23pm |
|
Looks great Jon! Do they sell scrap acrylic tubing by the pound
at Regional Supply? I am definately going to make one of
these. I just remembered that I have an old skimmer (air stone)
that would be perfect for this. It may even have another tube
inside a tube so I can make both reactors. Great Idea!!!
Fax
Edited by fj40fax - October 05 2006 at 2:24pm
|
|
Fax 318-3632
90g 2x250W 14kK MH
Sump, Fuge, G3, UV, O3, ACIII
Pleasant Grove, UT Across State Street from the Purple Turtle
Adjustments and Massages for Frags!
|
|
jfinch
Guest
Joined: March 06 2003
Location: Pleasant Grove
Status: Offline
Points: 7067
|
Post Options
Thanks(0)
Quote Reply
Posted: October 05 2006 at 3:31pm |
Do they sell scrap acrylic tubing by the pound at Regional Supply?
No, the don't sell scrap tubing, but the do sell it by the foot. And it's relatively cheap (~$2-3/ft for 3" tube).
|
|
|
|
Bob Kripfgans
Guest

Joined: November 13 2004
Location: Tooele, Ut.
Status: Offline
Points: 1084
|
Post Options
Thanks(0)
Quote Reply
Posted: October 05 2006 at 6:54pm |
Nice job as usual Jon. Sounds like a good project for a rainy winter weekend.
I'm thinking that I could eally use one since I use tap water for top offs. I haven't had to much of a problem with cyno but it could sneak up on me fast.
|
|
WMAS is da place!
Save the Banggai's!
Tooele,Ut.
|
|
Corey Price
Guest

Joined: August 25 2004
Location: Farmington
Status: Offline
Points: 2567
|
Post Options
Thanks(0)
Quote Reply
Posted: October 09 2006 at 11:58pm |
|
I hope to get my DIY skills up to this point.
|
|
Kevin
Paid Member


Joined: September 12 2002
Location: Pleasant Grove
Status: Offline
Points: 1044
|
Post Options
Thanks(0)
Quote Reply
Posted: October 10 2006 at 10:20am |
|
What is the wall thickness on that acrylic tube?
|
|
Corey Price
Guest
Joined: August 25 2004
Location: Farmington
Status: Offline
Points: 2567
|
Post Options
Thanks(0)
Quote Reply
Posted: October 10 2006 at 1:41pm |
|
I just bought some 1/2" and 3/8" sheet acrylic scraps at Regional- they sell it by the pound. 3" dia extruded tube is less than $4 a foot at Regional, and 4" dia is about $7.50 per foot.
Edited by Corwando - October 10 2006 at 5:59pm
|
|
jfinch
Guest
Joined: March 06 2003
Location: Pleasant Grove
Status: Offline
Points: 7067
|
Post Options
Thanks(0)
Quote Reply
Posted: October 10 2006 at 3:17pm |
Almost everything I've built that needed tube was 1/8", but for this particular project I used a piece of 1/4" thick tube that I had laying around.
|
|
|
|
Kevin
Paid Member
Joined: September 12 2002
Location: Pleasant Grove
Status: Offline
Points: 1044
|
Post Options
Thanks(0)
Quote Reply
Posted: October 10 2006 at 5:01pm |
NEVER MIND -- I just went up and read his post again  and found the info I needed.
I previously asked --
Another question, where do you get the rubber gasket for between the acrylic tube plate, and the acrylic plate with all the hose connections?
Edited by Kevin - October 10 2006 at 5:02pm
|
|