| Author |
 Topic Search Topic Search  Topic Options Topic Options
|
tfowers 
Guest


Joined: April 23 2003
Location: Brazil
Status: Offline
Points: 150
|
 Post Options Post Options
") Thanks(0) Thanks(0)
 Quote Quote  Reply Reply
 Topic: Acrylic Seam Topic: Acrylic Seam
Posted: February 25 2004 at 1:41pm |
Hi all,
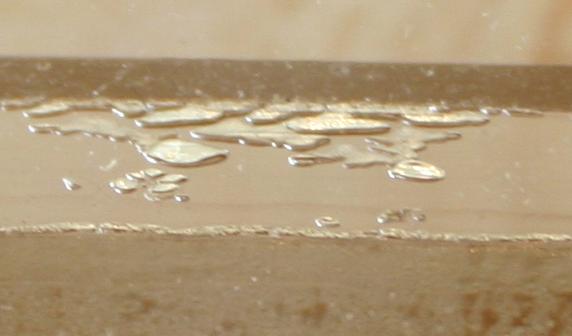
I'm working on building an acrylic tank, it's going to be 30x30x24H(90 gal) out of 1/2in acrylic. I tried my first seam last night and it's almost flawless, except for one botch:

zoomed:

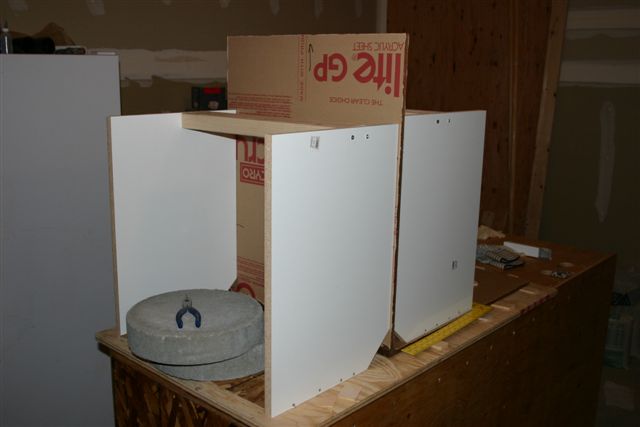
The whole setup with jigs:
I should note these bubbles are on the outside edge of the seam.
Any chance I could live with this? Or should I recut it and start over?
Thanks in advance - Tim
Edited by tfowers
|
 |
jglover
Guest

Joined: February 10 2004
Location: United States
Status: Offline
Points: 576
|
Post Options
Thanks(0)
Quote Reply
Posted: February 25 2004 at 1:43pm |
try it and see  you could try and reenforce it if it is in a hidden spot.
|
|
jfinch
Guest

Joined: March 06 2003
Location: Pleasant Grove
Status: Offline
Points: 7067
|
Post Options
Thanks(0)
Quote Reply
Posted: February 25 2004 at 2:27pm |
|
I wouldn't worry. Fill it, if it leaks either dab some weld-on 16 or silicone in the corner. Structurally, imo, your ok.
|
|
|
|
Adam Blundell
Presidency


Joined: June 24 2002
Location: Davis County
Status: Offline
Points: 18526
|
Post Options
Thanks(0)
Quote Reply
Posted: February 25 2004 at 3:34pm |
I do exactly what Jon said. I go back over each seam with #16, I just usually don't admit that secret. But since Jon mentioned it, I'll second that idea. I have some if you can have if you are willing to wait a while. Or actually, it is only like $4 so you might as well just grab some at a store.
Adam
|
|
Come to a meeting, they’re fun!
|
|
tfowers
Guest
Joined: April 23 2003
Location: Brazil
Status: Offline
Points: 150
|
Post Options
Thanks(0)
Quote Reply
Posted: February 25 2004 at 3:42pm |
|
I think I'm going to glue a square piece of acrylic over it to alleve my fears, since I'm building up rock in the corners of the tank anyway.
Thanks guys!
Tim
|
|
Adam Haycock
Guest

Joined: August 23 2003
Location: Fiji
Status: Offline
Points: 2647
|
Post Options
Thanks(0)
Quote Reply
Posted: February 25 2004 at 5:29pm |
Looks good Tim. I also have some weld-on #16 if you need any. Im practicing the pin method tonight on my 20 gallon refugium. Couple of questions for you...
What are you using for pins?
What did you use to make the edges smooth?
Are you leaving an 1/8" lip on the outside to apply solvent? The only bad thing about this way is that you need to cut the lip off later using a router.
|
|
|
|
tfowers
Guest
Joined: April 23 2003
Location: Brazil
Status: Offline
Points: 150
|
Post Options
Thanks(0)
Quote Reply
Posted: February 26 2004 at 10:25am |
|
I just got some size 24 sewing pins from wal-mart, not sure if that means 24 "gauge". I used a joiner to get the edges smooth. Yes we left a 1/8in to route off later. We did another edge last night and it was PERFECT - no bubbles at all! (patting self on back) We waited another 30 sec on the weld-on(1:50 total), used a few more pins, and hung a 5lbs weight on the piece itself. I'm really amazed how well the pins method works. - Tim
|
|
GonZo
Guest

Joined: July 26 2002
Location: Finland
Status: Offline
Points: 225
|
Post Options
Thanks(0)
Quote Reply
Posted: February 26 2004 at 1:12pm |
|
Can someone describe what the pin method is. Please!
|
|
Cortney (West Jordan)
The joy of discovery is certainly the liveliest that the mind of man can ever feel. - Claude Bernard
|
|
Adam Haycock
Guest
Joined: August 23 2003
Location: Fiji
Status: Offline
Points: 2647
|
Post Options
Thanks(0)
Quote Reply
Posted: February 26 2004 at 1:30pm |
|
Cortney,
Two pices of acrylic are positioned at 90 degrees to
each other. Pins are inserted between the two
pieces about every six inches. Solvent is applied
between the two. About 30-60 seconds later, the
pins are pulled and the weight of the vertical sheet
pushes down on the solvent - pushing a small
amount out of the joint. You are left with a beautiful
joint that is practically void of air pockets. This thread
goes into more detail...
http://reefcentral.com/forums/showthread.php?s=&p
ostid=1171757
I tried this method last night with almost perfect
results. My "pins" were a little too thick, allowing too
much solvent to enter between the pieces. This
caused a little too much solvent to be pushed out
when I pulled the pins. Im going to try the wires in
twisty ties tonight to finish my refugium.
Edited by BananaTropics
|
|
|
|
jfinch
Guest
Joined: March 06 2003
Location: Pleasant Grove
Status: Offline
Points: 7067
|
Post Options
Thanks(0)
Quote Reply
Posted: February 26 2004 at 2:35pm |
Adam, if you're getting too much liquid squeeze out leave the pins in a little longer. I usually keep them in for over a minute with 1/4" material. It really gets the plastic soft. If the acrylic piece softens to the point that it flows around the pin, you've waited too long and will have bubbles where the pin was.
For me the key to the whole pins method is shimming. Spend 95% of your time shimming and you'll like the end results. Side pieces aren't too hard, glueing the bottom on is where it really pays to shim well.
|
|
|
|
Skyetone
Guest

Joined: January 09 2004
Location: United States
Status: Offline
Points: 1612
|
Post Options
Thanks(0)
Quote Reply
Posted: February 26 2004 at 4:39pm |
shim?
I too am going to build my first acrylic soon.
Dead link BTW
Edited by Skyetone
|
|
I will just give my warning that your system will flood, bulbs will burn out, and things will take continuous maintenance... get over it.
Magna
|
|
Meeshi_ma
Guest

Joined: January 16 2004
Location: United States
Status: Offline
Points: 159
|
Post Options
Thanks(0)
Quote Reply
Posted: February 26 2004 at 5:03pm |
|
The link works, you just have to make sure that both lines get copied.
|
|
Adam Haycock
Guest
Joined: August 23 2003
Location: Fiji
Status: Offline
Points: 2647
|
Post Options
Thanks(0)
Quote Reply
Posted: February 27 2004 at 7:47pm |
Thanks Jon! I just did the bottom seam and it
worked great! 
Edited by BananaTropics
|
|
|
|
Adam Haycock
Guest
Joined: August 23 2003
Location: Fiji
Status: Offline
Points: 2647
|
Post Options
Thanks(0)
Quote Reply
Posted: February 27 2004 at 10:55pm |
|
|
|
|
|
tfowers
Guest
Joined: April 23 2003
Location: Brazil
Status: Offline
Points: 150
|
Post Options
Thanks(0)
Quote Reply
Posted: February 28 2004 at 10:47am |
|
Just had time for the 2 sides - doing the back today. I'll try go get some more pics.
Tim
|
|
Adam Haycock
Guest
Joined: August 23 2003
Location: Fiji
Status: Offline
Points: 2647
|
Post Options
Thanks(0)
Quote Reply
Posted: March 09 2004 at 7:05pm |
Hows it coming Tim?
Are you planning on using a 45 degree router bit to cut off the sharp corners?
|
|
|
|
tfowers
Guest
Joined: April 23 2003
Location: Brazil
Status: Offline
Points: 150
|
Post Options
Thanks(0)
Quote Reply
Posted: March 10 2004 at 7:05pm |
|
Not sure on the corners, probably try to round them. The bottom is on and has a great seam - I haven't done top or overflow(external) yet, but I'm I'm waiting for the rest to cure anyway, so I'm not in a hurry.
Tim
|
|
Adam Haycock
Guest
Joined: August 23 2003
Location: Fiji
Status: Offline
Points: 2647
|
Post Options
Thanks(0)
Quote Reply
Posted: March 10 2004 at 7:52pm |
I tried using a router to smooth one of the back edges, but didn't like the look. I think a file or sandpaper will do nicely.
BTW, I gave you the wrong amount on a 30"x30" piece of 1/2" GP. Its actually about $60, not $80
|
|
|
|
jfinch
Guest
Joined: March 06 2003
Location: Pleasant Grove
Status: Offline
Points: 7067
|
Post Options
Thanks(0)
Quote Reply
Posted: March 10 2004 at 10:21pm |
I use a 1/8" roundover bit followed by sandpaper and tripoli on a cloth wheel. Or I just file the sharpness off the edge and call it good .
|
|
|
|