| Author |
 Topic Search Topic Search  Topic Options Topic Options
|
Luckedout 
Guest


Joined: October 11 2009
Location: Layton
Status: Offline
Points: 1495
|
 Post Options Post Options
") Thanks(0) Thanks(0)
 Quote Quote  Reply Reply
 Topic: My 90g Build Thread Topic: My 90g Build Thread
Posted: December 22 2009 at 11:14pm |
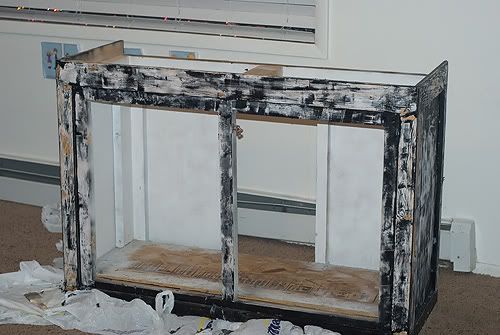
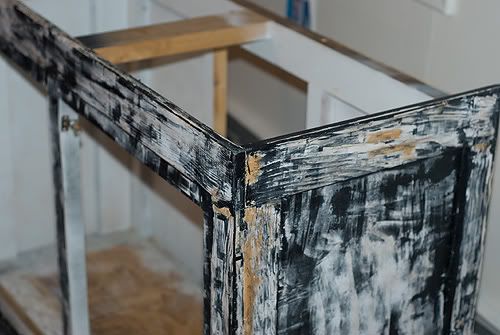
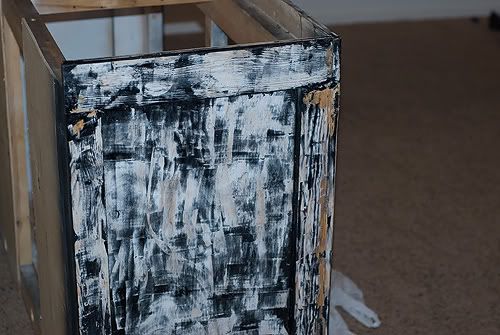
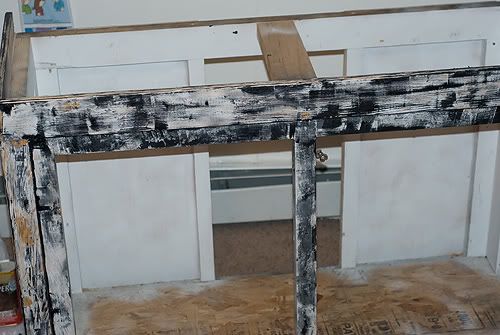
I recently purchased a used 90g tank with a single overflow. I love the look of my 54gallon, but I want a tank that can be used in my office for my patients to see. I set my corner tank up unsure of whether I would be able to even keep a saltwater tank, so now that it's been up and running for a while I'd like to try my hand at something bigger that people coming to my office can see and enjoy. So I found this good deal. It came with a stand and even some VHO's in the hood with an icecap ballast. The tank was only a few months old (the guy bought it to store some fish until his 92g corner was done  ). The stand however was fairly beat up. It looked like at one time it must've been a nice stand, but it's just worn out. This tank is going into my office, so I am going to redo the stand. I have built an addition to make the stand taller and also to give me a step for maintenance. I am also completely rebuilding the hood to give me more space and to accomodate some MH's. I am also re-finishing the stand and staining it a red mahogany to match the decore in the office. I have a few pictures that I'll post in a few min.
|
|
-Ben
90g Mixed reef
www.body-balancechiropractic.com
|
 |
Luckedout
Guest
Joined: October 11 2009
Location: Layton
Status: Offline
Points: 1495
|
Post Options
Thanks(0)
Quote Reply
Posted: December 22 2009 at 11:18pm |
|
|
|
-Ben
90g Mixed reef
www.body-balancechiropractic.com
|
|
Luckedout
Guest
Joined: October 11 2009
Location: Layton
Status: Offline
Points: 1495
|
Post Options
Thanks(0)
Quote Reply
Posted: December 22 2009 at 11:22pm |
Here it is finally sanded down and I'm starting to apply the first coat of stain. 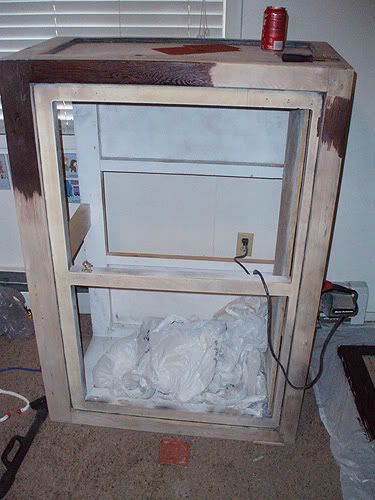 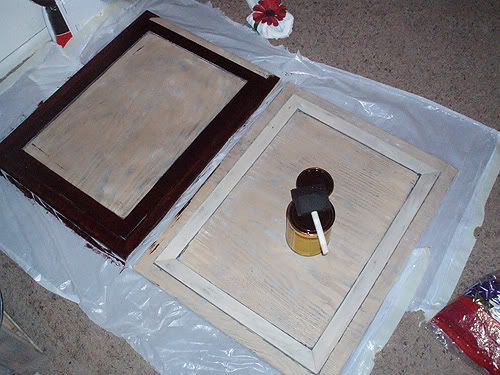 Daddy's helper. 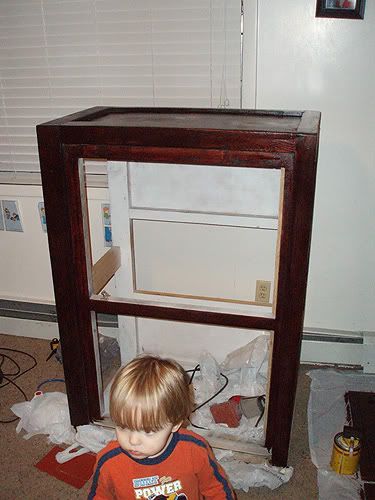
|
|
-Ben
90g Mixed reef
www.body-balancechiropractic.com
|
|
Luckedout
Guest
Joined: October 11 2009
Location: Layton
Status: Offline
Points: 1495
|
Post Options
Thanks(0)
Quote Reply
Posted: December 22 2009 at 11:25pm |
And here we are with the stain on. 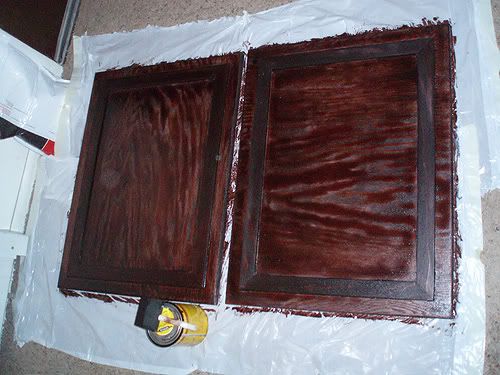 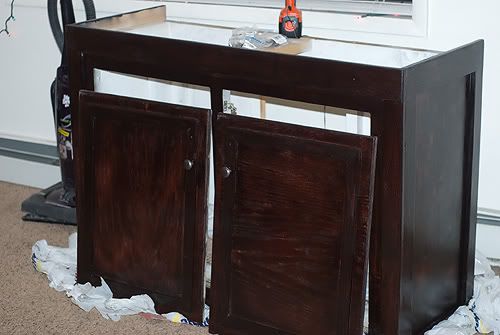 And with the doors now attached, it's ready to be moved to my office, much to the delight of my wife. 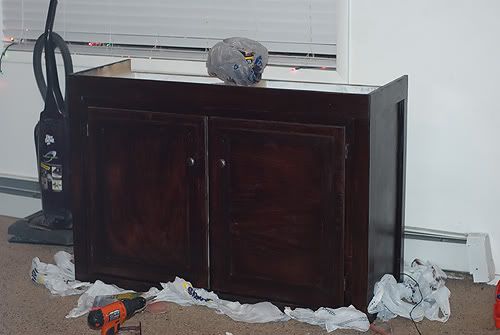 The extension to the stand is almost finished. I'm also halfway through the hood. I don't have pictures of them yet, but I'll get some on here soon. Let me know what you think! p.s. Still have to do a little finish work around the stand but overall I'm happy with how it's coming along. Also, I'm not sure how I'm going to plumb this thing, so I'll need help with that. I'm planning on a refugium underneath, but I also want an auto top-off because I can't keep lugging water around my office.
Edited by Luckedout - December 22 2009 at 11:32pm
|
|
-Ben
90g Mixed reef
www.body-balancechiropractic.com
|
|
jwoo
Presidency

Joined: April 29 2009
Location: Alpine
Status: Offline
Points: 3603
|
Post Options
Thanks(0)
Quote Reply
Posted: December 22 2009 at 11:34pm |
|
That looks great! I love build threads - I'll be sure to follow!
|
|
None at the moment
Soon: 72 Gallon Bowfront
|
|
ksmart
Guest
Joined: August 31 2009
Location: West Jordan
Status: Offline
Points: 1582
|
Post Options
Thanks(0)
Quote Reply
Posted: December 24 2009 at 5:56pm |
|
Looking good, cant wait to see more!
|
|
|
|
skimace7
Guest

Joined: November 20 2007
Location: United States
Status: Offline
Points: 460
|
Post Options
Thanks(0)
Quote Reply
Posted: December 28 2009 at 1:52pm |
|
Well done!.
|
|
Luckedout
Guest
Joined: October 11 2009
Location: Layton
Status: Offline
Points: 1495
|
Post Options
Thanks(0)
Quote Reply
Posted: December 28 2009 at 11:44pm |
It's coming along nicely. My brother was here on vacation from Basic Training so I grabbed him to help me move the tank and get things set up. I wish I had more pictures, but I forgot my camera so these are from my phone. Here is the tank in place. You can see the stand has been secured to the base that I built for it. I added the step to just make it easier to get into the tank. You can see the hood on top, which isn't finished yet. 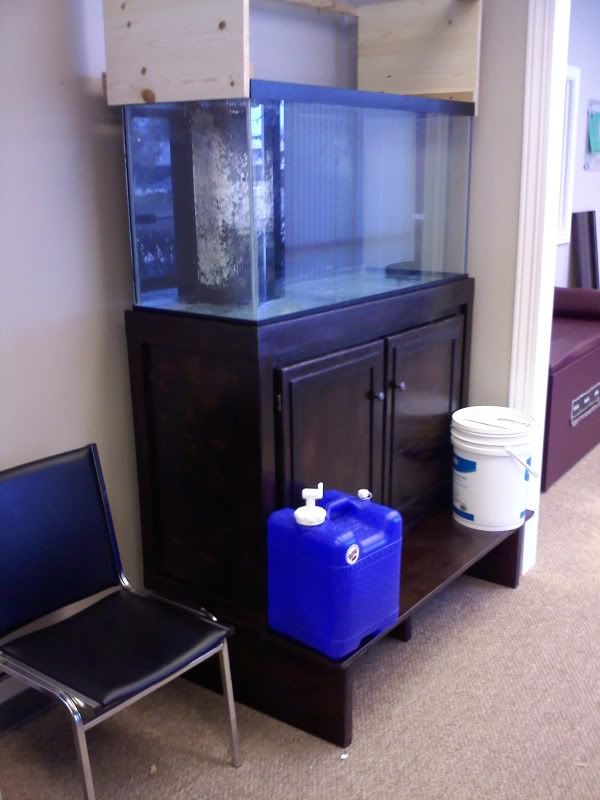 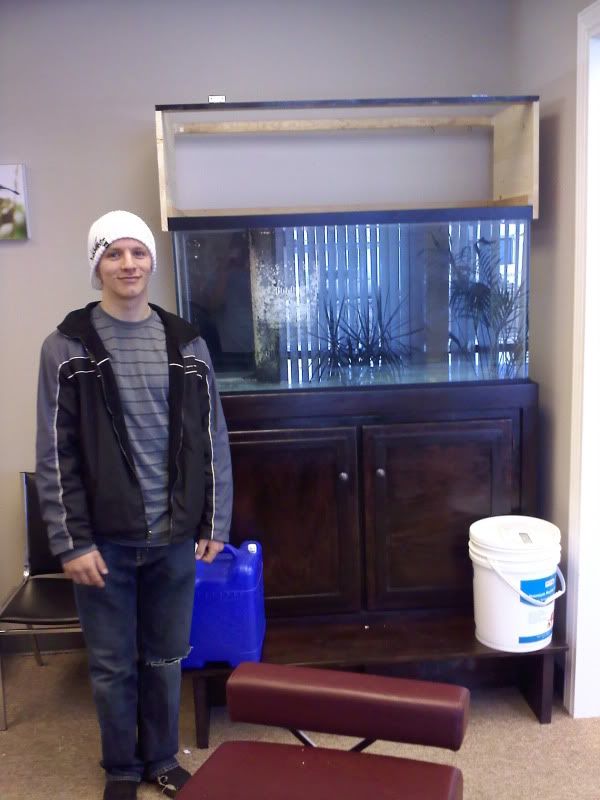 My brother is about 5' 11' so I'm pretty happy with the height of the tank. You won't have to stoop to look at it. I'll try to get some pictures of the sump and finish up the hood. I also have to start figuring out my plumbing.
Edited by Luckedout - December 28 2009 at 11:45pm
|
|
-Ben
90g Mixed reef
www.body-balancechiropractic.com
|
|
Mike Savage
Guest

Joined: July 15 2005
Location: Murray
Status: Offline
Points: 19173
|
Post Options
Thanks(0)
Quote Reply
Posted: December 29 2009 at 8:53am |
|
|
|
|
|
Mike Savage
Guest
Joined: July 15 2005
Location: Murray
Status: Offline
Points: 19173
|
Post Options
Thanks(0)
Quote Reply
Posted: December 29 2009 at 8:54am |
I would paint the inside of the hood white to help reflect light and protect the inside of the hood from salt spray.
Mike
|
|
|
|
Luckedout
Guest
Joined: October 11 2009
Location: Layton
Status: Offline
Points: 1495
|
Post Options
Thanks(0)
Quote Reply
Posted: December 29 2009 at 10:23am |
|
Ahh that's a good idea. i was debating on painting, staining or just sealing it and leaving it the natural wood color on the inside.
|
|
-Ben
90g Mixed reef
www.body-balancechiropractic.com
|
|
Desertreef
Guest

Joined: December 28 2009
Location: Logan
Status: Offline
Points: 28
|
Post Options
Thanks(0)
Quote Reply
Posted: December 29 2009 at 9:22pm |
|
That is great. I like the step. It will help short persons, like kids, see in better and give taller people a differnt view.
|
|
Luckedout
Guest
Joined: October 11 2009
Location: Layton
Status: Offline
Points: 1495
|
Post Options
Thanks(0)
Quote Reply
Posted: December 29 2009 at 9:33pm |
|
yeah that was my thought since it's in my office and a lot of kids come through there. Thanks!
|
|
-Ben
90g Mixed reef
www.body-balancechiropractic.com
|
|
tileman
Guest
Joined: November 05 2003
Location: Murray
Status: Offline
Points: 5368
|
Post Options
Thanks(0)
Quote Reply
Posted: December 29 2009 at 10:47pm |
|
Its looking real good. I really like the height of the tank. Will you be able to run a waterline through the wall for your auto topoff?
|
|
335G Reef
TOTM.
http://www.advancedaquarist.com/2015/2/aquarium
ReefKeepers TOTM Feb. 2012
http://reefkeeping.com/joomla/index....k-of-the-month
&
|
|
Luckedout
Guest
Joined: October 11 2009
Location: Layton
Status: Offline
Points: 1495
|
Post Options
Thanks(0)
Quote Reply
Posted: December 29 2009 at 11:24pm |
|
I'm tempted to run one through the drop ceiling and into my utility closet.. but I have to consult with someone who has actually done a top off to show me if it would work.
|
|
-Ben
90g Mixed reef
www.body-balancechiropractic.com
|
|
Luckedout
Guest
Joined: October 11 2009
Location: Layton
Status: Offline
Points: 1495
|
Post Options
Thanks(0)
Quote Reply
Posted: December 30 2009 at 12:27am |
When I raised the tank up, I also took out the bottom of the stand to give myself a bit of room. I put in a larger sump then what came with the tank. I'm also thinking about putting in a small shelf to store some equipment, but that might happen later down the road. 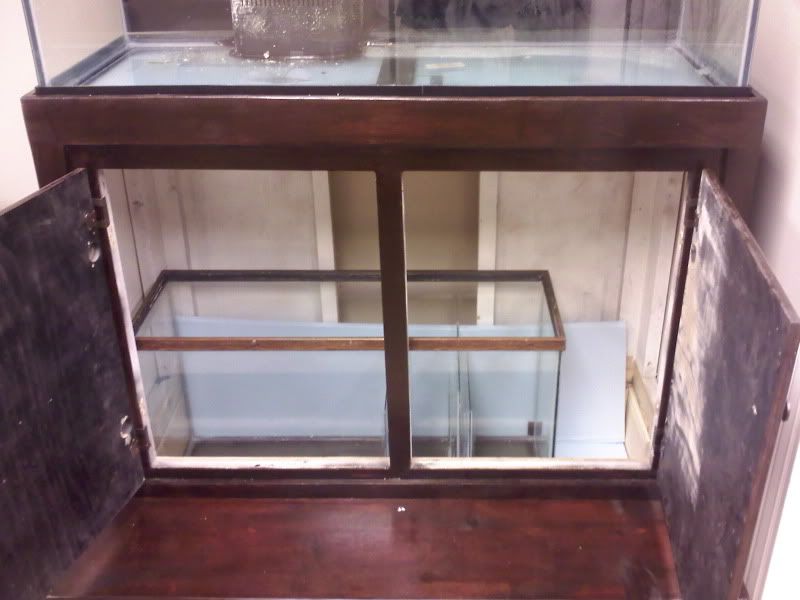 Jeff Morrill built the sump for me. Instead of putting the refugium space in the middle I had him put it to the side. I'm going to T off my return so I can control the flow in my refugium a little better. I saw a similar concept on skimace's refugium and really liked it. So kudos to him for the idea.  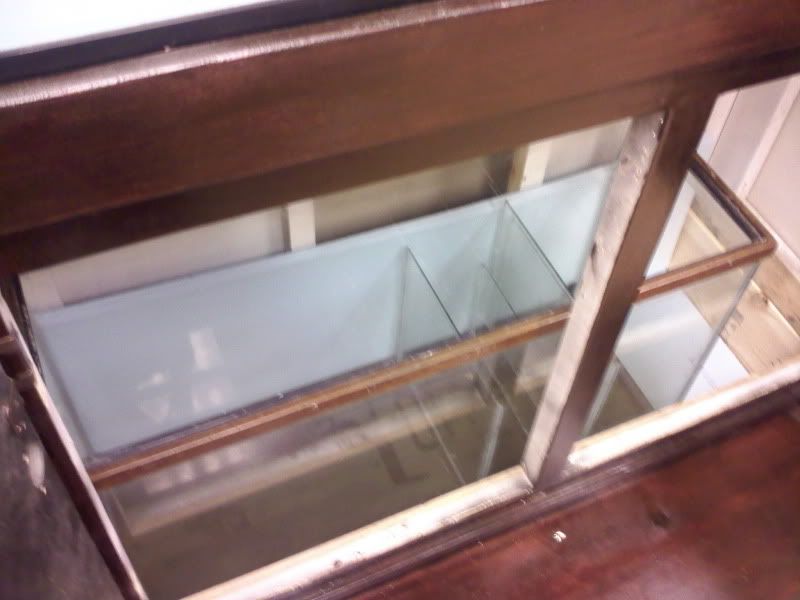 That sump is 40ish gallons so this pic gives you an idea of how much more room I have by lowering the floor in the stand, 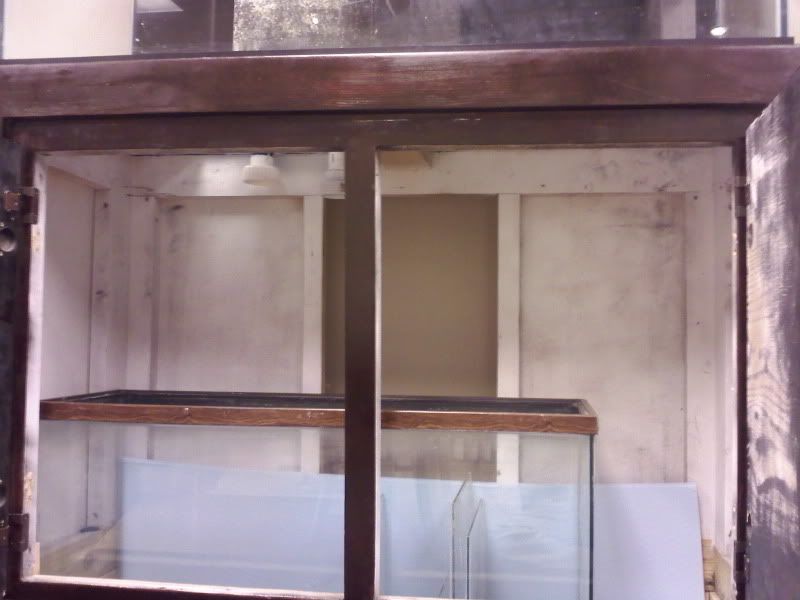
|
|
-Ben
90g Mixed reef
www.body-balancechiropractic.com
|
|
Jeffs_little_ocean
Guest

Joined: October 04 2009
Location: Kaysville
Status: Offline
Points: 869
|
Post Options
Thanks(0)
Quote Reply
Posted: December 30 2009 at 8:53am |
|
Thats awesome. I love following build threads like this. On a side note, my first sump was deisgned with the fuge to the side like that and it was in that end where all the gunk from the system would settle. I had to vaccume it out or I would get nitrate spikes. Just an fyi. You could always just add a little maxijet or small pump to make sure you have good water circulation there.
|
|
Life is good....right?
|
|
Luckedout
Guest
Joined: October 11 2009
Location: Layton
Status: Offline
Points: 1495
|
Post Options
Thanks(0)
Quote Reply
Posted: December 30 2009 at 12:01pm |
|
Yeah, that is my main concern with it. On skimace's tank he has his return coming up under the water level to bubble and create some movement. I'm leaning toward trying that and then if I notice a buildup I have a little maxijet 600 I can put in there.
|
|
-Ben
90g Mixed reef
www.body-balancechiropractic.com
|
|
Desertreef
Guest
Joined: December 28 2009
Location: Logan
Status: Offline
Points: 28
|
Post Options
Thanks(0)
Quote Reply
Posted: December 30 2009 at 8:40pm |
|
I think it looks like a fun project. I can't wait to see what you put in it.
|
|
Luckedout
Guest
Joined: October 11 2009
Location: Layton
Status: Offline
Points: 1495
|
Post Options
Thanks(0)
Quote Reply
Posted: January 04 2010 at 9:39pm |
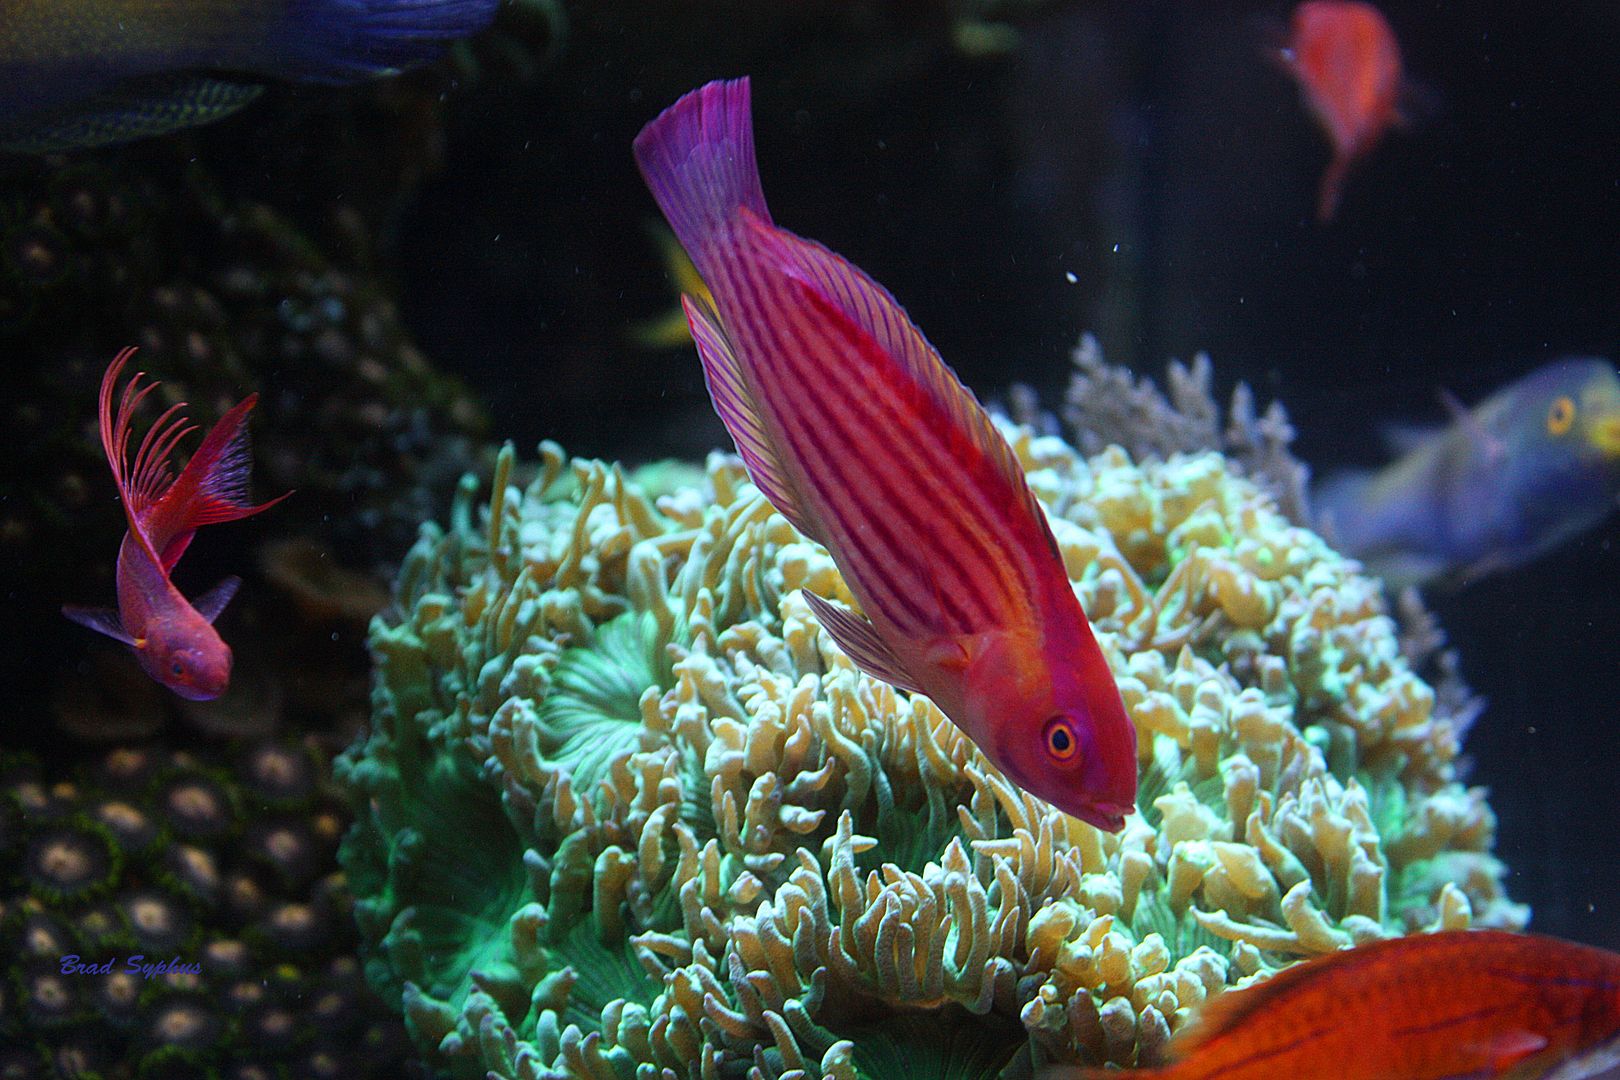
Ok. I finally mocked set up my plumbing. It took me a while to get here because I was thinking of adding a small frag tank to the setup, but I decided against it at the 11th hour because it was going to make plumbing the tank a LOT more difficult. Plus, the tank is at my office and I don't want it to be too cluttered, so I want this build to be pretty clean. Forgive me for the crappy phone pics Overall picture. The overflow is draining into the line on the left and the return flow is on the right. 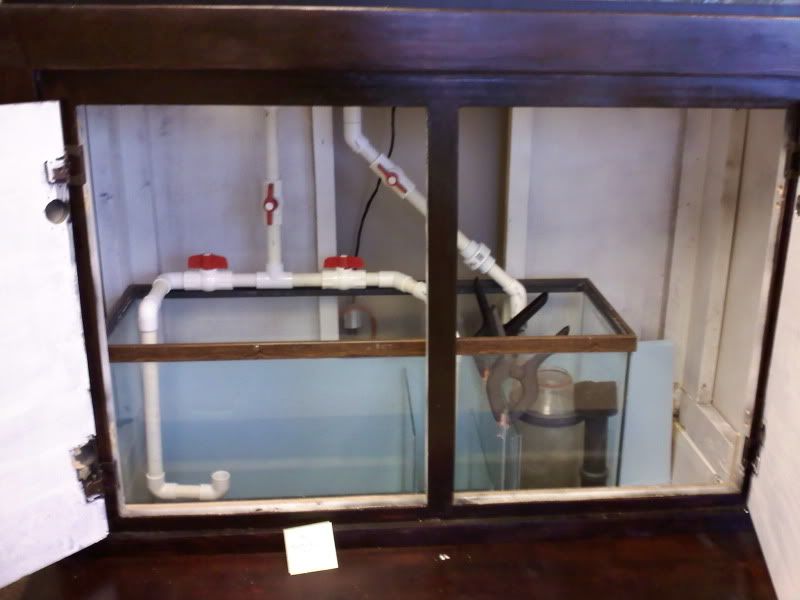 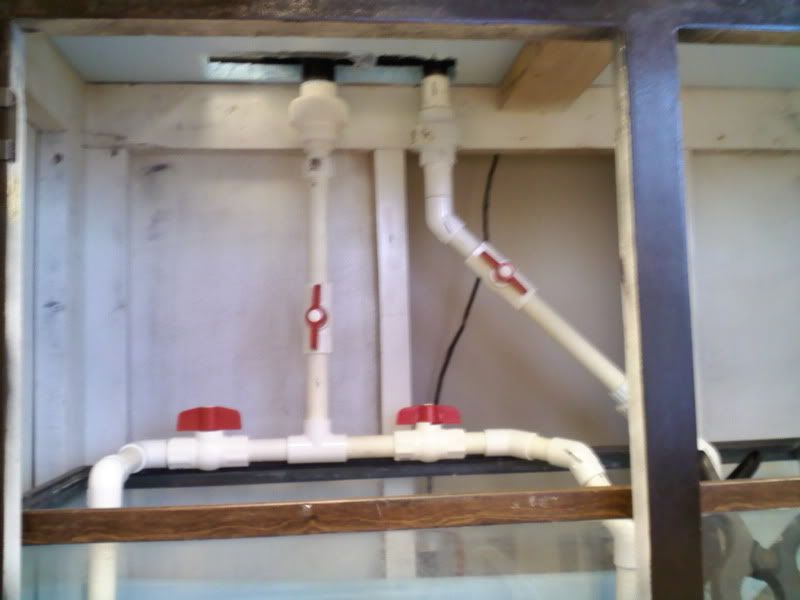 Here is the refugium line. I made it like this hoping for it to bubble up into the refugium. I think this will be better for oxygen exchange and to create water movement. I won't glue these pieces just in case it doesn't work how I'd like it. What do you think? 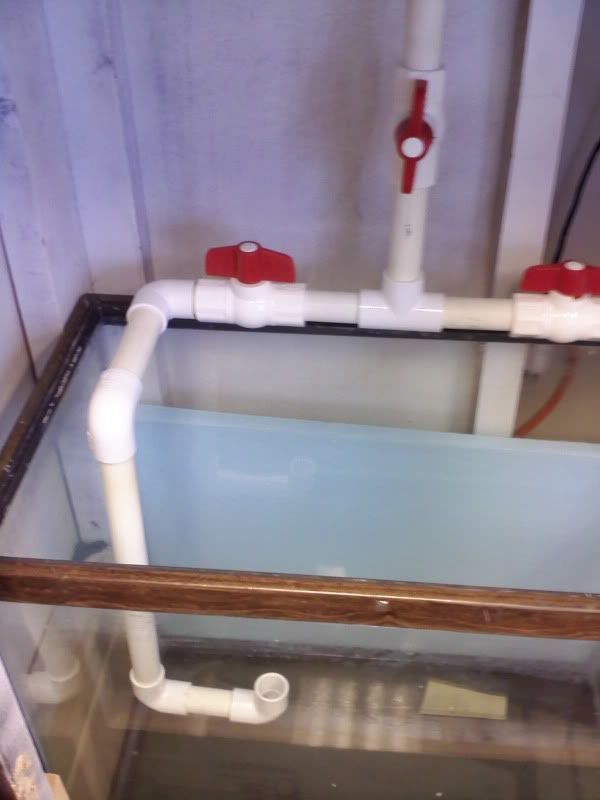 Here is the other overflow return line. Since my sump doesn't have a comb next to the refugium I put in a little shelf and I'm going to add eggcrate to keep macro algae or whatnot from getting out. I might buy a 90 deg elbow to clean up the look, but for some reason I didn't have another 90 deg but I had 2 45's so that works. 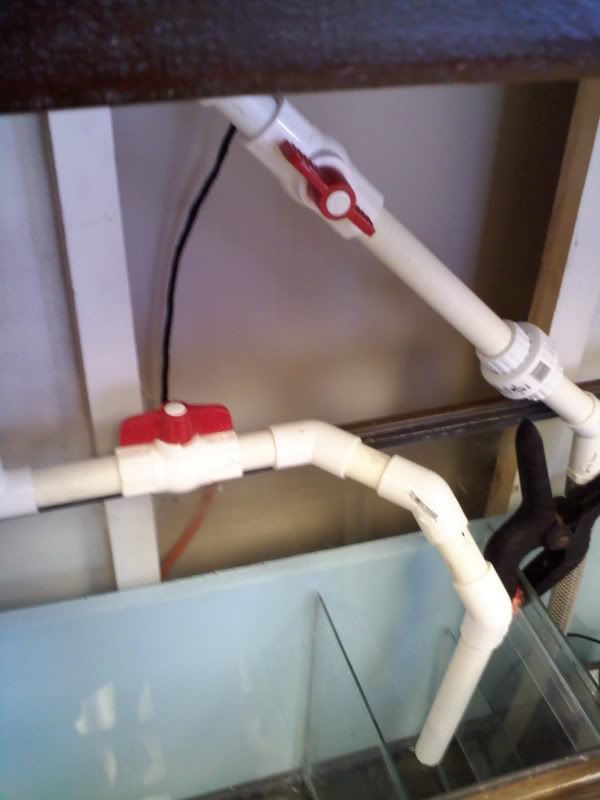 Here's the area for the return pump and skimmer. This skimmer might be too big for the area I have, but we'll see if it works. I used the braided flex tubing to attach to the return pump. I heard that it will minimize vibration noise from your pump, so we'll give it a shot. 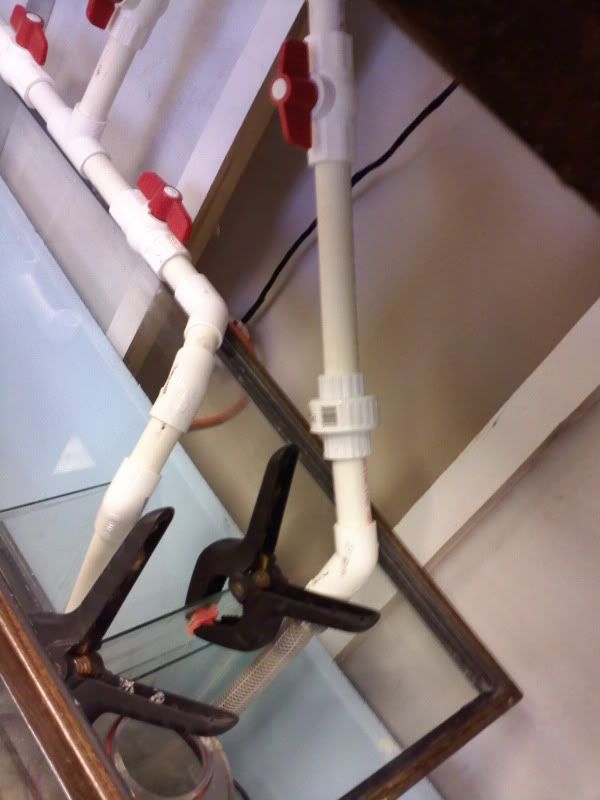 Dursa return on the left. Water coming back in on the right. This was how it was set up by it's previous owner. It only has a single return line into the tank. I'm thinking adding a second one, but not too sure if it's necessary. What do you think? 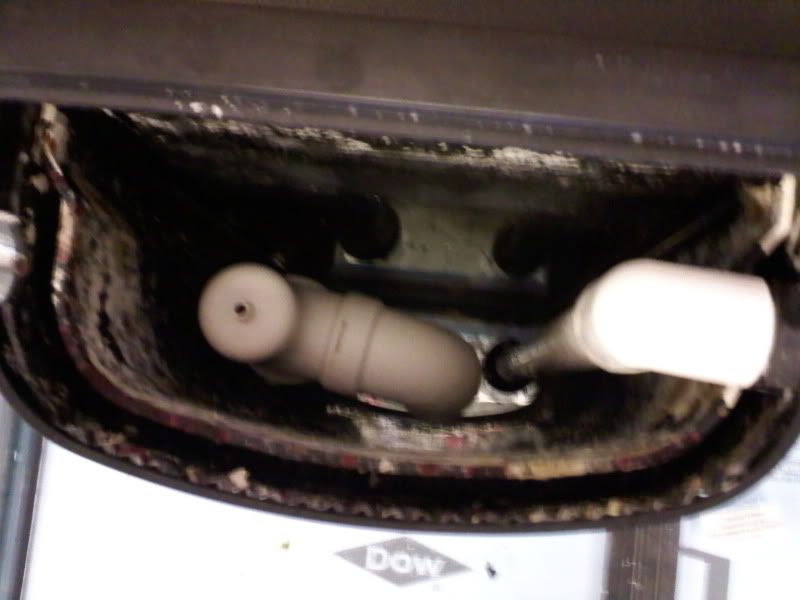 Here's FTS with the new hood that I built. The hood isn't finished how I'd like it, but this tank has to get up and running soon so I'll fix it up a bit more later on. Overall I'm pretty happy with the look considering I'm not very handy and I only have very basic tools to do the job. 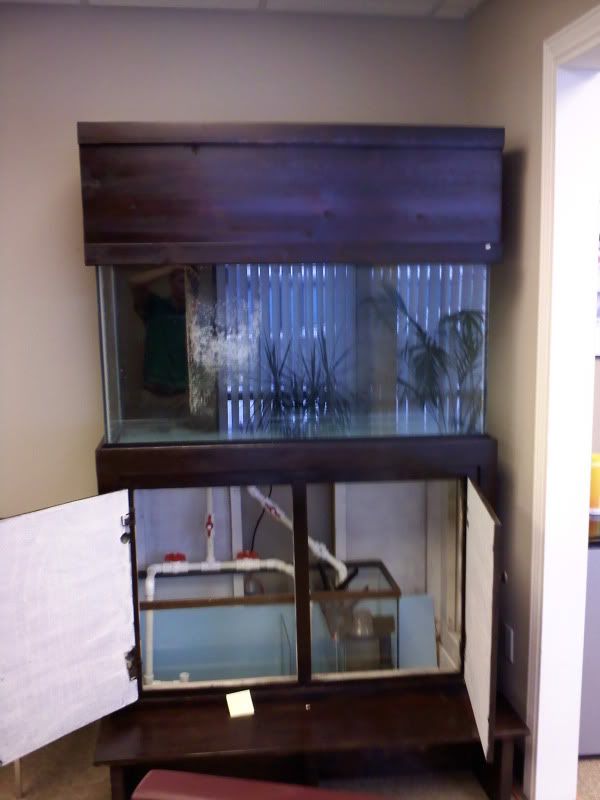 Let me know what you think of the plumbing. I haven't glued anything yet so I can change it up if you think something would work better. Thanks for looking! -Ben
|
|
-Ben
90g Mixed reef
www.body-balancechiropractic.com
|
|