Utah Reefs Homepage
  New Posts New Posts RSS Feed - 150 gallon Tank Automation with Reef-Pi
  FAQ FAQ  Forum Search   Events   Register Register  Login Login

150 gallon Tank Automation with Reef-Pi

 Post Reply Post Reply
Author
Kevin View Drop Down
Paid Member
Paid Member
Avatar

Joined: September 12 2002
Location: Pleasant Grove
Status: Offline
Points: 1044
Post Options Post Options   Thanks (0) Thanks(0)   Quote Kevin Quote  Post ReplyReply Direct Link To This Post Topic: 150 gallon Tank Automation with Reef-Pi
    Posted: May 08 2019 at 10:38pm
I am following the post by redleader on his reef pi build and thought I would share mine as well.

I have attempted to write my own reef pi controller a number of times. I originally started out with a big framework and lots of code, but eventually lost interest after a few weeks. I then wrote a simple one for just dosing calcium and alkalinity. I had that running for a while when I discovered https://reef-pi.github.io/. It had a ton more features than I had written so I reimaged my pi with the new code and have been running it ever since.

I have a reef-pi controller running on my 30 gallon and have had it running for quite some time. Probably 6 months or so. Currently I have it dosing my calcium and alkalinity. It also does temperature monitoring and alerting if my temperature goes out of a given range. Unfortunately I went really weak on the build process and put it all in a card board box. Can't see anything going wrong with that.


I recently bought a 150 gallon tank and wanted to do even more automation on it. I initially set everything up in another cardboard box to do temperature monitoring. Unfortunately I had some problems with water leaking all over the floor (sump overflow) and decided I needed to do better than a cardboard box underneath my tank. So it was unplugged and it took me a long time to design, print, put together, setup my new reef pi. Finally last week I was ready to at least do temperature monitoring and Auto TopOff. Shortly after that I already had all the components ready and so I hooked up my calcium and alkalinity dosing. So here are some pictures.
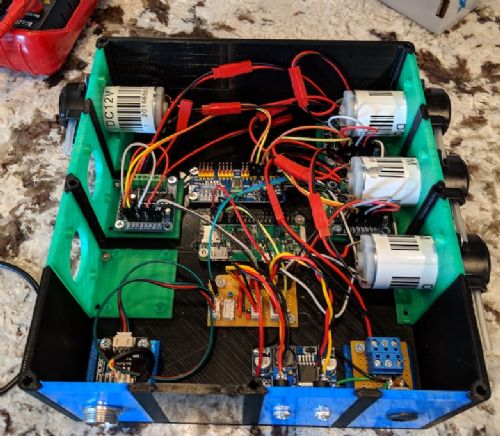

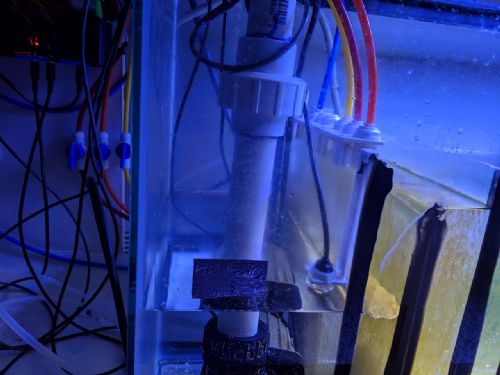


I have run 6 different colors of RO tubing through my walls from a nearby room to my tank. Blue is for RO water. Yellow is my Alkalinity. Orange is Calcium. Red will be magnezium. The White and Black lines (not shown) I am going to be using for auto water changes (black is waste water, white is new salt water).

In the future I am planning on hooking up 8 outlets to be controlled by my reef-pi.

Here is a screen shot of my temperature data.


Here is a screen shot of my ATO data (how long the pump runs each hour in seconds)
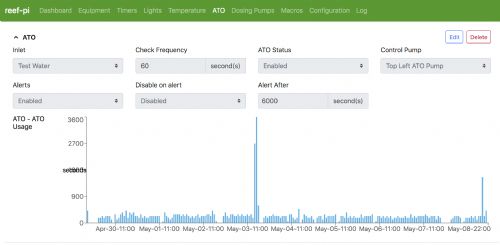

The software is not perfect and has some weird quirks. Setting it up takes some work and some effort with a soldering iron. Debugging issues with the wiring is a pain and if you wire it wrong it can ruin parts of it. It is most certainly not as good as an apex, but its cost point is much lower. Because of the lower cost I can add one per tank. I also have plans to monitor my Dosing reservoirs, RO water, new Salt water so I can be notified when they get low.

Anyway I will be adding more info as far as parts, cost, more pictures and details.

You can go here to see all of the build instructions that the people that made reef-pi put together.
https://reef-pi.github.io/
Back to Top
Kevin View Drop Down
Paid Member
Paid Member
Avatar

Joined: September 12 2002
Location: Pleasant Grove
Status: Offline
Points: 1044
Post Options Post Options   Thanks (0) Thanks(0)   Quote Kevin Quote  Post ReplyReply Direct Link To This Post Posted: May 08 2019 at 11:59pm
As a side note I buy most small items in multiples assuming I will use it again in another project. The prices I am listing is for the total, not the single item. Costs would go down if you were to buy with someone else and share.

RASPBERRY PI
-------
Pi Zero W - $14
32 GB SD Card - $6
12 vdc 3A Power Supply - $6

CONNECTORS
-----------
12v DC Power Supply Jack (10) - 6.95 (For plugging in power)
Stereo Audio male/female jack (10) - 5.99 (For Temperature sensors).
2 pin Wire Connectors (20) - 7.29
Aviation Plug Connector (10) - 10.90 (Used with the DF Robot Water level sensor. Its not needed, but I liked it better than using the DF Robot connector directly.
3 pin connector - $2.50 I used with the temperature sensor.

ELECTRICAL COMPONANTS
---------
L293D pump controller (5) - $6 For controlling Peristaltic Pumps
PCA9685 PWM board - $6 For controlling Peristaltic Pumps
DC to DC converter (5) - 10.75
DF Robot Water level sensor - $5.99 plus shipping
12VDC peristaltic pump - $25 ($7ish each) ($4 if your willing to wait for it to ship from china). Search EBAY. You want an inner tube diameter of 3 mm so that you can use drip irrigation connectors.
Temperature probe 6 foot (5) - $13 (These need coated in silicone. They will rust in salt water)

SOLDERING COMPONENTS
----------
4.7k resistors - $2 (Used with the temperature sensor)
1k resistors - $2 (Used with float switches, or water level sensors)
Female to Female Jumper wires - $2
StripBoard - $3 I like this for making my own boards
Header Pins - $2.50 Used in making my own boards
Terminal Block - $2.50 Makes it easy to disconnect / connect the 12v power to things.

MISC
-----------
Reef-Pi housing (Something to hold everything) - $16
Heat Shrink Tubing
Solder
Wire
Soldering Iron
Multi-meter

Taken with bulk it cost around $158. For only what you need exactly it would be around $116.

I have also bought stuff to control 8 outlets. That probably set me back another $30.

Edited by Kevin - May 09 2019 at 12:34pm
Back to Top
Krazie4Acans View Drop Down
Admin Group
Admin Group
Avatar

Joined: December 17 2012
Location: Syracuse
Status: Offline
Points: 24177
Post Options Post Options   Thanks (0) Thanks(0)   Quote Krazie4Acans Quote  Post ReplyReply Direct Link To This Post Posted: May 09 2019 at 8:57am
Nice work. I too built a DIY controller years back. Mine was Arduino based and not Pi but had similar capabilities to what you are using yours for. After a while it just became too much to manage on top of maintaining my tanks so I bought an Apex.

Now I am doing things with Pi but it is connected to my 3D printer and not my aquarium.

Do you count your hourly rate for doing all of this work in building it, soldering, designing, printing, etc into the cost? About how many hours do you spend doing all of the soldering, wiring, assembly and such?
My ocean.
90g (yup, won it!), 40g, 28g, & 10g Systems
PADI Advanced Open Water
Tank Thread:
Back to Top
Kevin View Drop Down
Paid Member
Paid Member
Avatar

Joined: September 12 2002
Location: Pleasant Grove
Status: Offline
Points: 1044
Post Options Post Options   Thanks (0) Thanks(0)   Quote Kevin Quote  Post ReplyReply Direct Link To This Post Posted: May 09 2019 at 12:32pm
I do not calculate my time into the cost of building it. If I did that it would make the apex worth it. Another advantage to the apex is it seems to hold its value pretty well.

I enjoy the DIY aspect and I have a hard time swallowing how much an apex costs so it works out for me.

Now that I have a design down I think soldering / assembling the next one would be much quicker. There is only two boards that need soldered. The 12v splitout is very a very quick solder job. Maybe 10-20 minutes. The board that contains my power/ground header pins plus temperature sensor/waterlevel sensor hookup takes a good amount of time. My guess is I could take it out in a couple of hours.

For assembly, it probably took a couple hours to put all that in there and test it to make sure all my connections were correct.

Stringing the RO tubing through my walls took a while. Hooking up the RO tubing took an hour or so. In addition I had to fight cheap Chinese peristaltic pumps.
Back to Top
 Post Reply Post Reply
  Share Topic   

Forum Jump Forum Permissions View Drop Down

Forum Software by Web Wiz Forums® version 12.03
Copyright ©2001-2018 Web Wiz Ltd.

This page was generated in 0.092 seconds.