| Author |
 Topic Search Topic Search  Topic Options Topic Options
|
Mark Peterson 
Paid Member


Joined: June 19 2002
Location: Murray
Status: Offline
Points: 21437
|
 Post Options Post Options
 Thanks(0) Thanks(0)
 Quote Quote  Reply Reply
 Topic: Simple Overflow pics Topic: Simple Overflow pics
Posted: November 24 2005 at 1:18am |
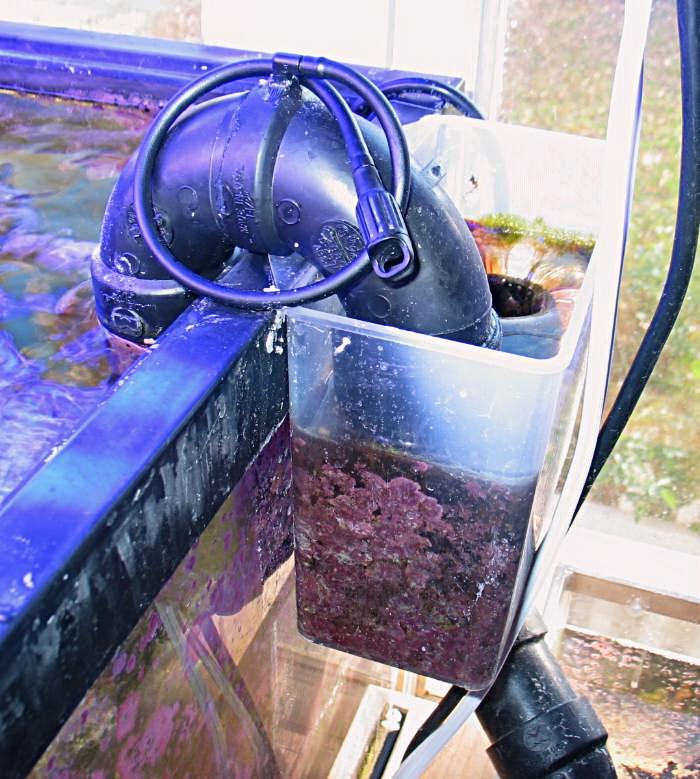
They say that a pic is worth a thousand words. This should save me a bundle. 



Edited by Mark Peterson
|
Reefkeeping Tips, & quick, easy setup tricks:www.utahreefs.com/forum/forum_posts.asp?TID=9244 Pay it forward - become a paid WMAS member 
|
 |
rstruhs
Guest


Joined: October 18 2003
Location: Japan
Status: Offline
Points: 1003
|
Post Options
Thanks(0)
Quote Reply
Posted: November 24 2005 at 1:05pm |
Mark, you might elaborate on the plumbing a little. Like, where did you get the pipe(s), did you glue them together, and do you have any type of screen or filter on the inlet in your tank to keep the fish out?
Have you thought about hooking the little tube you have to start the siphon up to a power head? That way, you never have to worry about starting it again?
I like it though!
|
|
Rodney, Sandra, Jeffery, and Laura Struhs
South Jordan, Utah 98th South & 40th West.
(801) 282-2744
75 gallon reef
55 gallon reef
55 gallon FOWLR
20 gallon FOWLR
|
|
Mark Peterson
Paid Member
Joined: June 19 2002
Location: Murray
Status: Offline
Points: 21437
|
Post Options
Thanks(0)
Quote Reply
Posted: November 24 2005 at 8:49pm |
Hardware store for pipe and elbows and a drip irrigation elbow glued in with ABS cement for the siphon starter/bubble remover.
ABS cement at critical joints, pressure fit the others for ease of adjustment.
Screen is held in place by ABS cement to the diagonal cut at the end of the pipe. Diagonal cut allows more water flow. The screen is made from a mesh bag that holds produce in the grocery store. The holes were large enough to let everything through but fish and snails.
Yes a powerhead would constantly remove bubbles that accumulate in the "U" tube, but if I clear it every 10 days or so, there is no problem and I save adding another electrical gadget. (Note: the tubing is plugged for good reason. Do not drop the tubing down to create a siphon for the purpose of continually drawing air bubbles out of the U tube. During a long power outage this will drain the tank several inches causing a flood and will also lose the siphon in the U tube.)
I have to say, for the record, that it's better to have a tank drilled for the overflow, but if drilling is not possible or practical, this method is almost fool-proof.
I also must say that I prefer drilling tanks on the upper back rather than using all that tank space for the full corner acrylic overflow.
Edited by Mark Peterson
|
Reefkeeping Tips, & quick, easy setup tricks:www.utahreefs.com/forum/forum_posts.asp?TID=9244 Pay it forward - become a paid WMAS member
|
|
Manofcichlids
Guest

Joined: September 11 2004
Location: West Jordan
Status: Offline
Points: 478
|
Post Options
Thanks(0)
Quote Reply
Posted: November 24 2005 at 9:33pm |
|
Wow, thanks Mark! That just about exactly what I did inmy 125g! You were a great help! Thanks again!
Could you possibly get a picture of how you did your drain line in the
specimen container? Perhaps a shot from under it? I didn't really
understand that part...might help others too!
Michael
Edited by InfiniteScales
|
|
Fish keeping is healthy until the fish start talking back
|
|
Mark Peterson
Paid Member
Joined: June 19 2002
Location: Murray
Status: Offline
Points: 21437
|
Post Options
Thanks(0)
Quote Reply
Posted: November 24 2005 at 10:30pm |
Sorry, no camera right now, and with the algae growing on it, I'm not sure it would be much help. The document I sent to you describes it. I take two couplers, cut a hole in the bottom to one side of the Lees box. The hole is just large enough for a pipe to go through snugly. The couplers connect to each end of a short piece of this pipe. The bottom of the Lee's box gets squeezed between the couplers. With ample cement, this makes a good seal.
A pipe leading down is cemented to the bottom coupler. A short standpipe is pressed, not cemented, into the top coupler. Because the tank water and water in the overflow box are connected via siphon in the U tube, the length of the short vertical standpipe sets the water level in the tank and overflow box.
|
Reefkeeping Tips, & quick, easy setup tricks:www.utahreefs.com/forum/forum_posts.asp?TID=9244 Pay it forward - become a paid WMAS member
|
|
Manofcichlids
Guest
Joined: September 11 2004
Location: West Jordan
Status: Offline
Points: 478
|
Post Options
Thanks(0)
Quote Reply
Posted: November 24 2005 at 10:33pm |
|
Okay, that's actually what I did. I put some one 0-ring on each side of
the box and then sealed it with a little bit of silicon over the cement
just to make sure it didn't leak...no problem so far!
|
|
Fish keeping is healthy until the fish start talking back
|
|
Jody
Guest

Joined: October 23 2005
Location: Logan, Utah
Status: Offline
Points: 100
|
Post Options
Thanks(0)
Quote Reply
Posted: November 26 2005 at 11:08am |
Hi Mark,
I like what you have done here. I use a siphon tube I had hanging around in my parts box, to drain water from my main tank down to my algae tank and then I drilled a hole in the algae tank and it gravity feeds into my sump. I did take the precaution of drilling a hole just below the water line, in the siphon tube coming out of my main tank. That way if worse comes to worse, like the power going off, the siphon will break and it won't drain my main tank all over the floor and into the basement!
Jody
|
|
75 gal Reef Tank
45 gal Sump
|
|
Mark Peterson
Paid Member
Joined: June 19 2002
Location: Murray
Status: Offline
Points: 21437
|
Post Options
Thanks(0)
Quote Reply
Posted: November 26 2005 at 11:39am |
|
But what happens in your system when the power comes back on?
|
Reefkeeping Tips, & quick, easy setup tricks:www.utahreefs.com/forum/forum_posts.asp?TID=9244 Pay it forward - become a paid WMAS member
|
|