| Author |
 Topic Search Topic Search  Topic Options Topic Options
|
JS 
Guest


Joined: April 12 2006
Location: United States
Status: Offline
Points: 222
|
 Post Options Post Options
") Thanks(0) Thanks(0)
 Quote Quote  Reply Reply
 Topic: DIY HOB refugium Topic: DIY HOB refugium
Posted: May 21 2006 at 10:38pm |
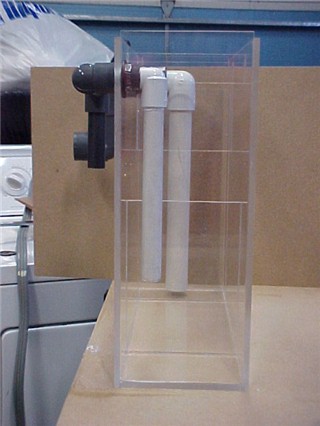
Here it is! I just finished my HOB refugium. It's 14 inches high by 14 inches long by 5 inches wide. 1/4 inch acrylic and glue cost $23 and the schedule 80 dark grey fittings cost about $20. The return line is 1 inch and the inlet pipe is 1/2 inch. I am in the process of making the lights for it and I am going to use a maxi jet 900 to push water through it. I also have an air driven skimmer in the mail that will fit in the compartment where the inlet pipe is. That compartment is 3 inches by 5 inches. The compartment that holds the sand and algae is 9 inches by 5 inches. Not bad for $40. If you used regular white PVC fittings you could save about $15. I used dark grey because it looks better in the aquarium. I guess it's all indifferent once it gets covered with coraline.
|
|
Be careful who watches your tank! http://www.utahreefs.com/forum/forum_posts.asp?TID=27846
|
 |
Dion Richins
Presidency


Joined: April 03 2005
Location: Farmington
Status: Offline
Points: 11664
|
Post Options
Thanks(0)
Quote Reply
Posted: May 21 2006 at 10:52pm |
Jason-Orem,UT I swear if I spend any more money on my tank we will be the only family living in a cardboard box with a reef tank!
To be honest we would have quite a neiborhood of cardboard boxes. The lighting would be awsome though.
Nice fuge  |
|
|
|
griffith
Guest

Joined: May 02 2006
Location: Centerville
Status: Offline
Points: 2300
|
Post Options
Thanks(0)
Quote Reply
Posted: May 21 2006 at 11:10pm |
|
Nice work.
|
|
Kevin F
Guest
Joined: April 27 2006
Status: Offline
Points: 264
|
Post Options
Thanks(0)
Quote Reply
Posted: May 22 2006 at 10:14am |
|
Very cool. Where did you get the grey fitting?
|
|
The mediocre mind is incapable of understanding the man who refuses to bow blindly to conventional prejudices and chooses instead to express his opinions courageously and honestly. Albert Einstein
|
|
JS
Guest
Joined: April 12 2006
Location: United States
Status: Offline
Points: 222
|
Post Options
Thanks(0)
Quote Reply
Posted: May 22 2006 at 11:11am |
|
Kevin,
I got the dark grey fittings at the local Lowes. They have a whole
section of schedule 80 fittings. It was located by the sprinkler
section. Kind of pricey but I thought it was worth it. They had
fittings from .5 inch to 1.5 inches. I really can't believe that
companies charge over $100 for these HOB refugiums.
Edited by Fatso - May 22 2006 at 11:19am
|
|
Be careful who watches your tank! http://www.utahreefs.com/forum/forum_posts.asp?TID=27846
|
|
Dion Richins
Presidency
Joined: April 03 2005
Location: Farmington
Status: Offline
Points: 11664
|
Post Options
Thanks(0)
Quote Reply
Posted: May 22 2006 at 12:38pm |
|
Grey fittings are for spa's. Home depot has them as well. It is a great looking refug.
|
|
|
|
sshm
Guest

Joined: November 11 2005
Status: Offline
Points: 771
|
Post Options
Thanks(0)
Quote Reply
Posted: May 22 2006 at 8:17pm |
|
do you have some sort of spillover thing, like if the outlet cloggs for some reason then the water has a way back into the tank instead of overflowing out of the fuge?
|
|
|
|
taylorwaldron
Guest

Joined: February 13 2006
Location: Kearns
Status: Offline
Points: 647
|
Post Options
Thanks(0)
Quote Reply
Posted: May 23 2006 at 2:22pm |
|
how will you connect the maxijet to it?? also how much sand will you be puting in? i have thought to make one as well.
|
|
JS
Guest
Joined: April 12 2006
Location: United States
Status: Offline
Points: 222
|
Post Options
Thanks(0)
Quote Reply
Posted: May 24 2006 at 9:17am |
|
sshm,
I haven't really thought about it overflowing. It would be really easy
to modify it to allow the water back into the tank. The return pipe
sits about 1/2 inch off of the bottom of the fuge. I had a frag tank
plumbed to my sump in a previous tank with the same concept for return
and never had a problem with it overflowing(not saying it couldn't
happen). I think putting a piece of eggcrate between the last baffle
and the return compartment would stop anything big enought to clog the
line from entering. Anyone with these HOB fuges had any problems with
overflowing?
taylorwaldron,
I just slip a piece of vinyl tubing over the maxijet nozzle and that
will fit snuggly into the 1/2 inch pipe(not the fitting). If it doesn't
fit tight enough you can wrap the vinyl with teflon tape. Just cut the
1/2 inch pipe to where you want the pump to sit in the tank. I also
built a pre-skimmer box out of 1/8 black acrylic and the maxijet sits
in that pulling water from the surface. I ended up using a RIO 800
because I had it laying around. I intalled the fuge and added about
15-17lbs. of oolitic aragonite sand (5-6 inch bed). I am going to get
rubble rock and chaeto algae today. I also purchased a $20 27watt PC
light at HD that I am modifying. The bulb is a quad bulb and is only
like 6 inches by 4 inches, perfect for the 9X5 inch compartment. I say
go for it. The hardest part was gluing the acrylic and that wasn't
terrible.
|
|
Be careful who watches your tank! http://www.utahreefs.com/forum/forum_posts.asp?TID=27846
|
|
taylorwaldron
Guest
Joined: February 13 2006
Location: Kearns
Status: Offline
Points: 647
|
Post Options
Thanks(0)
Quote Reply
Posted: May 24 2006 at 11:54am |
|
when you get it all set up and working, would you mind if i dropped by and saw it in action? i am down in orem usually once a month or so.
|
|
Kevin F
Guest
Joined: April 27 2006
Status: Offline
Points: 264
|
Post Options
Thanks(0)
Quote Reply
Posted: May 30 2006 at 2:20am |
|
I don't think you will have to much of a problem with spillage except
the first time you turn it on. The design is very similiar to the CPR
HOB refugiums, so I'm thinking it would work similiarly. JMO
|
|
The mediocre mind is incapable of understanding the man who refuses to bow blindly to conventional prejudices and chooses instead to express his opinions courageously and honestly. Albert Einstein
|
|
Mark Peterson
Paid Member


Joined: June 19 2002
Location: Murray
Status: Offline
Points: 21436
|
Post Options
Thanks(0)
Quote Reply
Posted: May 30 2006 at 11:35pm |
Wouldn't future cleaning be hampered by the end of the outlet pipe being so close to the bottom? I don't understand the necessity for that compartment. (I'm a simple, "no compartments" type of guy  ) Why couldn't the pipe just hang into the refugium with a good screen over the end? The flow isn't so fast that the screen would ever get clogged, especially with all the bugs that should be living there. That way the refugium could also be longer. 
The biggest problem I see with having the pump sit in a skimmer box is that evaporation will cause it to go dry. Unless I am misunderstanding it, all water lost to evaporation will first lower the water level in the skimmer box. Then there is the problem of tuning the powerhead to pump just the right amount of water. Too slow - no skimming action; too fast - pump runs dry. 
Personally, I like the design with the pump located in the refugium rather than in the tank. Bubbles in the siphon tube are the biggest problem. They are easily removed manually or with the powerhead by a line leading from the top of the siphon tube.
Edited by Mark Peterson - May 30 2006 at 11:49pm
|
Reefkeeping Tips, & quick, easy setup tricks:www.utahreefs.com/forum/forum_posts.asp?TID=9244 Pay it forward - become a paid WMAS member
|
|
JS
Guest
Joined: April 12 2006
Location: United States
Status: Offline
Points: 222
|
Post Options
Thanks(0)
Quote Reply
Posted: May 31 2006 at 12:34pm |
|
taylorwaldron,
Don't mind at all. Just give my cell # a call to give me a heads up. The more time the better. (702)217-7394.
Kevin F,
You're right. When I first hooked it up and plugged in the pump the water
level rose to almost overflow. I had to unplug the pump and plug it
back in a couple of times and when the air was out of the return line
the water level dropped and stayed constant. I did base it off of the
CPR models just changed the dimensions to suit my needs.
Mark Peterson,
Not sure if cleaning would be hampered or will be neccessary. If it is
neccessary the return pipe is not glued to the 90 degree fitting and
can be removed. I know a lot of protein skimmers have the return really
close to the bottom to prevent micro-bubbles. Kind of what I was trying
to achieve here since I have a air driven skimmer in the first
compartment that doesn't keep all of the bubbles in the tube. I have
tried a straight outlet fitting(eliminating the elbow and submerged
pipe) and because it sucks in air with the water as it returns to the
tank I get some serious bubbles. This is eliminated with the submerged
return.
I have the pump in the skimmer box for access
reasons. I don't have to worry about skimmer box running dry. I have 4
suction cups mounted to the back of the pre-skimmer box. I have a DIY
auto top off that I made. It consists of a 10 gallon aquarium in the
stand plumbed with 1/2 inch CPVC and with a CPVC gate valve. A maxijet
1200 sits in the tank and pushes the water into the main tank. I have
it connected to a digital timer that goes off for 1 minute every 4
hours. I just found where I wanted my water level in my tank and
measured the evaporation after 4 hours. I then turned the pupm on for 1
minute and adjusted the gate valve to the desired amount. After I found
the water level in my tank I just slid the pre-skimmer box where I
wanted it(suction cups). Works awesome and tank level stays constant.
The one thing I will say is at night when the fans go off the
evaporation is less. I have the water top off inlet positioned so it
sits 90'd into my tank with the opening about 1/16-1/8 inch above the
water level I desire. At night as the pump goes on the water level will
fill up a little past the opening and when the pump goes off it will
back siphon about 1/2 cup of tank water until the sipon breaks and that
is where my water level should be. I have checked my salinity each week
before my 5 gallon water change and have not noticed any drops in
salinity.
I have had the fuge running for about 1 week and the chaeto has already
been mowed once. I will update this with new pictures of everything in
action. Sorry for the long post.
Edited by Fatso - May 31 2006 at 1:14pm
|
|
Be careful who watches your tank! http://www.utahreefs.com/forum/forum_posts.asp?TID=27846
|
|
superman1981
Guest

Joined: October 09 2006
Location: Mozambique
Status: Offline
Points: 3007
|
Post Options
Thanks(0)
Quote Reply
Posted: September 07 2007 at 4:44pm |
|
I know it's been over a year since this thread died, but I thought I'd resurrect it!
JS,
How is the HOB refugium working out? Have you made any modifications to it in the last year? Anything you would have done differently? and finally, do you have any current pics you want to share with us?
Thanks,
Tim
|
Sure you are, you are Crappy Reef Club Member #1 -Chk4tix 6 gal nanocube 65 gal build thread
|
|
Mike Savage
Guest

Joined: July 15 2005
Location: Murray
Status: Offline
Points: 19173
|
Post Options
Thanks(0)
Quote Reply
Posted: September 07 2007 at 4:52pm |
It sure looks sweet!
Mike
|
|
|
|
superman1981
Guest
Joined: October 09 2006
Location: Mozambique
Status: Offline
Points: 3007
|
Post Options
Thanks(0)
Quote Reply
Posted: September 07 2007 at 4:57pm |
|
This is very similar to what I was thinking of building, but I wasn't going to use PVC pipe as a return. I was thinking more along the lines of building an overflow in the last box that would work just like a HOB filter... What are the pluses and minuses or using PVC instead of the type of overflow I was planning?
|
Sure you are, you are Crappy Reef Club Member #1 -Chk4tix 6 gal nanocube 65 gal build thread
|
|
JS
Guest
Joined: April 12 2006
Location: United States
Status: Offline
Points: 222
|
Post Options
Thanks(0)
Quote Reply
Posted: September 08 2007 at 11:17pm |
Tim, I Have since sold the tank and the fuge so no current pics are available. I wasn't trying to re-invent the wheel when I built the fuge, I just didn't want to pay the price of retail. I also just made the dimmesions custom to what I wanted. The rest of the design just came from the CPR HOB fuges that they charge $150 for. I think it cost me $40 total. The tank I had it on was a 37 gal and I was afraid to hang it on the back because of the weight so I supported the fuge with a piece of 3inch PVC pipe. The only thing I would change is to cut slots in the top of the last baffle before the return. Water would flow under the baffle and once in awhile I would get build up on the top water layer. Kind of like tanks without overflows (nothing to surface skim). The fuge still worked great despite me not being pleased with the baffle. I will post a picture of the fuge in action. 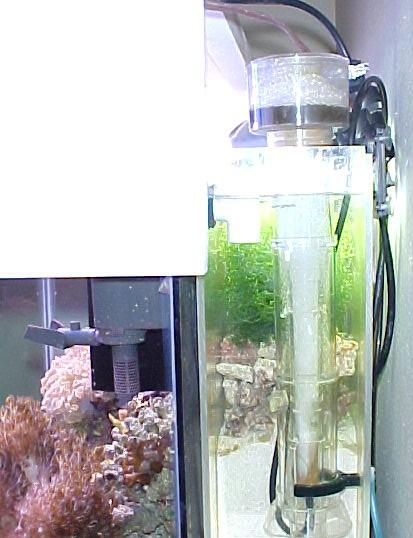
Edited by JS - September 08 2007 at 11:18pm
|
|
Be careful who watches your tank! http://www.utahreefs.com/forum/forum_posts.asp?TID=27846
|
|
llj000
Guest
Joined: March 30 2012
Status: Offline
Points: 6
|
Post Options
Thanks(0)
Quote Reply
Posted: April 05 2012 at 9:02am |
I know it's been over a year since this thread died, but I thought I'd resurrect it!
--------------------------------------------------------------------------------
|
|