| Author |
 Topic Search Topic Search  Topic Options Topic Options
|
Sculpin 
Guest


Joined: May 16 2008
Location: Kaysville
Status: Offline
Points: 1480
|
 Post Options Post Options
") Thanks(1) Thanks(1)
 Quote Quote  Reply Reply
 Topic: Micah's Whole House System Build Topic: Micah's Whole House System Build
Posted: December 12 2010 at 8:45pm |
This will hopefully be the first of many posts I'll be making on my whole house Tank Build project.
The plan: To connect all the tanks in my house to one filtration system in the basement.
The Breakdown: Filtration/frag tank system- A combination of 4 tanks will constitute this system in a tiered pattern. The first tank will be a 10 gallon and hold both the poly bag and protein skimmer and be highest tank in the filtration system. The tank will have two holes drilled in the top corners, which pour into a lower, 40 gallon breeder which will be a frag tank. The 40 breeder will also have two holes drilled in the top corners and pour out into another 40 breeder which will be a refugium. I plan on having two parts to the refugium. The larger will be where Macro algae and all light loving stuff will live. The other, smaller half will be sectioned off with dark acrylic and hold live rock for sponges and other, dark loving critters. Half of the water coming from the frag tank will go to light loving part of the refugium and the other half of the water will go to the darkened part. The refugium will also have two holes drilled in the top corners that will pour into the last and lowest tank (that I haven't figured out the size of yet). This will hold the heaters, auto top-off and connect to a GenX 55HP pump for my return (I already have one, thats why I'm picking it, and I think it will do the job nicely). The water will, until I get the 120 display, cycle into it's self. I'm also thinking about putting a safety overflow drain on the top of the last tank just incase (I don't like a flooded basement).
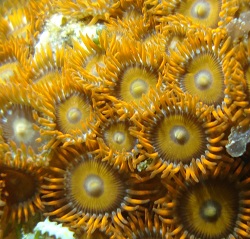
29 BioCube- This will be a simple but nice display with only one major modification. It will have an auto top off that continuously pours in salt water from the basement filtration system and flow back into it again. I'm going to keep real basic corals in here and not go too extravagant. Just lots of different and beautiful zoanthids and maybe some ricordias.
120 Display- First off I would like to get your feed back on this one, so feel free to pipe in and let me know what you think. The tank (if I end up purchasing one new) will be a Aqueon with dual center overflows. As for the stand, I'm still deciding between a steal stand with black removable MDF boards and a hanging fixture, or a traditional style wood stand, using either bamboo or cherry. Both options I would build myself. I was a steal fabricator for most of my life (my dad owned a fab shop that I worked in from age 12 to 21) and I think I can muddle through carpentry if I decide to go with that option too. I've also yet decided on lighting. I'm thinking between a freakn' ton of 55w 48" T5 bulbs or use a fixture I already own which is a older Aqua Medic SpaceLight (2 250w MH's and 2 36w CP's). I can't decide because I love how you can mix and match the T5 bulbs till you get perfect lighting, but I also like the Spacelight because, well I already have it. As for coral and aqua-scaping, I want lots and lots of SPS and lots and lots of LPS's like Trachs, Favias, brains, cynarina, duncans and so one. Also some zoanthids for the darker areas and whatever every else that peaks my fancy.
What is Done- So far I've got my 29 BioCube rockn' with some fish and Macro and over this weekend I built the benches that the filtration system will set on. The room that they are in (which has the furnace and water heater in it) is as big as a bed room. I'm, in addition, building a work bench for tinkering and fragging, a bandsaw, some shelves, and a sink in that room.
And now some photos-
This is a top view of the Filtration/Frag tank system-
And the side view- A view with the Display-
These are the stands I built today. I stole and modified the design from a how to build a work bench youtube video I found. It turned out very very stout, so perfect for for a bunch of tanks. If your interested in building some yourself, here is the link- http://www.youtube.com/watch?v=uFpeNVO80kY
And my Nano-
Well here I go, wish me luck and please give me feed back, this is the first time I'm actually setting up my own large system.
Micah
Edited by Sculpin - December 13 2010 at 1:04am
|
|
|
 |
griffith
Guest

Joined: May 02 2006
Location: Centerville
Status: Offline
Points: 2300
|
Post Options
Thanks(0)
Quote Reply
Posted: December 12 2010 at 8:47pm |
Cool -- keep us posted
Linn
|
|
MadReefer
Guest
Joined: December 13 2007
Location: Kearns
Status: Offline
Points: 1965
|
Post Options
Thanks(0)
Quote Reply
Posted: December 12 2010 at 9:10pm |
10 gallon tanks can work, but the odds are against you. I would just get something with a bit thicker glass if I were you. It's not drilling them when they break. It's a tiny bit of leverage on the plumbing that you connect to the hole that will cause them to break.
|
|
Deluxe247
Guest

Joined: December 02 2009
Location: Salt Lake City
Status: Offline
Points: 336
|
Post Options
Thanks(0)
Quote Reply
Posted: December 12 2010 at 11:59pm |
|
This is a very cool concept. It will be fun to watch come together. The only issue I have so far (just my opinion) is that I always like to put my skimmer after my refugium so the macroalgae and other goodies have lots of nutrients, then the skimmer just removes what's left after that. That said, I have run a system with the skimmer in front of the fuge, and it worked great too.
Also, I agree with MadReefer on the thin glass. You might consider getting a plastic storage tote as an inexpensive, and more ductile, alternative.
|
|
90G Mixed Reef
|
|
Sculpin
Guest
Joined: May 16 2008
Location: Kaysville
Status: Offline
Points: 1480
|
Post Options
Thanks(0)
Quote Reply
Posted: December 13 2010 at 12:11am |
That is a good point, I think I will for the first and last containers.
Thanks!
Micah
|
|
|
|
Jeffs_little_ocean
Guest

Joined: October 04 2009
Location: Kaysville
Status: Offline
Points: 869
|
Post Options
Thanks(0)
Quote Reply
Posted: December 13 2010 at 12:15am |
Agreed, plus 10 gallon tanks arent really deep enough to utilize the filter sock very well. I would go with a 20 gallon tank. Im not really a fan of plastic tote's as I like to be able to look in and see things. Also they usually have 20 gallon tanks at the centerville DI for like 4 dollars. Ummm, not that Ive ever gone in there. Ummm Ive just heard about the tanks from, ummmm a friend..... 
|
|
Life is good....right?
|
|
Sculpin
Guest
Joined: May 16 2008
Location: Kaysville
Status: Offline
Points: 1480
|
Post Options
Thanks(0)
Quote Reply
Posted: December 13 2010 at 1:00am |
I'll have to check it out, I have no pride about buying tanks from the local DI. But shoes and socks... that is where I draw the line.
Micah
|
|
|
|
Sculpin
Guest
Joined: May 16 2008
Location: Kaysville
Status: Offline
Points: 1480
|
Post Options
Thanks(0)
Quote Reply
Posted: December 15 2010 at 12:09am |
Got a steal of a deal on a 120 tonight. $100 bucks w/ stand. It's got a few deep scratches in it so thats a bummer but I think I can make it work.
And the journey begins!
Micah
Edited by Sculpin - December 15 2010 at 12:15am
|
|
|
|
SGH360
Guest

Joined: April 04 2010
Location: Centerville, UT
Status: Offline
Points: 1786
|
Post Options
Thanks(0)
Quote Reply
Posted: December 15 2010 at 12:19am |
so you are the one who bought the 120G setup. Cool cant wait to see it set up 
|
|
MadReefer
Guest
Joined: December 13 2007
Location: Kearns
Status: Offline
Points: 1965
|
Post Options
Thanks(0)
Quote Reply
Posted: December 15 2010 at 12:22am |
 Sculpin wrote: Sculpin wrote:
And the journey begins! |
|
|
Sculpin
Guest
Joined: May 16 2008
Location: Kaysville
Status: Offline
Points: 1480
|
Post Options
Thanks(0)
Quote Reply
Posted: December 15 2010 at 1:36am |
I think this weekend I'll build a new stand for it. I don't really care for the old one, seemed a little rickety.
I'll make sure and do a good photo set of the stand build.
Micah
|
|
|
|
Sculpin
Guest
Joined: May 16 2008
Location: Kaysville
Status: Offline
Points: 1480
|
Post Options
Thanks(0)
Quote Reply
Posted: December 19 2010 at 12:38am |
Update: This weekend I ran the RO line from under my sink and into the utility room. No easy task and it took me all morning.
As I was at Lowes buying some fittings I found some super cool, heavy duty plastic bins that I think I'm going to use instead of glass tanks. I will still be using a 40 breeder for my frag tank though. There was a 27 gallons and one that must of been 40 gallons (it didn't say).
I'm think having the first tank in the system be one of these 27 gallon bin, then the second will be the 40 breeder, the third be another 27 gallon as the refugium, and the last bin will be the larger 40 gallonish one. I plan on putting a bunch of LR in the last one and keep the lid closed to create a dark refugium.
It's not as cool as I wanted it to be but its a little more economically feasible and I think it will all do very nicely. I'm kind of stoked about these bins I found, they were pretty tough so I don't think there will be any risk of them falling apart.
Micah |
|
|
|
MadReefer
Guest
Joined: December 13 2007
Location: Kearns
Status: Offline
Points: 1965
|
Post Options
Thanks(0)
Quote Reply
Posted: December 19 2010 at 2:24am |
|
I think you should put the skimmer, then fuge, then frag, then sump. Because the fuge will feed the frags.
Edited by MadReefer - December 19 2010 at 2:26am
|
|
laynframe
Guest

Joined: May 17 2009
Location: north ogden
Status: Offline
Points: 1062
|
Post Options
Thanks(0)
Quote Reply
Posted: December 19 2010 at 10:17am |
What about when you loose power to your home and all the water runs from all the tanks back to your sump, did you calculate for that? Even with check valves your going to have a lot of water run back
|
|
The time we enjoy wasting isn't wasted time!!!!
|
|
Sculpin
Guest
Joined: May 16 2008
Location: Kaysville
Status: Offline
Points: 1480
|
Post Options
Thanks(0)
Quote Reply
Posted: December 19 2010 at 8:13pm |
I've been debating where to put the fuge and frag tank and you make a good point MadReefer. I may do that. That said, the system will be built so I can move one to another if I don't like how it's set up.
As for the system overflowing, I think I'll be ok. The last take where the ATO, heaters, and return pump will be is about 40 gallons. I'm thinking I'll put the ATO at about 20-30% high and leave the rest for back flow. That will be around 20-30 gallons and if that is a problem, I'll put in a check valve and stop any water trying to come back through the return line. I'll do a FW test with it all when it's up and running to see if it over flows. It is a concern of mine as well.
Micah
|
|
|
|
kethomps
Guest

Joined: August 26 2004
Location: United States
Status: Offline
Points: 369
|
Post Options
Thanks(0)
Quote Reply
Posted: December 19 2010 at 11:24pm |
|
First hand experience with 10g drilled tanks is they don't work. Drilling is fine but any pressure with the bulkhead and they break. I also have a system running to my basement. My 210 drains into two 125's. They are stacked; both overflow drains of one 125g drains into the second 125. I split the 210 up, one overflow goes into each 125. I have a frag tank that is fed from the bottom 125 with a pump; the frag tank has bottom drains. The bottom 125 is side drilled and that feeds the return pump (reeflo barricuda). Bottom 125 has the protein skimmer, probes, etc. Top 125 has live rock and macro algae.
I love the refugium tanks downstairs for ease of water changes and no water damage upstairs. Make sure your return pump is strong enough for the head distance. You mentioned check valves and these are a must. I also have several watchdog water alarms strategically placed in case of a water leak.
Edited by kethomps - December 19 2010 at 11:25pm
|
|
210g sw fish
West Jordan
|
|
Sculpin
Guest
Joined: May 16 2008
Location: Kaysville
Status: Offline
Points: 1480
|
Post Options
Thanks(0)
Quote Reply
Posted: January 02 2011 at 7:09pm |
So first off I took advantage of Petco's dollar a gallon sale and picked myself up a 40 breeder today. I also got a super heavy duty 27 gallon storage bin from Lowes that I think will do nicely for all my other tanks. A few things have changed for this project namely I'm only using one 40 breeder (frag tank) and the rest will be these heavy duty bins. I figured the more glass I have to drill the greater the changes are of me braking one.
At this point though I'm not sure how many bins I should use. If I wanted to go all out, I could fit 5 of these 27 gallon bins and my 40 breeder in the space that I have (2 of the bins would be on the floor). If I did that, my sump would be approximately 148 gallons (no I didn't do my math wrong, I plan on having the last two that would be on floor-level at the most half full). All that water would be cool but I'm leaning to running 4 bins. The first and highest would be the poly-bag/skimmer, the second the refugium, then to the 40 gallon frag tank, and the last two bins would be on the floor-level connected to the return.
What do you think?
Also, last weekend I took some time and built a work bench. I followed the same design plan as the first benches for the sump but just made it higher and attached a piece of melamine covered board on the top. Cool huh? The next couple things to do will be hooking up a large laundry sink in that room and doing the wiring. I'm thinking about giving the system it's own double 20 amp breaker. I'm pretty sure there would be no way I pop that baby.
Anyways, heres some pics of my new work bench and the bin I'll be using-
Bench
Bin next to my new 40 breeder
Bin
Well thats my update. If you have any advice, questions, or comments please let me know. Your feedback has already been very valuable, keep it coming!
Micah
|
|
|
|
Mark Peterson
Paid Member


Joined: June 19 2002
Location: Murray
Status: Offline
Points: 21436
|
Post Options
Thanks(0)
Quote Reply
Posted: January 19 2011 at 6:31am |
Check valves are prone to failure. I would never use them though I know tanks that do. It really is very easy (for me  )to design the system with return lines at the surface so that the total drainage from this multi-tank system would be only 3-5 gallons, an amount easily held in the lowest tub where the return pump and ATO are situated. Be sure to soap and rinse extra well those black storage tubs. There are harmful mold release chemicals used on those that may not get washed off before they leave the factory. One extra advantage to those plastic bins is that you can cut a notch and glue into the notch a DIY spillway instead of having to drill and use expensive bulkheads.
|
Reefkeeping Tips, & quick, easy setup tricks:www.utahreefs.com/forum/forum_posts.asp?TID=9244 Pay it forward - become a paid WMAS member 
|
|
jcom
Guest
Joined: November 23 2009
Location: SLC
Status: Offline
Points: 579
|
Post Options
Thanks(0)
Quote Reply
Posted: January 19 2011 at 9:42am |
|
Micah, ditto to what Mark said...be careful with that bin, I know it well. It's the one from Lowe's with the yellow lids. Might be fine, but I had one (for camping storage) and it reeked of chemical off-gassing for almost 2 years...finally had to use another one. Even after numerous washes, it still smelled VERY strongly. I would seriously consider going with a different brand. Just FWIW.
|
|
Sculpin
Guest
Joined: May 16 2008
Location: Kaysville
Status: Offline
Points: 1480
|
Post Options
Thanks(0)
Quote Reply
Posted: October 23 2011 at 7:00pm |
I just wanted to update you guys on my project. I didn't give up but I did put this project in hiatus for the past 6 month.
Today I got the electrical done. I ran two new and separate 20 amp lines down to the utility room and installed 10 outlets (5 for one line 5 for the other). I'm thinking it's probably a little overkill but at least I have peace of mind that I won't be overwhelming one little 15 amp line.
The next step will be installing a sink and getting it all plumbed. From there I can finally set up tanks.
Jcom, I'll have to agree with you on the tub. I think I'll ditch it. Does anyone know of some strong tubs out there that don't smell of horrible chemicals?
Micah
|
|
|
|


