Rufessor's 57 Gallon Oceanic Rimless build
Printed From: Utah Reefs
Category: Main
Forum Name: Tank Threads
Forum Description: A place to show off your tank build.
URL: http://www.utahreefs.com/forum/forum_posts.asp?TID=52032
Printed Date: February 16 2025 at 10:34am
Software Version: Web Wiz Forums 12.03 - http://www.webwizforums.com
Topic: Rufessor's 57 Gallon Oceanic Rimless build
Posted By: rufessor
Subject: Rufessor's 57 Gallon Oceanic Rimless build
Date Posted: October 19 2011 at 9:27am
|
Here goes- Picking up the tank tomorrow evening from BCarter from a sale off the classifieds here! Super excited to be upgrading to a "real" tank from the BioCube 29 that I am running now, its just too small and I am getting sick of constantly moving stuff around to keep it from killing something else or overgrowing it. Tank has overflow (stock) with two nice big holes in the bottom, a sump and a stand. No plumbing, hardware or anything else.... so its going to be a little bit of work to bring it to life. Still contemplating lighting... LED for sure, no other option for me. Seriously considering two Kessil A150W in the 15K (maybe 10K) variety, building a canopy and including my Panorama Ecoxotic modules in the canopy for moon lighting and "sunrise" by staggered on/off cycles. Also seriously considering building three pendant style fixtures DIY and a curved mount so I have a suspended ARC of lighting and using different angle lens on the LED depending on their angle to the tank. Either way the canopy I build will be suspended 12-18 inches from the water surface so I will probably need to build a mesh to cover the tank. Help on the mesh part would be great... looking for a super clean look with the mesh maybe even 1 inch beneath the water surface ... or would that look stupid from the side? probably- but I am trying to keep it looking pretty much like a open top rimless tank. Thinking about going with a Reef Angel controller so I can write my own programs etc, this *should* be quite simple for me as I have extensive background in system automation through programming- Anyone use one of these? Will post pics of tank etc tomorrow. First order of business is to get stand painted, paint back of tank and get going on plumbing. Then lights... Keep checking back I will try to be good and post pics as progress is made. ------------- Everything should be made as simple as possible, but not simpler -A.E. 57 Gallon RImless build in progress check the thread before if becomes boring and just full of nice pictures of colorful coral! |
Replies:
Posted By: rufessor
Date Posted: October 24 2011 at 9:11pm
|
First UPDATE. Tank is in the garage. I have been working on clearing the lower intake of the overflow chamber for increased flow from the bottom of the tank. Since the overflow is sand/rock encrusted this has been a bit of an adventure with the dremel but its working out great. Thanks to BCarter for the sale, it came with the 57 gallon Oceanic Illuminata rimless tank (36x24x18) a custom stand (being painted, was new and white) and a 30 gallon breeder set up as a sump with 3 chambers, 1 as an overflow to 90% tank height (cheato and deep sand bed will go here as well as about 1/3 of return flow), a middle chamber (maybe 50% of tank) where I will be putting my skimmer and a UV sterilizer if I can find one cheap, and a return chamber with a bubble trap. Please comment on my plumbing plans as I have all the pieces but have not cut anything yet and would like to know if this will work well. Keep in mind two things, it needs to keep the floor dry above all else- it needs to be whisper quiet. Basics- Durso in Overflow is 2 inch T and 2 inch intake with screw in mesh cone for large object rejection (snails etc), reduced to 1.25 inch pipe to bulkhead where it goes into a 1 inch pipe through the tank bottom then 90 to two drops, one with a reverse durso which is to the skimmer chamber and should be at about 2/3 of total flow, the other to the cheato chamber with a loc line termination in a wide nozzle to disperse flow. Keep in mind that above each drop, I have a ball valve which is not pictured and unions on each side of the valve for quick painless maintenance. On the return, I am running a 700 pump which is 1/2" MPT, I sized up to 1 inch PVC to the bulkhead and 3/4 up through the overflow to a T directing return flow to each side of overflow and terminating on each side with a Y locLine fitting with wide nozzels on each return flow (4 total). I plan on pointing on on each side at the sand and the other at the front glass and top of tank for good surface aeration. Please let me know if there are things you would change. I am considering a Y fitting instead of a T on the reverse Durso in the sump... heard it might be quieter.. other suggestions/experience would be considered 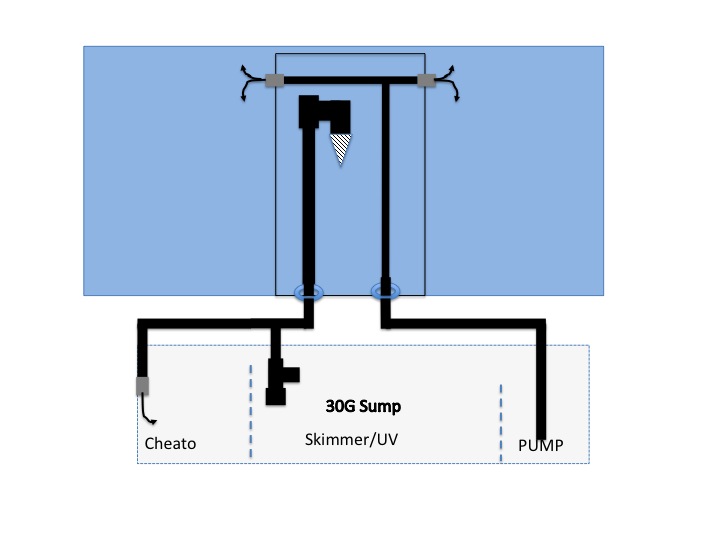 ------------- Everything should be made as simple as possible, but not simpler -A.E. 57 Gallon RImless build in progress check the thread before if becomes boring and just full of nice pictures of colorful coral! |
Posted By: kody72
Date Posted: October 24 2011 at 9:29pm
|
Instead of doing a t on your return. I would put a 3/4" scwd for added movement and it will still get good surface aeration ------------- http://www.utahreefs.com/forum/forum_posts.asp?TID=60612&title=kody72-fishroom" rel="nofollow - KODY72 FISHROOM BUILD 281g DT 187g Rimless Frag ATI PM lighting SRO DSCR-300ext 8013908179 |
Posted By: rufessor
Date Posted: October 24 2011 at 9:30pm
Pic of rough built Durso (no glue, down pipe is WAY too long etc) Pic of general idea for return flow and dremmel work on lower overflow intake, I need to carry it across to the left of the rock to add a few holes there, they exist but are covered by sand and gorilla glue... tough stuff.  ------------- Everything should be made as simple as possible, but not simpler -A.E. 57 Gallon RImless build in progress check the thread before if becomes boring and just full of nice pictures of colorful coral! |
Posted By: rufessor
Date Posted: October 24 2011 at 9:38pm
|
SCWD would probably fit (need to check) and would be a very cool addition. You do take a small hit in flow velocity with these guys don't you? Pump is 700 GPH but I probably have 4-5 ft of head so its probably in the 350 range. For now would have about 600 GPH from two in tank powerheads (just moving them from the nano) so total flow should be about 900 GPH so only 10X volume.... which is low I think??? Or is it ok.. ------------- Everything should be made as simple as possible, but not simpler -A.E. 57 Gallon RImless build in progress check the thread before if becomes boring and just full of nice pictures of colorful coral! |
Posted By: kody72
Date Posted: October 24 2011 at 10:00pm
|
Its okay depending one what corals you have. I would upgrade in the near future if I was you though. the scwds are designed to fit in the standard overflows like yours. ------------- http://www.utahreefs.com/forum/forum_posts.asp?TID=60612&title=kody72-fishroom" rel="nofollow - KODY72 FISHROOM BUILD 281g DT 187g Rimless Frag ATI PM lighting SRO DSCR-300ext 8013908179 |
Posted By: kody72
Date Posted: October 24 2011 at 10:04pm
|
Oh it doesn't reduce your flow that much they have a chart somewhere that show flow through the scwd also how long it takes it to switch from side to side ------------- http://www.utahreefs.com/forum/forum_posts.asp?TID=60612&title=kody72-fishroom" rel="nofollow - KODY72 FISHROOM BUILD 281g DT 187g Rimless Frag ATI PM lighting SRO DSCR-300ext 8013908179 |
Posted By: rufessor
Date Posted: October 27 2011 at 10:21pm
|
Next phase of design is nearing completion. Here are my relatively complete scale drawings of the light coverage from the canopy with optics as well as the planned layout (to scale) on aluminum heat sinks hung inside the canopy. Heat sink is 7 inch wide material that has 0.19 inch thick machined base (solid forged 6061 aluminum clear anodized) I will be using Cree XP-G Cool whites and Cree XP-E royal blues for lights, total is 28 white 35 blue, tank is 36x18x24 (LxWxD) so I should be good at near full power for about a 14 K light appearance with plenty of PAR for SPS. Let me know if you think my modeling is correct.... I KNOW that my light cones will not actually be as wide after the light hits the water... I know that the light will not escape from the aquarium due to critical angles not being achieved, I know that 60 or 80 degree optics will still spill 10-20% (or more) of light past that conical section, but really... were designing an aquarium canopy with a bit of forethought, not a manned moon shot... so I think I have taken into consideration quite a bit... but I have never built an LED... so PLEASE rip it apart constructively and tell me what you think I could improve... I am concerned that the 80 degree center lights might spill into the room... would love to find something like a 70 degree optic... Here are the diagrams. 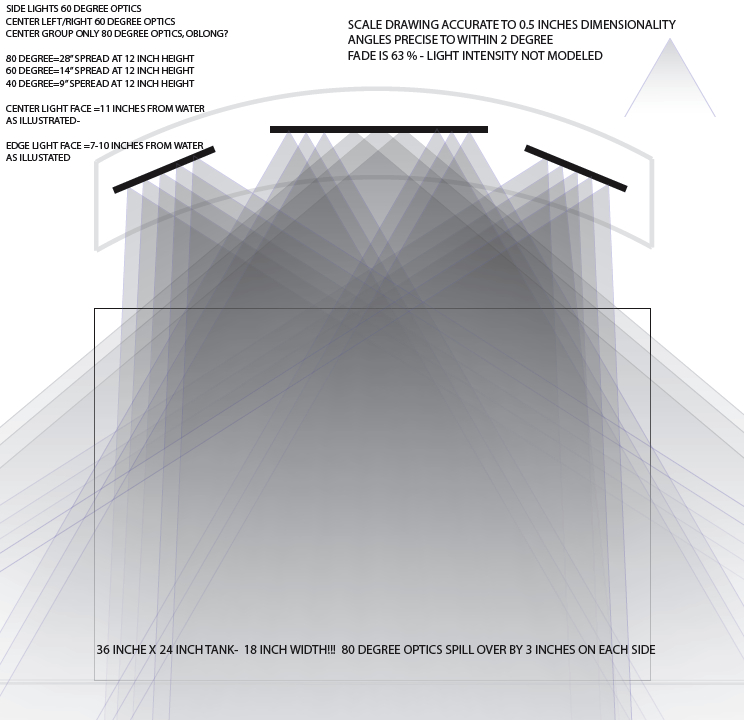 And here is my design for the LED layout on the heat sinks... ends are 10x7 middle is 14x7... no LED is closer than 1 inch to anyother, Black denotes cool white, blue denotes RoyalBlue ALL LED will be lensed, 60 everywhere but on center star which will all use 80 degree lens, side star layout on center heat sink will use 60 degree lens as in illustration of light spill/coverage 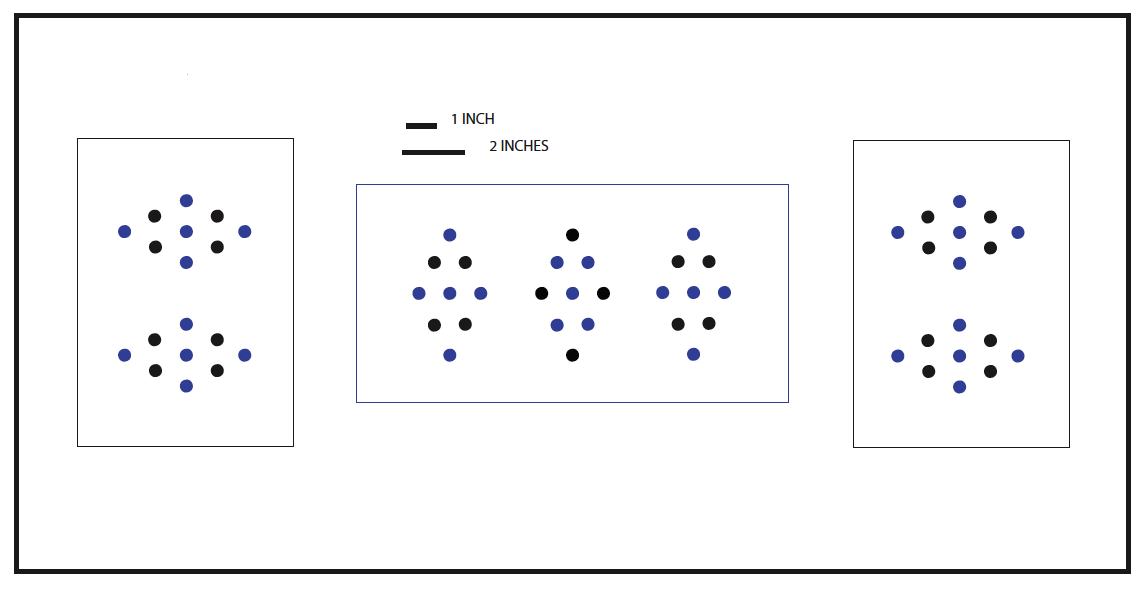 ------------- Everything should be made as simple as possible, but not simpler -A.E. 57 Gallon RImless build in progress check the thread before if becomes boring and just full of nice pictures of colorful coral! |
Posted By: rufessor
Date Posted: November 02 2011 at 10:39am
|
Ok... so I got the stand sanded down to 400 grit wet and will be using my HVLP sprayer to color it and then top coat with a Valspar marine varnish water resistant glaze for the finish. I coated the top of the stand where the aquarium sits with a pickup bed coat (armor Kote) which is a very water resistant flexible black coating that will keep the stand in great shape even with a bit of water on it. I also coated the entire bottom of the cabinet internally and about 1/2 inch up the walls with the same material so the sump can be a little wet (water changes etc) and not rot the stand.
My question now is... I am about 1 week from final plumbing and would theoretically be able to move live stock at that point... but without any lights.
I could move the top from the BioCube (new PC bulbs 26 Watt Actinic + 36 watt daylight) over to the 57 gallon and just set it on egg crate until I got my lights built. I also have 2 panorama modules (LED) from ecoxotic, one 455 nm blue, one mixed blue white. If that would be enough light to keep the corals going, and I put them all on one side under it. I plan on that.
If its not enough light, my next option is to get the 57 running with a single panorama module and 1 or two pieces of new rock and essentially cycle it with some cheato in the fuge and steal a good bit of the sand from the Biocube to seed the tank and then cycle it.... would that be even usefull as I will eventually just dump all 25 lbs of rock and coral into the display and fill the cheato chamber with the sand to 5 inches deep or so... so its not going to cycle once I transfer everything.
What do you think... will the biocube top with the LED Modules keep stuff going for a month (or less) while I build my lights... or would I be better served to just wait until the new tank and lighting is DONE and skip any cycling and move it all on day 1 with my new LED array over the tank.
Other options considered... I thought about asking for a loaner light but am concerned that the corals would need to adapt to that and then again to the LED which might be bad.
------------- Everything should be made as simple as possible, but not simpler -A.E. 57 Gallon RImless build in progress check the thread before if becomes boring and just full of nice pictures of colorful coral! |
Posted By: P.Kapp
Date Posted: November 02 2011 at 11:47am
|
I have seen a bunch of overflows that people have covered, but I think this one is my favorite. It really looks natural, and will look even better with some color on it. Nice job!! ------------- Preston Kapp 210 Gal Reef |
Posted By: rufessor
Date Posted: November 02 2011 at 11:55am
|
I wish I could take credit. BCarter did the overflow and then decided to stop his build and that is where I came in after purchasing the tank stand and sump. I have finished dremmel routing out all the overflow holes on the left side at the bottom. Looks even better when they are symmetrical. ------------- Everything should be made as simple as possible, but not simpler -A.E. 57 Gallon RImless build in progress check the thread before if becomes boring and just full of nice pictures of colorful coral! |
Posted By: Ahanix
Date Posted: November 03 2011 at 9:27pm
|
Depending on what you want to do with the setup, if you decide to run ecobak, or any form of biopellet eventually your chaeto will die off... Just for future planning, if you decide you want to go this route you wont need to focus as much on the refugium
Oh, in addition to that, I would personally suggest going with Neutral White LED's over the Cool Whites, the coloration is much better in your reds and they are closer to "full spectrum" |
Posted By: rufessor
Date Posted: November 04 2011 at 9:26am
|
Ok, Thanks for the heads up on coloration. I do have a number of orange red corals and would like to see them as they are quite beautiful. I do however like the fluorescent pop you get with the 15K light color, so I am thinking that what I might do is to mix about 2:1 Cool:Neutral whites as I do not want any "yellow" tinge to the color... This is so hard to comment on as everyone has a unique take on what looks good and what looks too blue/yellow/red.. But, since you comment I assume you have a LED so can you give me your impression of the amount of red/yellow dominance with the neutrals? Sorta kinda thinking that maybe I would put 80 degree lenses on the neutrals to spread them out more and place them in the middle positions on my arrays. Also, hearing from at least one person that I may be a little high in terms of LED numbers for this tank size and depth so I was going to cut out about 10... If you have some LED build experience can you comment on which to remove and where you would put cool/neutrals? ------------- Everything should be made as simple as possible, but not simpler -A.E. 57 Gallon RImless build in progress check the thread before if becomes boring and just full of nice pictures of colorful coral! |
Posted By: rufessor
Date Posted: November 04 2011 at 2:08pm
|
Confirmed from another source that cool whites are no longer suggested... changes daily. Current recommended ratio for best coloration is 7:4:1 Neutral White:Royal Blue:Std Blue Cree XP-G neutral:Cree XP-E royal:Cree XP-e Blue Because I am a renegade... I am thinking of putting 2-3 Green LED over the tank... some say in very low doses they are nice (no lens I should think). Any other comments... still have yet to order parts. LED #'s... now that I am using neutrals I am less concerned with too much PAR. I think they are a bit less powerful than the cool whites. ------------- Everything should be made as simple as possible, but not simpler -A.E. 57 Gallon RImless build in progress check the thread before if becomes boring and just full of nice pictures of colorful coral! |
Posted By: rufessor
Date Posted: November 10 2011 at 4:57pm
|
Update... The canopy is built and the stand and canopy will be finish painted tonight. Plumbing will start this weekend and I am hoping for a wet tank and a dry floor in a week or so. Here are two pics of the canopy I built, its 39 inches wide and follows the curve of a 72 inch diameter circle. Total depth of the enclosed part is just shy of 6 inches, so lights should not show once installed. Its going to hang via 3 wires off the ceiling, still have to figure out that mounting but should be pretty simple. Its UPSIDE DOWN... duh...  And here is what it will look like (upside down) just from the side as you would see it over the tank... when its not going to be upside down.. 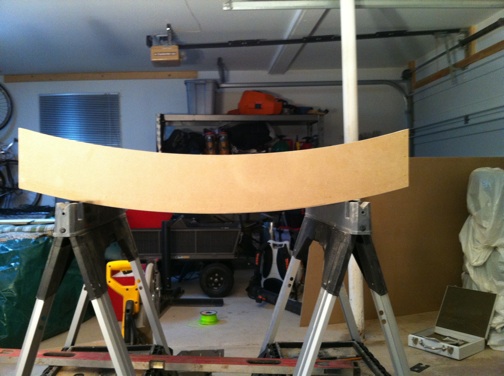 Super psyched with how this came out. I have it finish sanded and all seams and wood grain are filled for HVLP spray prep, pic is of rough construction not yet filled and sanded so you can see stables and some joints. Stand and canopy will be an espresso black color, super dark brown almost black. SHould look nice during the day and at night the stand and canopy will not really show up- just a nice bright tank.
------------- Everything should be made as simple as possible, but not simpler -A.E. 57 Gallon RImless build in progress check the thread before if becomes boring and just full of nice pictures of colorful coral! |
Posted By: ptronsp
Date Posted: November 10 2011 at 5:08pm
|
You did a fantastic job on that canopy. LOVE the color you are painting it too. I am not normally the dark wood kinda girl, but this should be beautiful! GREAT job! Pam ------------- The only clowns I like are in my tank! |
Posted By: rufessor
Date Posted: November 14 2011 at 10:28am
|
------------- Everything should be made as simple as possible, but not simpler -A.E. 57 Gallon RImless build in progress check the thread before if becomes boring and just full of nice pictures of colorful coral! |
Posted By: rufessor
Date Posted: November 14 2011 at 10:38am
|
Well... after sucking some major laquer thinner fumes.... the stand and canopy are now finished. Here are pics of the final product after two coats of color and two coats of laquer... the color that we had asked to get a match came out a little bit lighter than my wife and I had hoped, but its close enough and way too much work to change it now, after bringing a sample piece inside, we decided it looks a bit darker under normal lights (using super bright halogen spots in the garage for work) and will be ok. Next time were going to do black.... whatever. 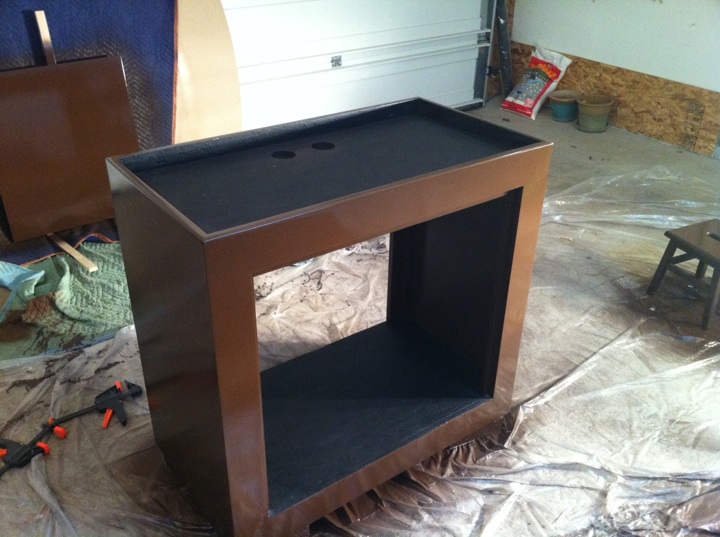 The door is in the back of the pic... the canopy is also done... Its still kinda sorta wet in this picture, the orange peel is looking a lot worse than it is, finish actually came out very nice, considering I had never used my HVLP spray gun prior to this project... I will not claim its absolutely perfect but good enough to move into the house without any reservations.  ------------- Everything should be made as simple as possible, but not simpler -A.E. 57 Gallon RImless build in progress check the thread before if becomes boring and just full of nice pictures of colorful coral! |
Posted By: Jeremyw
Date Posted: November 14 2011 at 10:39am
|
Canopy LOOKS GREAT! ------------- Next meeting: |
Posted By: rufessor
Date Posted: November 14 2011 at 10:47am
|
THANKS! I ordered my SKIMMER! SHould be here this week, so looking for water in it and plumbed by the weekend! Awesome to be done with the thankless carpentry work, somehow its more fun to be putting PVC together and getting water into the setup. I ordered my SKIMMER!!!!!!!!! Bubble Magus 180-a should be plenty o skimmer. Reviews have been great for these and they use a very high end acrylic cone. Its an ATB body, one pice cone with apparently similar performance. Great deal, looking forward to seeing things swimming in the tank soon. 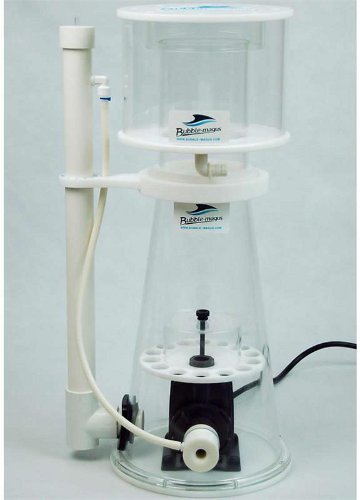 ------------- Everything should be made as simple as possible, but not simpler -A.E. 57 Gallon RImless build in progress check the thread before if becomes boring and just full of nice pictures of colorful coral! |
Posted By: rufessor
Date Posted: November 21 2011 at 2:42pm
|
Ok so some progress has been made... I finished up a few big things in the build. I removed all the paint on the sump, which is a new 40 breeder but had been fully painted on three sides, and its was a bit of a runny paint job and I did not want it fully painted, so for asthetics it all came off and I painted the left side covering up where the Macro will grow, since that has a lot of light it will be ugly and I don't care and want algae to grow but I don't need to see it. That leaves the rest of the sump crystal clear so I can see debris and clean it up. I also painted the rear of the tank along the water line and lower, with a black. Here is shot of the tank fully cleaned up and painted with the sump in the bottom of the stand.  You can just make out that the left side of the sump (1/3 or so) is painted as the glass reflection is gone. I LOVE the tank painted like this!!! I left the overflow/weir glass on the back of the tank unpainted so I can see in there. Its now plumbed with a Durso standpipe and a return, and it better be right because its ALL glued..  Only thing bugging me... IF you look at the return, the right side (from the back) is plumed from 3/4 at the "T" to 1/2 inch over the top of the Durso (yes I can get the top off... I have room), which was the plan. So I did that side and then went to finish the left, but because its so close to the cutout in the overflow I could not go down to 1/2 inch pipe without having a few inches sticking into the tank and then the loc line...which looked bush league... So I had to run a very short piece of 3/4 inch directly to the loc line, which means that the left side uses 3/4 pipe and the right 1/2 inch... unfortunate plumbing decision, but I started going with the 1/2 inch line finished that side and discovered I could not do the same to the other side and needed to use 3/4 so thats how it goes, and it was all glued. In the end I decided its unlikely to materially effect flow rate since pump is only 1/2 and I am splitting that to a 3/4 and a 1/2 both with nominal to zero back pressure... if its to fast on the 3/4 line I will just shove a piece of 1/2 inch tube in there to throttle it back to the same size. No consequence, but I almost started over to fix it. Finally, a picture of the tank with the returns complete. I should have it finished this evening. Will post pics with water in it to test everything soon. MOVE DAY IS FRIDAY after Turkey day.
 ------------- Everything should be made as simple as possible, but not simpler -A.E. 57 Gallon RImless build in progress check the thread before if becomes boring and just full of nice pictures of colorful coral! |
Posted By: rufessor
Date Posted: November 22 2011 at 8:49am
|
It took a good long while (probably 7-8 hours) to plumb the whole system, but I am probably way too anal and have everything tight and aligned just the way I want it. I plan one trip to Home Depot to get a bigger end for my Reverse Durso in the skimmer compartment. I have the tank overflow split into two segments as I diagramed, more or less, the cheato chamber is throttled throttled back in terms of flow and is quiet but has a few bubbles coming out, not sure if I should care... ANyone have a comment here... would appreciate it. I will post to prompt answers. Here it is sitting full... door is just set into opening for picture, so its not aligned perfectly...  ------------- Everything should be made as simple as possible, but not simpler -A.E. 57 Gallon RImless build in progress check the thread before if becomes boring and just full of nice pictures of colorful coral! |
Posted By: rufessor
Date Posted: November 22 2011 at 8:52am
Here is a pic of the sump with the skimmer running. Note that its in pure tap water, no salt, no organics proteins etc... so I am assuming this is normal bubble behavior in the absence of any surfactants... or should it be making a creamy froth in pure water???? ------------- Everything should be made as simple as possible, but not simpler -A.E. 57 Gallon RImless build in progress check the thread before if becomes boring and just full of nice pictures of colorful coral! |
Posted By: ksmart
Date Posted: November 22 2011 at 2:35pm
|
Your tank is looking really awesome! And yes that looks like normal bubble behavior in fresh water. ------------- |
Posted By: Trevor40
Date Posted: November 24 2011 at 7:37am
|
Your tank look great and super clean design. ------------- Call or Text (801)834-3119 |
Posted By: rufessor
Date Posted: November 28 2011 at 10:02am
|
Thanks! Here is a picture of the completed plumbing components, from left to right we have the pump return plumbing. The split from the overflow on the left to the Fuge with Cheato and a smaller "Reverse durso" silencer, this side gets about 30% of the flow- while the right side to the tank overflow goes to the skimmer chamber and has a much bigger "reverse durso" to silence the overflow. I had to make one modification to the right side main overflow, the up tube from the silencer now has a 45 turn at the top and a 6 inch extension tube that now points straight up. I was getting a bit of bubbles coming out the top and spraying water around. With the addition of a 45 turn to vertical and the extra 6 inches of height I have a nearly silent overflow and no spray. Filter sock fits over large silencer with all the pieces, barely... but it fits. The sock also helps to eliminate completely any noise or bubbles. You will notice that things are very slightly different from the pic of the Sump above... I spent a LONG time playing with things to quite down the overflow and here is what I now think is the best design. I spent a while on-line looking at things and stole the 45 degree idea but never really copied anything piece for piece (what would be the fun of that). So.... I believe (and trust me I played with this a LOT)- that it is crucial to have your main overflow line come into the T at a 45 degree angle to best separate the air/water mix. It makes a huge difference from the more typical straight vertical design.  ------------- Everything should be made as simple as possible, but not simpler -A.E. 57 Gallon RImless build in progress check the thread before if becomes boring and just full of nice pictures of colorful coral! |
Posted By: rufessor
Date Posted: November 28 2011 at 10:12am
|
Ahhh... After taking 3 days to do the move... Day 1- 5 gallon water change from Biocube into 57 gallon with sump. 1 bag of salt (for 50 gallon water) plus another 3 cups or so, and a whole lot of RO water. Tank on, pumps on, skimmer running. Heater on and leave it overnight. I would post a picture of a 1/2 full tank with salt in the water but really... Day 2- Move each rock to new tank and place on bare bottom. Day 2- 8:30 pm-2 am... rearrange all the rock, trying not to break anything (hahahha...) my red branching montipora is now basically a flat mound with all the branches pruned... it by far suffered the worse for the move, but will be fine. Day 3- Rinse incredibly well, 15 lbs of Argonite medium reef sand. Add to tank around rocks and in open areas. Rinse incredibly well, 15 lbs of Argonite Puka shell sand. Overtop reef sand. TAKE PICTUREs...  And I must show the lights I am running on my sweet new tank... ARE YOU JEALOUS. To the right we feature the BioCube 29 PC light top... To the left we feature 2x Panorama Modules (EcoXotic) one 455 nm Blue, one mixed blue white. Lights are on a 12 hour rotation, swap side to side.... until I can get my new lights built. Which may be a few weeks... might go to a 24 hour light cycle if needed, swap side to side every 12..  ------------- Everything should be made as simple as possible, but not simpler -A.E. 57 Gallon RImless build in progress check the thread before if becomes boring and just full of nice pictures of colorful coral! |
Posted By: rufessor
Date Posted: November 30 2011 at 10:47am
|
Can I just comment on how incredibly inept I feel. I rearranged the rock work a bit on the left side... and I swear to god. I HATE MOVING LIVE ROCK more than anything. It took me literally 2 hours to place TWO pieces of rock just right with support to get a nice cave and not destroy any coral. Absolutely the most incredibly tedious maddening thing, you have it almost perfectly where you want it... glue a coral on and move something, then hate it and try to find the position you had where three pieces fit together perfectly and it took an additional 2 hours to find that position again... ARGHHHHHHHHHH But its done now... My wife thinks I am very very special. ------------- Everything should be made as simple as possible, but not simpler -A.E. 57 Gallon RImless build in progress check the thread before if becomes boring and just full of nice pictures of colorful coral! |
Posted By: ptronsp
Date Posted: November 30 2011 at 1:32pm
*Deep Breath* Matt... hahah. It is really looking nice. I have to add Troy hates when I get in the mood to change rocks around ( YES rocks guys  ) I sit and tell him what to do .. (what women do best) and he gets so aggravated because it has to be just right.... ) I sit and tell him what to do .. (what women do best) and he gets so aggravated because it has to be just right....  . And then when it comes to scaping we are both perfectionists. . And then when it comes to scaping we are both perfectionists.
It will be great following the grow out! Pam ------------- The only clowns I like are in my tank! |
Posted By: rufessor
Date Posted: November 30 2011 at 3:16pm
|
Thanks! I am super excited. I ended up deciding that the bridge lighting I was using, although amazing.. was not enough. Even the Zoas were getting skinny and "reaching" for the light. So- thanks to the generosity of a Utah Reefs participant... I have a dual 96W T5 36 inch light sitting on the egg crate... and the tank now looks really really beautiful... the corals also seemed to immediately open a bit more and I suspect that their colors will be back in full in a few hours as it was only a couple days with poor light. One thing I note... the live stock seem to love the space. My pistol shrimp has been endlessly busy excavating the entire left side of the tank in and among the rocks and his buddy the watchman goby now loves perching all over the rubble and rock. He is also super bold now, and will openly swim across the entire tank during feeding, even in the Biocube he never ventured far from home. He is either hungry or feels like the tank is empty and "safe". I will post a pic with real lights and the new rock formation. I listed my BioCube and hope to buy the LED components next week and get the true hood built and installed in a few weeks, then I will feel like its project complete. That and an ATO... ahhh... can you say almost 2 gallons a day! ------------- Everything should be made as simple as possible, but not simpler -A.E. 57 Gallon RImless build in progress check the thread before if becomes boring and just full of nice pictures of colorful coral! |
Posted By: bstuver
Date Posted: November 30 2011 at 8:04pm
|
Looking good:) Are you building a canopy that will sit all the way on? If so why? Isn't the point of this tank because it is rimless? :) Or just something to cover your light build that will be hung above it? ------------- Jackie Stuver "wait these aren't the happy Hawaiians oompa doompa godly heaven on your face zoas? I dont want them then. lol!" Ksmart |
Posted By: rufessor
Date Posted: November 30 2011 at 9:34pm
|
The canopy as pictured in prior posts will be suspended 6-8 inches from the ends of the tank. So the middle will end up about 12 inches up. Working on a design to rim the tank with acrylic to hold a fish net I place and also seeing if I can work in some posts in acrylic at each corner to hold the canopy up. You will definitely see the entire water surface. Still kinda trying to work out how to keep it super clean looking yet suspend the canopy. Ceiling mount won't work due to lights in ceiling and our aesthetics. And my Wife is not to hot about an arm hanging off the wall. Working with Tyler at elite aquatics to see if we can get something good in place. Based upon his work I am sure it will end up just about perfect. The only finished part of the build at this point is plumbing. I have to do a bunch of work in the cabinet to get wiring worked out more formally and the top and lights are whatever I had in the garage with a very generous loaner T5 light until I get me LEDs built. ------------- Everything should be made as simple as possible, but not simpler -A.E. 57 Gallon RImless build in progress check the thread before if becomes boring and just full of nice pictures of colorful coral! |
Posted By: phinfan
Date Posted: November 30 2011 at 10:03pm
| like it |
Posted By: bstuver
Date Posted: November 30 2011 at 11:27pm
|
Oh geez sorry I completely forgot I had seen pics of the canopy before:) Cool it's going to look really cool. ------------- Jackie Stuver "wait these aren't the happy Hawaiians oompa doompa godly heaven on your face zoas? I dont want them then. lol!" Ksmart |
Posted By: rufessor
Date Posted: December 13 2011 at 10:26pm
|
YEEESSSSS Guess what was waiting for me when I got home from work?? I very small box... full of.... very small LED's and a bunch of other electronics I ended up changing the lighting design, as I had way too many LEDs and was using old information on color mixing and best color rendition in tanks. I ended up using a 4:7:1 ratio of Cree XP-G Neutral white : Cree XP-E Royal Blue : Cree XP-E Blue I found some sweet Cree Bins... Got the following 28 Cree XP-E Bin 316 Royal Blue, 450 nm wavelength (lowest bin possible) and highest lumens possible from Cree. These ROCK. 16 Cree XP-G Neutral white R4/4A bin, which equates to 4500-5000K color temp (the coolest of the neutral white bins) and good intensity, not R5 but more than adequate (went for color temp not intensity bin if I had to make a choice). The XP-E blues are just whatever they had as they are supposed to be a higher wavelength bringing in some greens so that was what I wanted anyhow. I was going to get the XT-E Royal blues but canceled them for the XP-E when I discovered the wavelength bin on the ones I had access too was 460 ish... too high... Instead of three heat sinks and 6 drivers, I am going with two heat sinks and 4 drivers (mean well ELN-60-48p) which I also received today. The LEDs are all mounted on a black star, I have all 60 degree black optics for them, black high temp wire, and should be getting my 12x7 black anodized heat sinks in the mail soon. I will be using thermal tape to adhere the LEDs so the final build should be super super clean, all black, no globs of glue etc. Layout of the LEDs will be as follows, attempting to group them very tightly together into what I hope will act as 4 different point sources of well blended light. The color mixing and mount order is shown below, RB= Royal Blue, CB = Blue, N= Neutral White One heat sink will contain the left side or the illustration the other the right, which are mirror images. The heat sinks will be mounted centered over their 1/2 of the 36 aquarium length. I should have the canopy suspended about 12 over the water at the center so lights will be closer to 16 high... as a start, I doubt I need to go higher but may lower it a few inches depending on if I get spill onto the floor with the lens angles. ----RB---------------RB---------------------------------RB--------------RB -RB--N--RB-------RB--N--RB--------------------------RB--N--RB------RB--N--RB N---CB---N--RB--N---CB---N--RB--TANK MIDDLE --RB--N---CB---N--R--N---CB---N -RB--N--RB-------RB--N--RB---------------------------RB--N--RB-----RB--N--RB ----RB---------------RB---------------------------------- RB-------------RB Basically I am trying hard to avoid the disco ball shimmer everyone gets with dispersed arrays of LEDS carpeting the tank, which also leads to bad color rendition. Since my lights will be at slight angles to the tank and pointing at each other towards the middle of the tank (see the arced canopy) I think I may have a nice PAR distribution and good acro growing space in the middle on the covered overflow. We shall see... I probably spent WAY too much time researching this, but so far as I can tell, this is the ratio that is becoming dominant for color and growth (commercial fixtures are just moving this way now). The cool whites are starting to loose favor as red rendition is generally thought to be very poor at 4:1 RB:CW whereas the 4:7:1 is showing amazing colors in the tanks that have been built this way. I will post pics of the tank and build progress when I get the heat sinks. For now, Thanks again to Pilot172 for the loaner light, working well and things are actually growing instead of browning out. I should have your light back SOON! ------------- Everything should be made as simple as possible, but not simpler -A.E. 57 Gallon RImless build in progress check the thread before if becomes boring and just full of nice pictures of colorful coral! |
Posted By: rufessor
Date Posted: December 14 2011 at 11:10pm
|
Ok... I just found out the heat sinks are shipping tomorrow... if I believe them since they were supposed to ship last week. I kinda got the feeling that I am not a typical customer, i.e. not a company, not ordering 1,000, generally about what I would have expected ordering from a fabrication company that makes components for electrical cooling in high end amplifiers etc... But I think they might have a heat sink that would work for ambient cooling of LEDs with no fan at 24 LEDs per 12x7 heat sink. Which if my calculations are correct (and I don't believe them for a second, I get the math but this is a new field for me and my units are probably all over the place)---- would be very cool. They have a relatively low pin density but each pin is CNC machined with 17 grooves to help with radiant cooling and I had them black anodized since black is the best color for black body radiation emission, and it actually matters (weird that this is true, but this is no myth, many raidiant heat sinks are black and the math behind its been know a very long time. I kinda think it might work since I read that most LED builds are massively overbuilt on the heat sink ( at least if you actually use a commercial heat sink and not DIY with home depot aluminum channel etc), so my guess is it will work out randomly (50% chance) or need a fan (50% chance)..... which is why I ordered a stealth fan kit (2 double bearing fans with speed control, which are quiet). I plan on putting the LEDs on the heat sink, turning it on and holding my hand on it for a good 15 minutes or more. If I can keep my hand there its good to go, if its too hot to touch, probably either need an infared thermo to actually figure out temp or just add fans (much cheaper). LED life time degrades SIGNIFICANTLY with elevated junction temps... like 50% or more (or just plain old dead) if your hot so its not where I want to be. Pictures of stuff will follow.
------------- Everything should be made as simple as possible, but not simpler -A.E. 57 Gallon RImless build in progress check the thread before if becomes boring and just full of nice pictures of colorful coral! |
Posted By: phys
Date Posted: December 15 2011 at 12:00am
| dont forget the thermal paste!!! It helps immensly for thermal transfer. |
Posted By: Ryan Thompson
Date Posted: December 15 2011 at 8:08am
|
If you are wanting to avoid the disco ball effect, ditch the optics. They will only hinder you in that attempt.
When using multiple point source lights, you are bound to have some color separation and light banding going on. It only takes the branch of an SPS or a small over hang on a rock to create the barrier need to separate the light. I have used 3 different LED setups and all of them have light banding to some degree. The PAR38 bulb that I used with 60 degree optics, was by FAR the worst. |
Posted By: rufessor
Date Posted: December 15 2011 at 9:43am
|
I will have two options once the LED are on the heat sink, if I get color issues I can raise the fixture or add a diffuser or try no optics. I plan to very lightly glue them with the plan being easy removal. It's weird that I feel like there are so many unknowns going into this as hundreds or thousands of people have done this yet there are still very common complaints. I am nearly certain that my color will be ok and intensity more than necessary but very unsure of how colors will blend. All you can do is put them super close together and see how it goes. In any case I am confident I will like it, just hope I don't want to change it after its built. Thanks for advice. ------------- Everything should be made as simple as possible, but not simpler -A.E. 57 Gallon RImless build in progress check the thread before if becomes boring and just full of nice pictures of colorful coral! |
Posted By: phys
Date Posted: December 15 2011 at 12:07pm
| if you look around, there is thermal glue. This is the best way to make sure all the heat is sapped from the led as its created, you may notice without it that the led will still be warmer than the heat sink.i used a tiny spot of 2 part epoxy on the "wings" of the led star with a spot of arctic silver in the center. They stay on and still stay cool. My heat sing is pretty thin but even without fans, it doesnt get too hot to touch but i dont run them 100%. |
Posted By: rufessor
Date Posted: December 15 2011 at 12:58pm
|
The tape backing I have is from Bergquist which is a company that specializes in heat transfer with these tapes cut to the exact dimension of the LED star. I looked it up and it's not as good as the ArticAlumina ceramic epoxy in terms of thermal resistivity but should work. Its difficult to measure die temp on the LED but if that's getting so hot as to be damaging the heat skink will def be way to hot to touch. Was trying to avoid epoxy as it can be harder to remove and would leave a big white smudge on my all black setup if I ever even touched it. So I totally agree that best is thermal ceramic epoxy. UT going to try to build first heat sink with thermal tape and light it up and see. Tape can be removed and everything glued if necessary. ------------- Everything should be made as simple as possible, but not simpler -A.E. 57 Gallon RImless build in progress check the thread before if becomes boring and just full of nice pictures of colorful coral! |
Posted By: rufessor
Date Posted: December 15 2011 at 1:02pm
|
Sorry. I wanted to ask, since two people have suggested the thermal epoxy. Does anyone have negative experience with the tape or a local source for the ArticAlumina stuff. I will wait to hear back but completely willing to bail on tape if it's caused issues. I thought I was getting a specialized well tested product.
------------- Everything should be made as simple as possible, but not simpler -A.E. 57 Gallon RImless build in progress check the thread before if becomes boring and just full of nice pictures of colorful coral! |
Posted By: rufessor
Date Posted: December 15 2011 at 1:27pm
|
Sorry. I wanted to ask, since two people have me tip Ed the thermal epoxy. Does anyone have negative experience with the tape or a local source for the ArticAlumina stuff. I will wait to hear back but completely willing to bail on tape if it's caused issues. I thought I was getting a specialized well tested product. ------------- Everything should be made as simple as possible, but not simpler -A.E. 57 Gallon RImless build in progress check the thread before if becomes boring and just full of nice pictures of colorful coral! |
Posted By: phys
Date Posted: December 15 2011 at 1:41pm
| the only prob i see with the tape is the potential for it to sag and drop your optics. Ive never had good luck with any tape on surfaces, it always fails. If you do use it, prepare the surface well. My thoughts tho, why would you use something less effective? The more heat transferred, the longer the life. You could use the clear epoxy on the tips of the star (very small amounts) and arctic silver(aluminum or gold also) which also only requires a small dab. It comes off easily enough. Use the tape for the initial test runs for spread and coverage, then when you have the setup how you want it, use the more permanent solution. |
Posted By: rufessor
Date Posted: December 15 2011 at 2:11pm
|
Yeah... temp will dictate. If my setup with tape is running cold then more efficient is useless as its all ready way more than good enough, if its hot or borderline even I will pop them and go for the better heat transfer. I NEED my heat sinks so I can try this!!!!!!!!!! ARGHHHH>>> they might ship today so no weekend warrior build for me. Its going to be late nights next week when the heat sinks get here. Will post results and build pics when I get stuff together. ------------- Everything should be made as simple as possible, but not simpler -A.E. 57 Gallon RImless build in progress check the thread before if becomes boring and just full of nice pictures of colorful coral! |
Posted By: phys
Date Posted: December 15 2011 at 2:22pm
| good luck! For future reference, newgg.com has the thermal paste. Ive only seen it one place in utah and i have no idea where it was. |
Posted By: rufessor
Date Posted: January 05 2012 at 12:53pm
|
OK- Finally an update, and I think ITS A BIGGGG ONE!@ THis is a a teaser to the pics I will be posting in a minute or two but I wanted to explain what I did and why I did it. My design for the LED placements has evolved as I read more, thought more, and then finally again (slightly) after I received all the pieces and just played puzzle with the stars on the heat sink. The layout I described using a text diagram ended up being probably the best in terms of my ability to rationally distribute and cluster the different colors of LEDs as well as for color blends. Then one night I was looking at my tank with the main lights (loaner) off and just an ecoxotic panorama module on the tank, and I was super suprised to see very distinct color lines, from the white and blue lights. Its probably more due to the fact that the light is sitting on egg crate so the individual LEDs are "focused" through a single square hole in the egg crate, but it got me to thinking, if I arrange it in neat horizontal rows across the heat sink there are going to be lines of increasing intensity as you move across the array where the ends have only 1 LED in depth, and the middle has as much as 5 deep in the middle. SO I pondered and played and tried something that I ended up liking a LOT. I am using that arrangement, but I turned in on a 45 degree angle so the LEDs never line up in depth (look at the pictures I will post) and I am SUPER happy with how this looks. Now I cannot wait to light it up. In terms of fuses, as this was the last discussion here. I bought fuse holders and then did some reading and ended up consulting an engineer who works with LEDs and decided they sound like a great idea but are functionally useless for the protection most people think they are getting. If you fuse your LED string with the idea that you are protecting them in some way from an inrush current that would fry the LED string, the FAST fuses people are using have a VERY long time interval to actually blow compared to the time interval required for an inrush current to actually fry your LED string. So if you get an inrush current sufficient to damage the LED the following sequence of events will occur. The current will rush, the LED will fry, your fuse will blow... in that order. The MeanWell power supplies are filtered and have inrush protection (which is part of their expense) and further are tunable with respect to the max applied current. So, I am going without fuses and if the power supply fails and I blow them up, then I will be replacing a sting of LEDs and getting a new power supply. The ONLY thing a fuse would protect against would be you setting the POT on the powersupply incorrectly and providing a filtered but sustained over current, which would (given my power supply capacity) serve to over heat the LEDs and then fry them, a fuse would protect from this. BUT, since I intend to set this an forget it, if I set it correctly its not going to change. Thus, no fuses. I guess you can comment but its done and I am happy with this, I am pretty analytical and when a trusted engineer who works in the field explains it to me and I can understand the explanation, its good enough for me. As too the thermal pads vs epoxy. Someone somewhere who has a very expensive IR thermometer with a pin point measurement capacity that uses a laser to highlight the point being measured has posted the LED DIE temperature (the part we really care about) with LEDs mounted on 20 mm stars using epoxy or pads, the difference in LED DIE temp was <2 f at max current, inconsequential and meaningless to LED lifetime, so I am using the thermal pads. They are very easy to use, but for adequate adhesion do require a decent pressure be applied to the star to maximize bonding and thermal transmission, so I built a little jig with a hole in the center for the LED to sit in and that was felt padded, EACH led was pushed down with max force for a few seconds and I tested by pulling one off, the acrylic epoxy on the pad fully bonded to the heat sink incredibly strongly (its a PAIN to remove) with no bubbles so my mounts seem good. ------------- Everything should be made as simple as possible, but not simpler -A.E. 57 Gallon RImless build in progress check the thread before if becomes boring and just full of nice pictures of colorful coral! |
Posted By: rufessor
Date Posted: January 05 2012 at 1:01pm
Ok, so here is a picture of the fins of the heat sink that I ordered black anodized, note each fin is grooved for maximal radiant heat transfer without fans (I hope).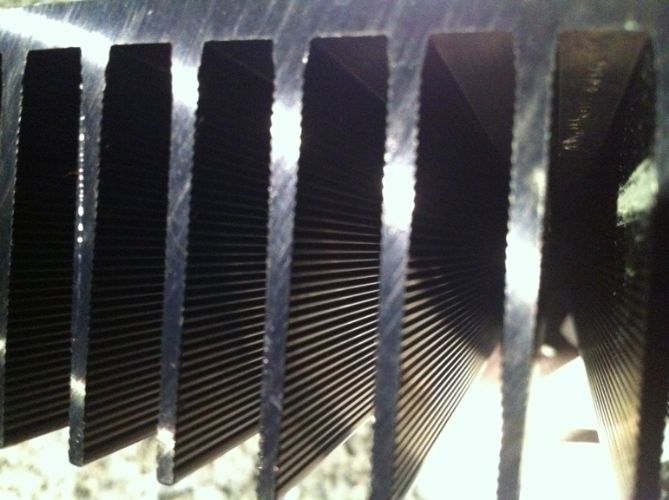 ------------- Everything should be made as simple as possible, but not simpler -A.E. 57 Gallon RImless build in progress check the thread before if becomes boring and just full of nice pictures of colorful coral! |
Posted By: rufessor
Date Posted: January 05 2012 at 1:06pm
Here is the LED lay out I decided on, I guess its just slightly different than a strict 45 degree rotation of the text layout, but nearly identical. And here it is glued, wired, and with LENs epoxied onto the stars (all 60 degree)  And here is the FINAL build of the lights, (not in the canopy yet, but I just need 8 stainless wood screws and 5 minutes with a drill (TONIGHT!) I drilled and tapped each heat sink in 8 spots with a 8x32 machine screw tap and used nylon thumb screws with nylon washers to mount an acrylic splash shield that I cut to about 1 inch larger in dimension than the heat sinks. To mount the heat sinks to the canopy I used 1 inch 90 degree aluminum bar that was drilled to mate to the tapped holes in the fins on the side of the heat sink. The empty holes on the bottom will be used to mount directly to the solid maple support bars of the canopy interior, so its not going to fall off... ever. The last pic is a close up of one module from the side to better illustrate the mounting of the splash shield and aluminum bar for mounting in the hood.  FINAL!  ------------- Everything should be made as simple as possible, but not simpler -A.E. 57 Gallon RImless build in progress check the thread before if becomes boring and just full of nice pictures of colorful coral! |
Posted By: rufessor
Date Posted: January 05 2012 at 1:21pm
|
So the only "Regret" I have, is when I laid them out, I decided to make the left and right sides mirror images of each other, if you look VERY carefully you can see that the Neutral white leds have a yellowish cast to them through the lens, and the left and right modules line up such that (there is a 6 in space between them in the hood because they are angled at each other (the hood is an ARC) but the center edge of the left panel ends in a NW LED and the center edge of the right panel also ends in a NW led. I seriously doubt that this will matter at all... but I suppose if I was going to start a company and make more of these (NO WAY) I Might think about building it slightly differently and see if its notable in any way... doubt it. Finally, I will be adding 8 UV leds, 4 on each heat sink kinda after the fact, ordering now. But I have space to distribute them rationally (planned it out during the lay out) and its super easy to work on if I just unscrew the splash guards. This should happen some time next week ish. New LEDS and another driver will be ordered soon... so final count is 5 different drivers! HOLY COW. I am kinda pleased with how it came out, it almost looks like a commercial product, well... good enough for me to be happy! Sad part is, I will never ever see it without completely blinding myself!! I dont have a drill press so one or two of the tapped holes are slightly off normal to the surface I drilled... but only I now about this, so don't tell anyone  ------------- Everything should be made as simple as possible, but not simpler -A.E. 57 Gallon RImless build in progress check the thread before if becomes boring and just full of nice pictures of colorful coral! |
Posted By: kellerexpress
Date Posted: January 05 2012 at 4:09pm
|
that some sweet DIY there! ------------- IM 30L Kessil A160we x2 |
Posted By: rufessor
Date Posted: January 10 2012 at 4:31pm
|
Ok so its LIGHT TIME! Here are some pics- ITS AMAZING. I cannot say enough how great this looks. I have color blend issues right now as the canopy is temporarily resting ontop of the glass until my hangers come in so you can see blue/white areas near the top where the lens angles have not blended yet but when I pick it up I can see the light balances out perfectly and I will have no disco ball effects! Looks like I got what I wanted so NO COMPLAINTS. I tuned the Meanwell drivers to 1.4 A for the XP-G NW string and 900 mA for the XP-E royal blue and cool blue string. Cool finding others may be interested in but not new information for those that do this all they time. I found that with PWM dimming, you need to run your Meanwell power supplies at the high end of the voltage output range which is adjustable to about 52 volts. Otherwise, if your string is drawing say 24-25 volts at 100% power, which is what happens with 8 XP-G NW on a ELN-60-48P powersupply, when you dim it lower than 25-30% the lights flicker on and off due to the power supply trying to feed the correct voltage which has dropped below the lower limit of the power supply, whereas my strings with 16 XP-E running at 900 mA require 52 Volts which is the MAX output of the controller and then have "head room" of 24 V to adjust required voltage to get current constant as you dim them they do not flicker even at 10% PWM dimming, a HUGE difference. So. I am ordering UV lights to add (true Violets) and will get two new lower capacity power supplies that MAX at 27 V and use them to power the XP-G NW strings and use the old (heheh... 2 days old) power supplies (1 of them) to power the UV string which will have 10 or so lights that actually require higher voltage (not CREE) and thus should dim perfectly on this. So... after its all said and done, I will be perfectly functional beyond any hope I had, and +34 dollars for the extra power supply... not bad. Here are the lights at 40% PWM all channels (4) 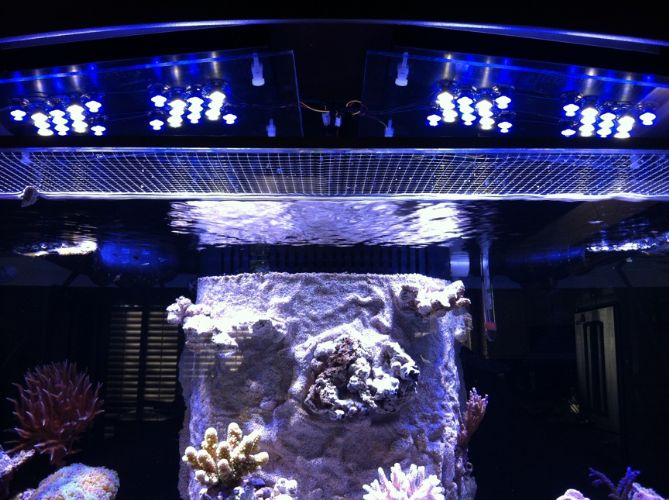 Here is the stand, tank, canopy and light looking up into the canopy from down kinda on the floor (you cannot see the lights usually)  And finally, what it looks like when your not sitting on the floor so you can see the lights. Remember, the canopy will be suspended from the ceiling using two stainless steel wires with Y adapters near the canopy so the canopy will have 4 attachment points and will be stable but you will only see two wires going up. The whole thing will move up about 10 inches so the sides will be 11 inches up or so and the middle about 16-17. 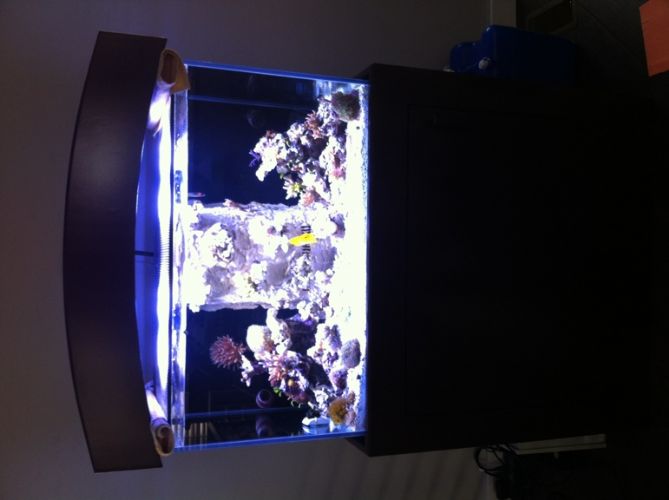 ------------- Everything should be made as simple as possible, but not simpler -A.E. 57 Gallon RImless build in progress check the thread before if becomes boring and just full of nice pictures of colorful coral! |
Posted By: rufessor
Date Posted: January 10 2012 at 4:43pm
|
Oh... I forgot. I needed to install fans to keep it all cool. The heat sinks are in fact capable of cooling it without fans but not when its stuck inside an enclosure like the canopy, all the hot air rises and the ambient temp at the top of the canopy gets hot and the LEDs start to warm up. So I installed two "Stealth" speed adjustable fans to suck room air down and blow it onto the heat sinks... so the canopy was drilled with a 1 inch hole saw over each fan, I made 5 holes over the fans and the holes are arranged into a pentagon shape around the fan blades so it actually looks kinda cool from the top. I have the fans set to basically the slowest speed (you can almost see the blades as they spin) and the heat sinks are actually cold to the touch even after 9 hours of LED lights. ------------- Everything should be made as simple as possible, but not simpler -A.E. 57 Gallon RImless build in progress check the thread before if becomes boring and just full of nice pictures of colorful coral! |
Posted By: bstuver
Date Posted: January 10 2012 at 4:48pm
|
Wow it looks great! Nice build! ------------- Jackie Stuver "wait these aren't the happy Hawaiians oompa doompa godly heaven on your face zoas? I dont want them then. lol!" Ksmart |
Posted By: will
Date Posted: January 12 2012 at 8:57am
| dude i'm jealous that is looking way good |
Posted By: rufessor
Date Posted: January 12 2012 at 9:07am
|
THANKS! So far the corals are not getting nuked at 40% but my plating red monti is for sure fading a little bit but nothing to worry about so far. I know this will eventually get super red as when I had it under LED bars in the Biocube it was almost pink whereas under PC it was kinda washed out red/brown so really looking forward to this coloring up. I think I figured out how I am going to suspend the canopy. I cannot find any wire hanging solution that I believe would A) support the weight B) look nice C) cost less than 100.00, a LOT less would be very nice. The wire kits that I believe would support it are clunky and designed for industrial High Bay lighting. The wire components that would look SWEET and easily support it are easily over 100 bucks mostly because none of these companies sell to individuals and charge a minimum order fee and none of the companies that use this stuff stock it, its all special order and subject to a 100 dollar minimum... ARGH. But... then I thought of a ceiling fan hanging kit designed for sloped ceilings. A single down tube of 3/4 inch going to the center of the canopy and screwing into a female 3/4 Pipe thread floor mount adapter (turned upside down under the canopy top) will basically provide a 3 inch circle to balance the hood on and then the top ceiling mount will swivel 45 degrees in any direction so I can move the canopy around if I need to. Picked up the components last night at Lowes in brushed nickel... but the ceiling support mentions 25 lb max... my canopy is 28... I bet I am fine as the fans wobble and can apply probably a lot more force than a static load but I am going to call a fan place and see if I can get a more substantial mount for the ceiling JUST in case. THANKS for the comments! ------------- Everything should be made as simple as possible, but not simpler -A.E. 57 Gallon RImless build in progress check the thread before if becomes boring and just full of nice pictures of colorful coral! |
Posted By: Tanuki
Date Posted: January 12 2012 at 9:09am
|
I am all about hanging lights. Love the look, and the water temp stays perfect with the room temp. Tank looks great. Quick question, and maybe I missed hit, but how does the system work when the return pump goes out? Does the overflow have a shut off valve or something so that the water doesnt all siphon out? ------------- Defending Reefscape Champion (I Think) |
Posted By: rufessor
Date Posted: January 12 2012 at 9:33am
|
Cool... if your a light hanger do you have any ideas other than what I posted... I have not cut the canopy... my wife is super super (repeat this a long time) concerned that it not look messy so I am tending to really really like the idea of a single down tube. ONLY concern is balance. I am now very glad that I was super careful in mounting the LED and heat sinks perfectly centered over each 1/2 of the hood lengthwise (like to within 1/16") so it should balance ok except the 13 wires coming up to power all the LED modules and the two fans... which pass through a small hole in the back of the canopy.. I think if I needed to I could mount an adhesive clip to the wall (its only 6 inches away) and that would hold the wires from tilting the fixture... so I think I am ok. but other suggestions would be at least considered. for now, I like the general clean lines this will produce and the idea that I could actually (it would hit the wall if I did this) quite literally take the canopy and swing it through a 45 degree arc (or actually wider) off vertical, so I can get at pretty much the entire tank if I needed to. Getting the canopy down would not be a lot of work but would require a ladder and a friend to hold it, but nothing else. As for the sump/overflow capacity. The Durso standpipe sits about ~4 inches below the back of the overflow so when the main pump goes off the tank drains to the level of the overflow teeth in the display, and then the capacity of the overflow chamber drains to about 4 inches below the display level. I have the return split into 4 loc lines with big wide nozzels on them, one on each side goes straight down and the other on each side of the overflow are actually just barely sitting out of the water on the display, so its does not siphon from the display beyond the level of the overflow teeth. My sump goes up about 3-4 inches but I still have another 4 inches or so before its even close to a flood. So its completely fail safe but for a clogged overflow in which case I get 25 gallons from the sump pumped onto my floor via overtopping the display. But I am not sure there is a design in existence that avoids that unless your using some sorta floats to stop the main pump. I do in fact have two float switches that came with my controller and I am considering putting them in the overflow to detect this as I use a peristaltic pump on continuously to deliver Kalkwasser as ATO water, I just tuned the pump to match the evaporation (almost exactly 1 gallon per day) and then the ATO water is the alkalinity/calcium supplement all in one. Actually this is working so well... I mix up 7 gallons of RO/DI water with about 10 tsp of Kalk paste Calcium hydroxide and then add in about 20 mls of 15 % acidity vinegar (which is just acetic acid). The acetic acid helps to bring more of the Calcium in solution, buffer for alkalinity through some chemistry and has the added benefit of acting as a small carbon source (kinda like vodka) to feed the bacteria. I have been running this for about a month now, and I can all ready see that the display is pretty much entirely free of any algae but for a few macros (and my tang is eating those) and I am now looking at my cheato and wondering if its got enough nutrients as its looking a bit tepid. Which is fine... the water is now so clear I can look through the tank the long way (through three feet) and its just as clear as looking through the front. My Calcium is constant at 400 ish. The only thing I am dosing is Mg twice a week and I am not testing as I just dose a maintenance level and unless and until something stops growing I will just keep it this way as my corals have NOTABLY grown in the 4+ weeks since moving to this system. In fact, the plating monti is growing so fast I swear I can see it change day to day its almost scary the thing is going to be HUGE in 12 months.
------------- Everything should be made as simple as possible, but not simpler -A.E. 57 Gallon RImless build in progress check the thread before if becomes boring and just full of nice pictures of colorful coral! |
Posted By: 08TRDOFFROAD
Date Posted: January 12 2012 at 7:24pm
| What are you using to dose magnesium? BRS two part mag mix? |
Posted By: rufessor
Date Posted: January 12 2012 at 9:24pm
|
kent Marine Tech M Magnesium. Its just MgSO4 and MgCl2 so any similar product would be the same. I am hadly a Mg expert I dont even test. And I just started Mg supplementation. In my nano I figured I was doing enough water changes to keep up. In this bigger system I know I am not going to keep up with water alone as ky skimming etc allows for longer intervals on water changes so this is how I am starting Its looking good but I will only really know in a few months. ------------- Everything should be made as simple as possible, but not simpler -A.E. 57 Gallon RImless build in progress check the thread before if becomes boring and just full of nice pictures of colorful coral! |
Posted By: rufessor
Date Posted: January 30 2012 at 3:06pm
|
SO I finally got the canopy hung and have a picture to prove it. I am up to 65 % on my LEDs and just now noticing that at least one of my corals is clearly getting pissed... I have a toad stool leather (pretty sure thats what it is) that I got when it was the size of a quarter, it was one of the first things into my new BioCube 29- which has grown to about 4-5 inches across (WOW)... well its turned into pure leather with the glossy kinda ready to shed its top layer look and keeps shrinking. Although it was on the sand bed it was pretty much dead center and so I moved it off to the side, I will see if this fixes it. All the other stuff (like the ACROS are LOVING the light so far). I traded for a blue tort and a few other frags... the blue tort came to me as a white tort (hehehe) with zero polyp extension. After moving it to the top and center its starting to turn blue now and I saw ALL the polyps peeking out from the tips yesterday!!!!!! SOO HAPPY. The tank is running pretty stable, my ATO water is 7 tsp (1 tsp/gallon) KalkPowder with about 14 tsp of vinegar (plain store bought) and I run through a bit more than a gallon a day and I am still not quite keeping up with Ca demand. All the stony corals have TAKEN off with growth under the LEDs... its been 3+ weeks now and I am absolutely sure that every acro in the tank now has new tips and everything is starting to color up just a little bit. I got an amazing greenish/yellow acro from Chad that I am unsure of in-terms of a name... but its really thick branches covered with large nubby polyps that extend out quite far and that is sprouting heads every where! So cool to see things take off after all the work setting this up! Next post will be a pic of the tank with canopy. The FINAL canopy pic will be coming when I can find a source for some perforated stainless steel. I want to rim the bottom with a 3 inch piece so it shields the lights just a bit more and ties in the ceiling mount with the tank, should be cool if I can find somewhere to get that. Still cannot decide if I want to cut the stainless to profile with the ARC of the canopy so its 3 inches showing everywhere, or cut it straight so that its a box with more stainless showing in the center... unsure currently! Any votes??? If you can understand what I am doing. . . without pics of something that does not exist its kinda hard to visualize.... ------------- Everything should be made as simple as possible, but not simpler -A.E. 57 Gallon RImless build in progress check the thread before if becomes boring and just full of nice pictures of colorful coral! |
Posted By: rufessor
Date Posted: January 30 2012 at 3:10pm
Here is the full tank shot with the canopy finally suspended. I tied up all the wiring so its now just the single black wire guide hanging down the back... might paint it to match the wall.... 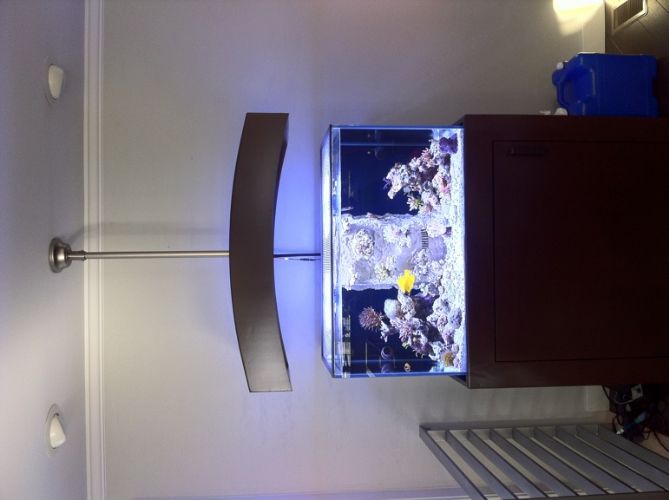 ------------- Everything should be made as simple as possible, but not simpler -A.E. 57 Gallon RImless build in progress check the thread before if becomes boring and just full of nice pictures of colorful coral! |
Posted By: phys
Date Posted: January 30 2012 at 4:51pm
| Looks awesome! I say kill the stainless rim. Right now it looks like its floating which is a cool effect to have there. |
Posted By: Ahanix
Date Posted: January 30 2012 at 6:56pm
No stainless rim, that's the water level Tanks looking great! |
 phys wrote:
Posted By: will
Date Posted: February 01 2012 at 9:02am
|
white? ouch... for the record it was very much so blue when it went out the door but it does do look white when it pulls in it's polys when it is moved try spraying it down with a turkey baster so you'll believe me i am very glad to hear it is doing good though
 |
Posted By: rufessor
Date Posted: February 01 2012 at 9:45am
|
No problem. It probably didnt like the transfer and travel. Its doing fine! I didn't mean to say anything about the source just that I was happy that its coming around. Not usually but occasionally we all get new corals in our tanks that for whatever reason did not like the move. Its looking better every day and I am sure will be fine! I was so worried about the LED intensity I kept it low and either the flow or the light were not to its liking. Its now under MUCH higher intensity light and pretty turbulent flow and seems much happier with its current position. I cannot wait for it to fully color up and start growing new tips! ------------- Everything should be made as simple as possible, but not simpler -A.E. 57 Gallon RImless build in progress check the thread before if becomes boring and just full of nice pictures of colorful coral! |
Posted By: will
Date Posted: February 01 2012 at 9:53am
|
lol right on dude i wish i knew how to put together some LEDs like that it is looking sooo good man i'm super jealous
|
Posted By: rufessor
Date Posted: February 01 2012 at 10:01am
|
I am not going to say the the build is "easy" as you do end up with a lot of components if you want to run PWM dimming and its all a bit much to take in from zero experience, but it does not require much more than a little planning and some careful work with a soldering iron. I would be happy to help anyone who wanted to it with advice and even a bit of practice soldering etc. I am a bit surprised how dominant the white LEDs are but I am running them all at equal PWM outputfor now. Once I get to 80% PWM in amonth or so I will then adjust the blues a little higher to tune color but its really very nice as is. If your interested just PM or call. We can get a parts list together that will be comprehensive and then its just a matter of ordering and going slow so the build works out! ------------- Everything should be made as simple as possible, but not simpler -A.E. 57 Gallon RImless build in progress check the thread before if becomes boring and just full of nice pictures of colorful coral! |
Posted By: will
Date Posted: February 01 2012 at 11:02am
|
very nice that is way cool of you you are a good man
|
Posted By: AquariumGuy
Date Posted: February 20 2012 at 12:24am
This is by far my favorite tank set up i have seen. Great Job. ------------- �A black belt only covers two inches of your ass. You have to cover the rest.� - Royce Gracie |
Posted By: skimace7
Date Posted: February 20 2012 at 9:01pm
|
very impressive... ------------- 120 gallon mix Reef mainly SPS and LPS... |
Posted By: rufessor
Date Posted: February 21 2012 at 11:22am
|
I finally have a few pictures that came out sorta OK... Thanks for the comments! We are enjoying it quite a bit... Having some weird (self inflicted no doubt) lighting issues with my controller program (which I am in the process of redoing in C++ while teaching my self the language...) But nothing that just powering on and off does not fix... I will try to post a few pics tonight. Looking for another fish, everything seems to be doing fine, its been some weeks since the last fish was added and the skimmer ouput has increased a bit but is by no means heavy. Since everything still has some growing to do I think this next fish will likely be our last for a good long while (if everyone keeps doing well and no deaths occur). ANy ideas for a fish that will be in and out of the rock work, colorful and reef as well as INVERTEBRATE safe. Would DEALY like a trigger (hahaha), a Wrasse (yeah... right... the colorful ones have been known to decimate shrimp (tried a mystery and corris = no shrimp/crabs/pods/worms in tank)... so thinking of a cool dottyback- Colorful- Check Shirmp safe- CHeck Reef Safe- CHeck Swims in rocks/caves- I think... Any ideas???? not going to go for fish over about 40-50 bucks... so a bit limited here. ------------- Everything should be made as simple as possible, but not simpler -A.E. 57 Gallon RImless build in progress check the thread before if becomes boring and just full of nice pictures of colorful coral! |
Posted By: rufessor
Date Posted: June 13 2012 at 10:30am
|
Ok... so I looked at my thread... so sad no pics or updates for a while. I am amazed at how fast things grow... so I will be posting some pics this weekend. But I wanted to update what I have been doing. I got a ReefAngel controller and started to teach myself C++... well.... I kinda went off the deep end and ended up implementing a pretty interesting lighting control software. I have 5 channels of custom LED. 2 blue/gree, 2 white, and 1 royal blue. These are on a PWM (pulse Width Modulation) control module (from ReefAngel) that is basically an Arduino processor with the standard PWM channels wired out from the processor to a wiring channel that feeds the 0-10V PWM signal to the drivers (MeanWell). Anyhow. I decided I was going to go for broke.... Here is what I ended up with. I wrote a program that calculates precise (within about 1-2 minutes) sun rise and sunset times for any place on the planet using latitude and longitude coordinates. This is then used to start the light sequence which is modeled on the intensity of solar radiation using a cosine function. Basically... if you put a photo detector on the surface of the planet in the sun, the intensity of light from sunrise to sunset follows a cosine function. So, in my program you simply set the flicker point for your LEDs (the PWM output at which they start to flicker at the very lowest end of their output. Then you also tell the program what the MAX output for any channel is. I also implemented offsets, so if you want blue to start say 1 hour prior to actual sunrise, the program will start them early and also can set them late (this is available for any channel and uses seconds of offset so you can control the lights down to the second in terms of timing of rise/set. Then, for whatever the time of the rise is for a given channel- I calculate what the midday point is (i.e half way between rise and set) and set up a linear slope that goes from 0-1 over the course of the first half of the day and 1->0 over the second half of the day. This is fed as a decimal fraction to get the cosine function to work properly and results in light intensity shifts (every 3 seconds... more is not necessary) following normal solar insolation. At midday ALL the channels are precisely at their MAX intensity and then start their retreat to sunset over the second half of the day. By calculating slope based upon the true half day length of every channel (my blues are about 2 hours longer on the second half for night vieweing and set later than the whites) I produce stable color mixes. I then implemented a cloud program. It randomly calculates if the day is cloudy, how many clouds there will be and then randomly programs them to occur throughout the day. The cloud effect takes the intensity set point and then starts a random walk so the light over the tank shifts up and down with the right side getting the change first, then 400 msec later the left side takes on the right side values while the right side gets a new value. So it looks like a cloud is passing over the tank. I also implemented storms... I have what amounts to a random storm generator. When each cloud is started it is randomly assigned the ability to have 0-1- or 2 storms. A storm is triggered if the random walk in intensity for the cloud hits the lowest possible light setting X number of times. When a storm happens its severity is randomly calculated with severity being higher in the afternoon (randomly but the limits increase so severe storms are more frequent). A "normal storm" dims the white channels to 10% of their current insolation setting (brightness during the day) and then continues with the intensity variation random walk as for a cloud but with 300 msec updates so the light changes faster. Then within a storm a lightning sequence is randomly generated with frequency dependent upon the severity of a storm. The lightning sequence is a random sequence of strikes (from 2-10 strikes) with the strike duration being between about 50-150 msec with a delay between strikes of 220-1300 msec (random). Each strike is all white channels going to near full intensity (80-100% random) for the duration (50-150 msec) and then off for the delay (220-1300 msec) and then the next strike occurs. For severe storms, the white channels are shut down and only blues are on, lightning is much more frequent and uses the white channels only. Its working amazingly well. I will update this post with a link to a you-tube video I took of an early version storm sequence... its even better now! Its really really cool.. The best part, is I swear that the corals are behaving differently. As the light starts to head toward sunset you can see polyp extension VASTLY increase as many of the corals extend polyps for night filter feeding, they seem to have even better color and the tank just in general is super fun to watch now. Its really cool to take a build from parts to controller and then program up the controller to make a nice natural light simulation pattern on the tank... that the corals appear to be responding to what is very close to a real light pattern is a bonus I was not expecting. Even the acropora have beautiful LONG polyp extension late in the day (they look fine all other times too but I am fairy certain I am not imagining this. So awesome. If anyone has a reef angel... I will share the code. There is a 20 page thread on its development at ReefAngel.com and its in use across the globe. Some of the first people to try it were in South Africa and India. Awesome. ------------- Everything should be made as simple as possible, but not simpler -A.E. 57 Gallon RImless build in progress check the thread before if becomes boring and just full of nice pictures of colorful coral! |
Posted By: rufessor
Date Posted: June 13 2012 at 10:52am
|
video of storm here http://youtu.be/jEOpuVZ__Ik ------------- Everything should be made as simple as possible, but not simpler -A.E. 57 Gallon RImless build in progress check the thread before if becomes boring and just full of nice pictures of colorful coral! |
Posted By: rufessor
Date Posted: June 13 2012 at 11:48am
|
Video of cloud dimming here... its actually much nicer in person... this is my phone and its not possible to set an exposure so its autoexposure is nearly as fast as the dimming so it evens our the intensity variation A LOT... in person its really cool looking... http://youtu.be/XpmG90fF7Jc ------------- Everything should be made as simple as possible, but not simpler -A.E. 57 Gallon RImless build in progress check the thread before if becomes boring and just full of nice pictures of colorful coral! |
Posted By: BobC63
Date Posted: June 13 2012 at 12:18pm
|
PLEASE get those new pics up SOON!!!
------------- - My Current Tank: 65g Starfire (sitting empty for 2+ years) - * Marine & Reef tanks since 1977 * |
Posted By: rufessor
Date Posted: November 12 2012 at 11:21am
|
Ok... Its only been about 5 months since I posted anything here about the tank. Well... things have been growing just a *bit*.... Here are three pics unaltered or adjusted for any color taken with my iPhone, they are actually quite good in terms of the true color of the tank, but its much better in person, but really... not bad pics for a phone! I have been running a dirt simple maintenance routine, I change about 7 gallons of salt every 2 weeks +/- (whenever I run through the 24 gallons of top off water and need to get more). I run 7 Tbsp of Kalk Paste mixed into 7 gallons of RO water with 3-4 Tbsp of grocery store white vinegar as ATO water. My ATO is a continuous duty persitaltic pump I have tuned to match evaporation rate. I supplement a few tsp of Mg a week (when I remember which is quite variable) as well as 3-4 tsp/week of Reef Fuel. Thats it asside from scraping the tank with a razor to get the spots of Coraline off the glass. Only need to do that every month or so... but its necessary. I have a few macros in there, a mermaids finger is currently needing a hair cut (I go through and prune out a few hundred of those things every couple months to keep then in control). To many corals to list and a number you cannot even really see even in these pics. 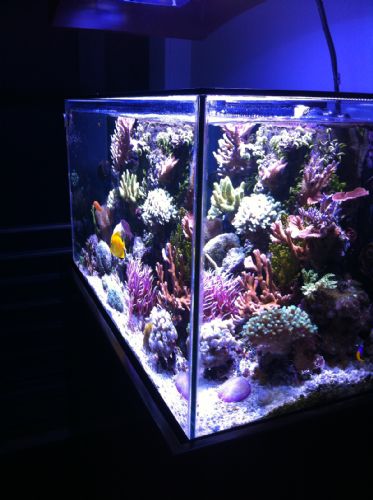 Here is another r  and Finally a full tank shot.  Its GORGEOUS under Actinic only... AMAZING colors- stunning really. I am so unbelievably surprised at how nice this is growing in an how "easy" it is. The only coral thats being a pain in the butt is a single Rose Millepora... but thats maybe kinda starting to come around... Decided my maintenance is exactly what its ever going to be and so if something does not like the tank, I move it around until it does or wait it out but if its doing poor, don'd add more of the same type cause maybe just maybe I need to work harder to get the really really hard stuff to thrive... or maybe its just one case, but either way, 99% of what I have put in there is growing like a weed!
------------- Everything should be made as simple as possible, but not simpler -A.E. 57 Gallon RImless build in progress check the thread before if becomes boring and just full of nice pictures of colorful coral! |
Posted By: BobC63
Date Posted: November 12 2012 at 11:28am
|
Wow - that is SWEET!!!! ------------- - My Current Tank: 65g Starfire (sitting empty for 2+ years) - * Marine & Reef tanks since 1977 * |
Posted By: rufessor
Date Posted: November 12 2012 at 11:42am
|
Thanks- I was just looking at the last prior pics... you should know that I have not added a single rock to the tank, its all coral growth filling in that vast open space of the prior pics :) ------------- Everything should be made as simple as possible, but not simpler -A.E. 57 Gallon RImless build in progress check the thread before if becomes boring and just full of nice pictures of colorful coral! |
Posted By: phys
Date Posted: November 12 2012 at 1:02pm
| congrats and applause for the time and effort spent on the lighting and the coding! Your tank looks beautiful and I'm sure you feel the time spent on the set up is well worth it! |
Posted By: Deluxe247
Date Posted: November 15 2012 at 1:06pm
|
That's all just coral growth in he last 10 months?! Congrats! ------------- 90G Mixed Reef |
Posted By: Dionysus
Date Posted: November 15 2012 at 1:13pm
|
Cant wait to see the growth in another year, crazy how well its growing in. How are you liking the bubble magnus?
------------- AquaMedic 250 Watt XM 20k 2 420s Vhos 29 DT SPS Dominant 20 G Long Frag http://utahreefs.com/forum/forum_posts.asp?TID=56607&title=dionysus-tank-build" rel="nofollow - My Tank Progress =) |
Posted By: Akira
Date Posted: November 16 2012 at 1:11am
| I only have 1 or 2 comments. What a fantastic build !!!! And plug and play lights dont have s@@@ on you!!! Sorry for the @@@ |
Posted By: kellerexpress
Date Posted: November 16 2012 at 2:11am
|
Growing in nicely! ------------- IM 30L Kessil A160we x2 |
Posted By: rufessor
Date Posted: November 16 2012 at 5:04pm
|
Thanks everyone- I have a funny story... I wrote the code for the lighting and was constantly updating it etc etc and had left the Arduino processor board with the PMW output sitting behind the tank with the USB cable wired onto the processor so I could just plug in my computer and load up the newest version without having to take the plastic housing apart every time I needed to get at the board to load something new. Anyhow, I got it finished and had it running for some months but neglected to ever replace the plastic cover on the computer board... well... I got a red tooth trigger... and then the program started acting increasingly odd and I figured I had a bug so went through the code, even posted on line that there may be an issue as others are using it... and finally one day my processor stopped comm with my computer... I looked back there to figure out what the HECK was up.. and it turns out my red tooth trigger likes to play in the power head ouput on the back left of the tank and was spraying salt water (little bits at a time) onto the processor and shorted out a few pins!! Anyhow, I finally ordered a new one and it should be here today. DAMN FISH! That's it- any one want a red tooth!!!!! Just kidding.... he is staying for now (my other fish have some ragged fins so may not be long for the tank). Anyhow, I looked... move in to the tank was Nov 28 2011 so growth pics are almost exactly 1 year. I have to say, looking back to the first shot I posted, I almost don't believe the growth, seriously... but its real and if I added anything it would have been 1 inch frags that have been there even less time... however its been many months since I added coral. ------------- Everything should be made as simple as possible, but not simpler -A.E. 57 Gallon RImless build in progress check the thread before if becomes boring and just full of nice pictures of colorful coral! |
Posted By: Dionysus
Date Posted: November 19 2012 at 12:30pm
|
Seeing the before pictures as everything as frags, and checking your tank out in person. Damn thats some crazy growth!!
------------- AquaMedic 250 Watt XM 20k 2 420s Vhos 29 DT SPS Dominant 20 G Long Frag http://utahreefs.com/forum/forum_posts.asp?TID=56607&title=dionysus-tank-build" rel="nofollow - My Tank Progress =) |
Posted By: rufessor
Date Posted: December 13 2012 at 1:55pm
|
Thanks- Good luck with your LED actinic supplementation build! PM me with any Q's I didnt think to answer in your post. Its SO WORTH GOING LED! I have been playing with the Light program a tiny bit... noticed that as the day lenght shortens I was seeing some of the Zoas start to "reach" for the light. They get extended necks and try to find light, and one monti was going a tiny bit brown (hardly brown but just note that coloration was changing) at the same time some of the real high Acros, like Tyree Pink Lemonade and Red Planet were actually coloring up and looking SWEET.... so I figured that I was probably partially bleaching things during the summer with the long days and under lighting now with the short days. So- I re-did part of the program and now it enforces a minimum day length to 12.5 hours, if the rise and set of the sun are closer together than that the program adds back time to bring the day length to 12.5 hours, but I do it assymetrically such that more time is added to the sunset than is subtracted from sunrise since I view the tank more at night after work... This is now running and I expect colors to get even better now as the real low off to the very edge of the tanks (this is where I see reaching) should gain just enough light to remain happy- while the center should not be bleaching. To correct the summer intensity- since I really like having the tank match the sun, I decided to calculate the % length of the day over 12.5 hours, which is 45,000 seconds, so if I have a day that is 49,500 seconds long, e.g. 4,500 seconds greater than 45,000 the tank MAX intensity is downgraded by exactly that % in intensity output, so this way- since I am using PWM dimming and the dimming is obtained by flashing the lights at a pre set max current (each string is different to match the LED type) by reducing the flash on time from 100% to 90% I should deliver pretty much exactly 10% less PAR... So- now during the summer and winter every single day should yield damn close to the same PAR over the tank but with very different light on intervals. No way to know if this is going to work other than simply let it go and watch the tank as the seasons change. Should be an interesting experiment, I am not aware of anyone anywhere doing this... I kinda sorta started this thinking I wanted to simulate the yearly PAR variation on a reef but in actuality asside from cloud cover equitorial reefs probably see little seasonal variation as the sun angle is minimally altered there... I was curious if I would ever in a million years see a spawn event by matching seasonal light variation... I kinda doubt I actually have even close to the PAR of an equitorial reef.... but my tank is only 24 inches deep and some corals are literally growing out of the water and those were bleaching so I feel like I had to do something to fix this in the summer... so for now I will see if this works. I wonder what my PAR is at the water line? Must be pretty damn high to bleach a Tyree pink lemonade and a Red Planet (not fully, but they go real faint pink in the summer, in the winter (like now) they are GORGEOUS! So I want to see if I can hold this coloration or even improve it!!! LOVE THE ABILITY TO CHANGE THINGS and with PMW and 5 channels... its almost too much to tinker with even for a tinker like me! :) ------------- Everything should be made as simple as possible, but not simpler -A.E. 57 Gallon RImless build in progress check the thread before if becomes boring and just full of nice pictures of colorful coral! |
Posted By: rufessor
Date Posted: December 17 2012 at 2:45pm
|
Check out the hammer!  and the Green Pocclipora 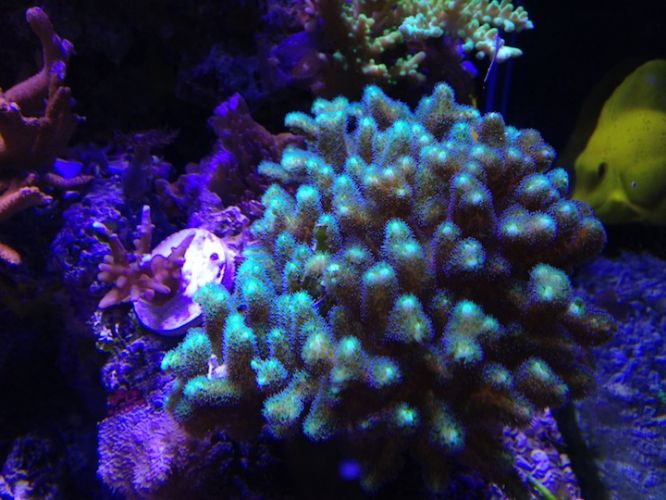 and this very cool acro under 475/450/405 nm LED only  ------------- Everything should be made as simple as possible, but not simpler -A.E. 57 Gallon RImless build in progress check the thread before if becomes boring and just full of nice pictures of colorful coral! |
Posted By: Dionysus
Date Posted: December 17 2012 at 8:42pm
|
I'm letting you down on the led build, I decided to go with vhos just because the halide light would fry the leds. But thanks for all your help! As always great looking tank! ------------- AquaMedic 250 Watt XM 20k 2 420s Vhos 29 DT SPS Dominant 20 G Long Frag http://utahreefs.com/forum/forum_posts.asp?TID=56607&title=dionysus-tank-build" rel="nofollow - My Tank Progress =) |
Posted By: 08TRDOFFROAD
Date Posted: December 20 2012 at 2:38pm
| How far are you LED's off the water? |
Posted By: rufessor
Date Posted: December 20 2012 at 3:20pm
|
it varies a little bit because my hood is arced but around 15 inches or so. I can fit my head between the tank and the suspended canopy to look down into the tank, but it is not roomy under there! ------------- Everything should be made as simple as possible, but not simpler -A.E. 57 Gallon RImless build in progress check the thread before if becomes boring and just full of nice pictures of colorful coral! |
Posted By: Dionysus
Date Posted: December 20 2012 at 10:32pm
|
Hows the color since you dropped your par a little? Has it improved?
------------- AquaMedic 250 Watt XM 20k 2 420s Vhos 29 DT SPS Dominant 20 G Long Frag http://utahreefs.com/forum/forum_posts.asp?TID=56607&title=dionysus-tank-build" rel="nofollow - My Tank Progress =) |
Posted By: rufessor
Date Posted: December 21 2012 at 11:11am
|
I actually modified the program to enforce a minimum day length since the sun rise and set are like 7-5 ish now days thats only 10 hours of light and I was noting that I was loosing some of the intense colors on a few corals (a few actually gained colors- those that were literally inches below the water were probably bleaching a bit during the summer) and that some of the Zoas way down low were getting long necks "reaching" for the light.... so my program now enforces 12.5 hours of light as the minimum period and after a week or so of running this my intense pink is back and the Zoas have shrunk down to their normal size so I believe its now dialed in pretty well. Very curious if over the summer, as the program begins to compensate for longer day lengths (over 12.5 hours) by reducing the PWM dim set points throughout the day if I can avoid the bleaching while also maintaining intense coloration. ------------- Everything should be made as simple as possible, but not simpler -A.E. 57 Gallon RImless build in progress check the thread before if becomes boring and just full of nice pictures of colorful coral! |
Posted By: Dionysus
Date Posted: December 21 2012 at 2:07pm
|
Your tank will soon have robotic arms, a force field, and reverse gravity. haha ------------- AquaMedic 250 Watt XM 20k 2 420s Vhos 29 DT SPS Dominant 20 G Long Frag http://utahreefs.com/forum/forum_posts.asp?TID=56607&title=dionysus-tank-build" rel="nofollow - My Tank Progress =) |
Posted By: rufessor
Date Posted: March 15 2013 at 1:18pm
|
Well... I will be adding some more pics, its growing out yet more and I have moved a couple things and introduced a few new frags. Happily, after over a year of my rose millepora basically doing nothing, moving it around to about 4 different spots, etc its finally now getting good polyp extension and coloring up!! MAN what a PICKY coral! Anyhow, my code modifications to the lighting worked and coming out of the depth of winter all the corals kept great color and the light cycle is now back to matching sunrise and sunset since the day length has come up to the point where it meets my minimal light period requirements. In a month or so I will be able to see if I need to mod things a little bit more to avoid the peak summer light period bleaching that was happening but things look great so far. Colors are probably about as good as they ever have been in the tank. I played yet more with the lighting program and decided that I really like the cloud effect but had been limiting it to about 20-30 % of the day. No longer, I now have it set up so that the % of the day with light intensity variation can be as much as about 80% and further introduced a random component that shifts the color balance on the tank as the intensity changes during a cloud, its kinda cool. Now the tank produces beautiful light intensity variation (its so smooth it looks like a cloud going over head) but coupled with that is a random variation between the two color channels (basically a white and a blue) so that sometimes the tank takes on a more stark blue dominant white while other times it shifts to a more warm white dominant color... its awesome! Pics soon! ------------- Everything should be made as simple as possible, but not simpler -A.E. 57 Gallon RImless build in progress check the thread before if becomes boring and just full of nice pictures of colorful coral! |
Posted By: BillyC
Date Posted: March 15 2013 at 2:09pm
| Looking forward to seeing that rose mille man! I'm surprised you've had such a hard time getting it to grow if it's the one that I'm thinking of. I know at least 2 other people who got a frag and they have colonies now lol. |
Posted By: BrentD
Date Posted: March 15 2013 at 7:02pm
|
Awesome stuff man, let me know if you ever cut frags;) ------------- http://utahreefs.com/forum/forum_posts.asp?TID=61713&title=brentds-rsm-250" rel="nofollow - My RSM 250 Thread |
Posted By: Tanuki
Date Posted: March 15 2013 at 7:49pm
|
I like the tank/ light a lot. Very cool. ------------- Defending Reefscape Champion (I Think) |
Posted By: grassfairy
Date Posted: March 15 2013 at 8:03pm
| How big was that hammer when you first got it? |
Posted By: Dionysus
Date Posted: March 15 2013 at 9:23pm
|
I think a fts is needed to show the beauty of this tank! ------------- AquaMedic 250 Watt XM 20k 2 420s Vhos 29 DT SPS Dominant 20 G Long Frag http://utahreefs.com/forum/forum_posts.asp?TID=56607&title=dionysus-tank-build" rel="nofollow - My Tank Progress =) |