Tcfabs Rimless Tank Build Thread.
Printed From: Utah Reefs
Category: Specialized Discussion
Forum Name: DIY
Forum Description: Do it Yourself
URL: http://www.utahreefs.com/forum/forum_posts.asp?TID=39713
Printed Date: June 11 2026 at 11:36am
Software Version: Web Wiz Forums 12.03 - http://www.webwizforums.com
Topic: Tcfabs Rimless Tank Build Thread.
Posted By: tcfab
Subject: Tcfabs Rimless Tank Build Thread.
Date Posted: March 23 2010 at 9:03pm
Well I just got my new tank today and thought I would start my build thread I will update as I go. I will update as I go. Tank- Miracles in Glass, custom built 48"long x 30" deep x 22" tall Rimless with Starphire front and ends 125 gallons total. The stand will be 2x2 steel frame and a flat black modern cover. Sump- Elite Aquatics 45"x24"x15" acrylic with refugium. Skimmer- Elite Aquatics custom built triple cone skimmer. Light- This will also be built by me, custom aluminium fixture 8x54 watt t-5's with ATI reflectors, 4 Cree LED moonlights, Phillips HO ballasts, 2 cooling fans. Controller-Apex. Powerheads-(2) Vortech MP-40's Calcium Reactor- Elite Aquatics 6" tube x 20" tall with Eheim pump. ------------- Need custom acrylic work? give me a call, www.Elite-Aquatics.net (801)645-6386 |
Replies:
Posted By: CapnMorgan
Date Posted: March 23 2010 at 9:05pm
Great to see you dive in! I'll be following your progress closely!  ------------- Steve http://utahreefs.com/forum/forum_posts.asp?TID=40637&PID=356246" rel="nofollow - My Old 180G Mixed Reef Currently: 120G Wavefront Mixed 29G Seahorse & Softies Running ReefAngel Plus x2 435-8 |
Posted By: fishoutawater
Date Posted: March 23 2010 at 9:06pm
|
Wow, looks like you are setting the bar pretty high on this one. ------------- Some day, when I grow up,... |
Posted By: badfinger
Date Posted: March 23 2010 at 9:15pm
| Ya man, that's sick!.. just wow |
Posted By: BobC63
Date Posted: March 23 2010 at 9:18pm
|
Those are some sharp looking pieces of equipment ------------- - My Current Tank: 50g Starfire Cube Reef * Marine & Reef tanks since 1977 * |
Posted By: Jasob
Date Posted: March 23 2010 at 9:22pm
|
Looks like a strong start! Someday I hope to have the patience to setup a tank with a little less spontaneity than usual. ------------- Jason Tooele, UT |
Posted By: tcfab
Date Posted: March 24 2010 at 7:47am
Thanks guys
|
Posted By: MadReefer
Date Posted: March 24 2010 at 8:14am
| Nice stuff. I'll be watching this build. |
Posted By: Deluxe247
Date Posted: March 24 2010 at 9:34am
|
Sounds like you got mad skills when it comes to fabricating equipment. I love to watch tank builds and this one looks like it will be fun to watch! ------------- 90G Mixed Reef |
Posted By: jmorrell
Date Posted: March 24 2010 at 10:25pm
|
This will be a cool build thread. I love rimless tanks. How thick is the glass? |
Posted By: laynframe
Date Posted: March 24 2010 at 10:37pm
|
It's 3/4" Starfire glass, I'm jealous!! ------------- The time we enjoy wasting isn't wasted time!!!! |
Posted By: tcfab
Date Posted: March 26 2010 at 7:06pm
|
. ------------- Need custom acrylic work? give me a call, www.Elite-Aquatics.net (801)645-6386 |
Posted By: CapnMorgan
Date Posted: March 26 2010 at 9:40pm
|
Lookin good! ------------- Steve http://utahreefs.com/forum/forum_posts.asp?TID=40637&PID=356246" rel="nofollow - My Old 180G Mixed Reef Currently: 120G Wavefront Mixed 29G Seahorse & Softies Running ReefAngel Plus x2 435-8 |
Posted By: Fishfinder07
Date Posted: April 05 2010 at 4:32am
|
Update please |
Posted By: downhill_biker
Date Posted: April 05 2010 at 7:24am
|
Wow Tyler, this is going to be an amazing build. Do you have a sketch or diagram of how you want to do the rock work? Do you know how you will light it and what kind of corals you intend to keep?
------------- Make sure you post your best pictures every month in our POTM forum. |
Posted By: tcfab
Date Posted: April 05 2010 at 7:56am
| Not much to update yet, I have been busy with another project. Hopefully I will start building the stand real shortly, I will post pics as I am building it. Curtis, I would like the rock work really simple and open it is going to be dry Key Largo rock from Marco Rocks. Light is going to be 8x54 watt t5's, not sure what bulbs yet. The tank will be mostly sps. |
Posted By: tcfab
Date Posted: April 10 2010 at 1:15pm
|
Got all my probe holders done and the saftey float switch in for the ATO.
------------- Need custom acrylic work? give me a call, www.Elite-Aquatics.net (801)645-6386 |
Posted By: MadReefer
Date Posted: April 10 2010 at 1:41pm
|
Beautiful |
Posted By: CapnMorgan
Date Posted: April 11 2010 at 3:16am
|
Amazing! To say this tank is going to be awesome would be an understatement! ------------- Steve http://utahreefs.com/forum/forum_posts.asp?TID=40637&PID=356246" rel="nofollow - My Old 180G Mixed Reef Currently: 120G Wavefront Mixed 29G Seahorse & Softies Running ReefAngel Plus x2 435-8 |
Posted By: Nick801
Date Posted: April 11 2010 at 4:03am
It Looks great but I'm a little confused... any chance you could you explain the water flow a bit? wheres the return pump going to sit... ? I'm assuming the back left side of the refugium area or? but with the way it looks its throwing me off just a bit I'm imagining the water comes down into those socks.... to the skimmer area then to the calcium reactor area... but then to get into the fuge the water level would have to be higher than that bubble catch right before the calcium reactor?... so wouldent that make that bubble catch pointless? or am I seeing this wrong =)? thanks in advance for the explanation ... can't wait to see this thing set up =) ------------- http://www.reefinsanity.com" rel="nofollow - www.ReefInsanity.com http://www.facebook.com/ReefInsanity" rel="nofollow - www.Facebook.com/ReefInsanity 801-680-4676 |
 tcfab wrote:
Posted By: downhill_biker
Date Posted: April 11 2010 at 10:22am
|
^I see what you mean nick. Maybe he is having 2 drain lines? I am really confused. And at that water level you would run the risk of flooding big time if power went out. Not sure how the fuge works. Everything else looks amazing.
------------- Make sure you post your best pictures every month in our POTM forum. |
Posted By: kody72
Date Posted: April 11 2010 at 10:40am
|
I bet he's gonna t off 1 of the 2 drain into the fuge and the return pump will go next to the reactor ------------- http://www.utahreefs.com/forum/forum_posts.asp?TID=60612&title=kody72-fishroom" rel="nofollow - KODY72 FISHROOM BUILD 281g DT 187g Rimless Frag ATI PM lighting SRO DSCR-300ext 8013908179 |
Posted By: CapnMorgan
Date Posted: April 11 2010 at 11:39am
|
I bet you're right Kody ------------- Steve http://utahreefs.com/forum/forum_posts.asp?TID=40637&PID=356246" rel="nofollow - My Old 180G Mixed Reef Currently: 120G Wavefront Mixed 29G Seahorse & Softies Running ReefAngel Plus x2 435-8 |
Posted By: tcfab
Date Posted: April 11 2010 at 12:47pm
I am using the Herbie method for my drain system. The two holes on the front lefthand side of my sump are where the drain lines will be. That first chamber right under the drain lines, the water will fill up and (pour) into the filter socks and into the skimmer chamber. This makes taking out the filter socks WAY easier then if there is a tube going down the middle of them. The water then flows past the skimmer through the bubble trap and into the next compartment where the calcium reactor is. This is my return area (still havent put my ATO float in). The pump is a Reeflo Dart external pump, so all that is going to be in the return area for the pump is a bulkhead. The whole back of my sump is my fuge. I am going to have a manifold on my return plumbing to feed my carbon reactor, phosphate reactor, calcium reactor and also supply water to the fuge in the back left hand side of the sump from a bulkhead on the top eurobrace. The water will trickle down the teeth you see on the white divider of the sump in the right hand corner. By doing this I am not feeding the fuge with "raw" water and making it a waste dump. The water level in the front chamber is 9" and the fuge will be 15" that leaves me room for 23 gallons of water in the front compartment for when the pump is shut off or in the event of power failure. My tank will only dump around 8-9 gallons of water when the pump is shut off or in the event of a power failure, so I have more then enough room for when this happens. I hope I explained that so it makes sense 
|
Posted By: downhill_biker
Date Posted: April 11 2010 at 10:44pm
|
Sounds good. I was getting worried when I started looking at it, but you have it figured out. It's a little complex for me, but it will definitely serve the purpose.
------------- Make sure you post your best pictures every month in our POTM forum. |
Posted By: tcfab
Date Posted: April 11 2010 at 10:47pm
| LOL, it just sounds complex its really not. I will have to post pics of the plumbing when I get to that point and it will make more sense. |
Posted By: Corey Price
Date Posted: April 12 2010 at 12:03am
| Makes sense to me and looks good, although I hate filter socks. |
Posted By: tcfab
Date Posted: April 12 2010 at 7:58am
|
I thought I would give them a try, I know they can be a pain sometimes They sump can run without them too.
|
Posted By: Deluxe247
Date Posted: April 12 2010 at 8:47am
|
Filter socks are a double-edged sword. They're great for removing (or rather trapping) detritus and other unwanted particulate matter, and for that very reason they need to be changed frequently so they don't foul the water. I only run mine for a day or two at a time. Anyway, that's actually a very cool sump setup you've got there. I was confused too, but your explanation helped. It's good to see everybody's ideas to get inspiration for my next build (not any time soon). ------------- 90G Mixed Reef |
Posted By: downhill_biker
Date Posted: May 11 2010 at 12:27pm
|
Any updates on this Tyler? I have been anxiously awaiting more pics on this amazing build...
------------- Make sure you post your best pictures every month in our POTM forum. |
Posted By: tcfab
Date Posted: May 11 2010 at 7:31pm
|
No, I wish It has been put on temporary hold for the moment. My wife got laid off from work about 2 weeks ago so we are trying to be careful with our money for the moment. She just got a new job so I should be back at it again before to much longer.
|
Posted By: Ricordia
Date Posted: May 12 2010 at 10:15pm
|
Can you post any details about your DIY light fixture while we wait? :) I'm looking at replacing my MH system with an 8x54w T5 system and DIY sounds like the right route. ------------- Rich Allen Murray, UT 150g Leemar Starfire reef tank with a 40g sump 75g planted freshwater with tetras |
Posted By: tcfab
Date Posted: May 12 2010 at 11:29pm
| Are you wanting to build your own fixture or are you putting a retro inside a canopy? I really like the look of the Elos LED fixtures on there nanos and that is kind of the look I am going for on my t5 fixture. My whole fixture will be suported from the back of the tank from a curved piece of 2x6 aluminum mounted on my stand. It kind of gives the look of the fixture just floating above the tank. The fixture and mounting arm will be "brushed " and then clear coating to seal them to give them a modern look. |
Posted By: BobC63
Date Posted: May 13 2010 at 12:26am
|
Maybe you already explained this, and I missed it...
Is there a particular reason your Ca reactor is inside your sump?
Is it not an external - capable model?
Or is it a space (under the stand) issue?
P.S. - that sump really looks very, very sweet!
------------- - My Current Tank: 50g Starfire Cube Reef * Marine & Reef tanks since 1977 * |
Posted By: tcfab
Date Posted: May 13 2010 at 8:00am
|
The calcium reactor may not go in there not sure yet, I was just toying with the idea. Yeah it is an external model but it can go in the sump as well. The reason I thougt about doing it in sump is because if it ever leaked it would just stay in the system, also the sump is going in my crawl space which is kind of cold in the winter and the pump on the reactor is just free heat for winter time. We will have to see though, I am not 100% its going in there yet
|
Posted By: Ricordia
Date Posted: May 13 2010 at 8:14am
My current fixture is a suspended Aquaspacelight 2, so it will have to be a complete new build. I like the sound of the ATI powermodule system, but it doesn't appear to have any room for my moonlights. Are you planning to build your fixture from scratch or do you have an aluminum carcass already? ------------- Rich Allen Murray, UT 150g Leemar Starfire reef tank with a 40g sump 75g planted freshwater with tetras |
Posted By: tcfab
Date Posted: May 13 2010 at 8:31am
|
It will be built from scratch, I do alot of custom sheet metal work for cars so I have all the tools needed to build it. Let me know if you need help building yours, they are pretty easy. You could build your own powermodule for alot less. You can buy the ballast's and reflectors ATI uses from reefgeek.
|
Posted By: P.Kapp
Date Posted: May 13 2010 at 11:06am
| I really like your idea of the curved arm holding your light over your tank, and making it look like its floating. My ceiling is vaulted where I will be putting my new tank, and too high for my liking to run cords from the ceiling. I have been trying to think of a way to mount my light, while still keeping it looking clean. Do you have any pics of how you are going to build it? |
Posted By: tcfab
Date Posted: May 13 2010 at 7:30pm
I only have a drawing that I did to get an idea of what it will look like, I dont have a scanner though What kind of light are you using on your tank P.Kapp? What kind of light are you using on your tank P.Kapp?
|
Posted By: DanhNgo
Date Posted: May 13 2010 at 8:55pm
|
oh man. I really like the rimless tank. it's really clean looks. ------------- 200 Gal Reef 25 Gal Nano Reef |
Posted By: Ricordia
Date Posted: May 13 2010 at 9:14pm
The ceiling in my previous home was vaulted and I had my Aquaspacelight 2 hanging from it with no issues. Each cable was approximately 10 feet long and the fixture is heavy! I used drywall screws in the ceiling to hold the hanger hardware and it was in place for almost six years without any issues at all. ------------- Rich Allen Murray, UT 150g Leemar Starfire reef tank with a 40g sump 75g planted freshwater with tetras |
Posted By: P.Kapp
Date Posted: May 14 2010 at 10:45am
The light I have right now is a fixture with 3 250w halides with pc supplements. But im pretty sure im gonna sell it and get a 60" T5 setup, either ATI or tek. Im not so much worried about the cables holding, I just like the idea of the floating fixture. I dont want to steal your post, but i would really appreciate your help. Youre obviously pretty savvy with this stuff
|
Posted By: tcfab
Date Posted: May 14 2010 at 7:31pm
|
Your fine send me a PM with what kind of tank you have and also what your stand looks like (maybe a picture).
|
Posted By: tcfab
Date Posted: June 21 2010 at 11:41pm
|
Not to much to update just yet  Â I will be getting some stuff done real soon though. I started on building my phosphate and carbon reactors I will post pics soon. I did get me two Ecotech Marine MP-40ES today. Â I will be getting some stuff done real soon though. I started on building my phosphate and carbon reactors I will post pics soon. I did get me two Ecotech Marine MP-40ES today.------------- Need custom acrylic work? give me a call, www.Elite-Aquatics.net (801)645-6386 |
Posted By: kody72
Date Posted: June 22 2010 at 12:03am
|
how much flow will you have all said and done ------------- http://www.utahreefs.com/forum/forum_posts.asp?TID=60612&title=kody72-fishroom" rel="nofollow - KODY72 FISHROOM BUILD 281g DT 187g Rimless Frag ATI PM lighting SRO DSCR-300ext 8013908179 |
Posted By: tcfab
Date Posted: June 22 2010 at 12:21am
|
Each Vortech can do from 1000 gph to 3,200 gph of flow each. My return will flow around 1,200-1,500 gph.
------------- Need custom acrylic work? give me a call, www.Elite-Aquatics.net (801)645-6386 |
Posted By: partsguy247
Date Posted: June 22 2010 at 2:07am
|
I really like your build quality and the amount of thought you put into your tank. Looks really good.
------------- Yes my tank has a lot of actinic. Yes that is the way I like it. Yes that is the way it is going to stay. |
Posted By: tcfab
Date Posted: July 11 2010 at 12:39am
|
I got a little bored the other day and decided to build myself a self cleaning head for my skimmer, I have been wanting to build one for a little while now( I think they are a cool gizmo lol ). I still need to build the wiper arm and the rod assembly, I am waiting on some red acrylic so I will post when I get that made. The motor is out of a rottisserie add on to a bbq grill (walmart). Here is the stepper motor (after I took it out of the factory housing) and adding some set screws. 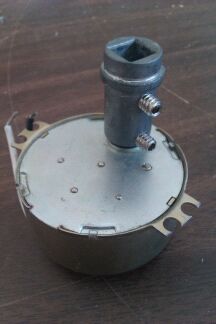 Here is the body (1.5 pvc coupler painted)  I had to make a bushing that goes around the motor to fit snug into the coupler. 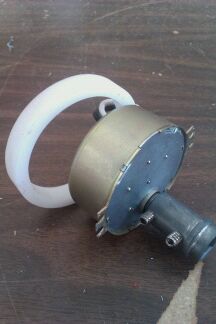 bushing on motor 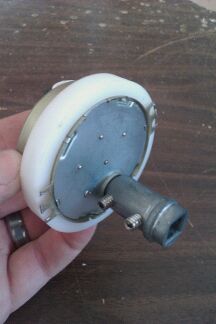 view of motor inside the new housing (coupler) top side 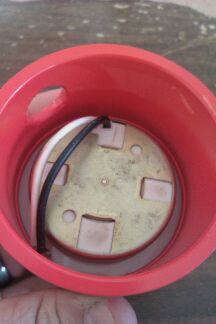 view from bottom side 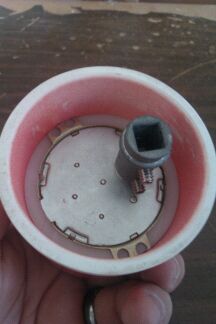 assembled 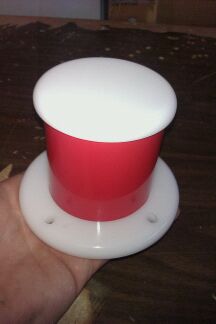 now all bolted up to the top of my skimmer lid.  ------------- Need custom acrylic work? give me a call, www.Elite-Aquatics.net (801)645-6386 |
Posted By: downhill_biker
Date Posted: July 11 2010 at 2:10am
|
That looks really good. So, this is cleaning the inside of the neck? or the cup? I think I would put a spray nozzle on it and have it spray down everything every couple hours, not sure though, and you are definitely the expert...
------------- Make sure you post your best pictures every month in our POTM forum. |
Posted By: SGH360
Date Posted: July 11 2010 at 2:47am
| awsome dude. im just a sucker of starting new tanks using everything new. Just like a new car and starting to add the first miles into it |
Posted By: tcfab
Date Posted: July 11 2010 at 10:32am
|
Thanks SGH. Curtis, it will wipe the inside of the neck down 2 times a day and will run for about 4-5 minutes each time. This will keep the crud from building up inside the the neck keeping performance up. Here is a pic of the Skim Clean neck, pretty much the same thing I am building now. http://glassbox-design.com/wp-content/uploads/2009/08/SkimClean-Detail.jpg">  http://glassbox-design.com/wp-content/uploads/2009/08/SkimClean-Universal-On.jpg">
 ------------- Need custom acrylic work? give me a call, www.Elite-Aquatics.net (801)645-6386 |
Posted By: kody72
Date Posted: July 11 2010 at 11:57am
|
u have way to much free time but lovin the build when i get rich ill have u build my setup ------------- http://www.utahreefs.com/forum/forum_posts.asp?TID=60612&title=kody72-fishroom" rel="nofollow - KODY72 FISHROOM BUILD 281g DT 187g Rimless Frag ATI PM lighting SRO DSCR-300ext 8013908179 |
Posted By: tcfab
Date Posted: July 11 2010 at 12:18pm
|
LOL, I just like building new stuff what can I say? ------------- Need custom acrylic work? give me a call, www.Elite-Aquatics.net (801)645-6386 |
Posted By: laynframe
Date Posted: July 12 2010 at 9:23am
|
speaking of likin to build stuff, we need to get crackin on my stuff little brother! ------------- The time we enjoy wasting isn't wasted time!!!! |
Posted By: tcfab
Date Posted: July 22 2010 at 11:22pm
Did some more work on the self cleaning head for my skimmer here is the final product.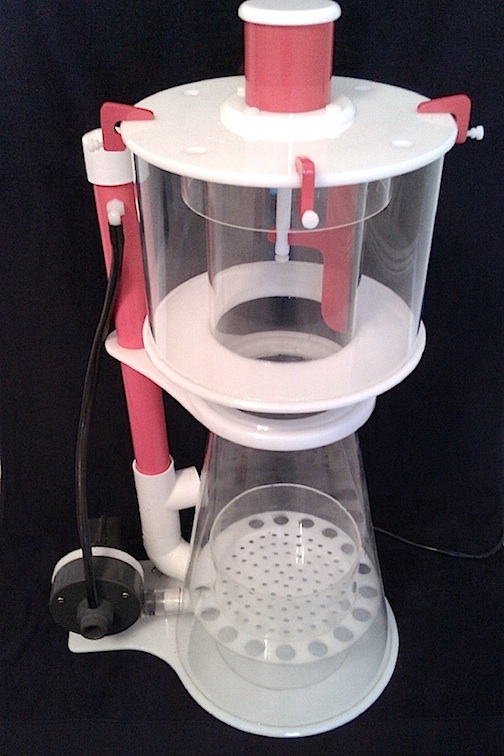 ------------- Need custom acrylic work? give me a call, www.Elite-Aquatics.net (801)645-6386 |
Posted By: Corey Price
Date Posted: July 22 2010 at 11:34pm
| Very nice, Tyler. |
Posted By: tcfab
Date Posted: July 22 2010 at 11:54pm
|
Thanks corey! ------------- Need custom acrylic work? give me a call, www.Elite-Aquatics.net (801)645-6386 |
Posted By: CapnMorgan
Date Posted: July 23 2010 at 5:32pm
|
Geez now I'm gonna have to have you build me one too! ------------- Steve http://utahreefs.com/forum/forum_posts.asp?TID=40637&PID=356246" rel="nofollow - My Old 180G Mixed Reef Currently: 120G Wavefront Mixed 29G Seahorse & Softies Running ReefAngel Plus x2 435-8 |
Posted By: tcfab
Date Posted: July 23 2010 at 10:59pm
|
Let me know, I could easily build you one ------------- Need custom acrylic work? give me a call, www.Elite-Aquatics.net (801)645-6386 |
Posted By: SGH360
Date Posted: July 24 2010 at 2:31am
| that is some fancy equipment love it |
Posted By: ejcatmul
Date Posted: October 22 2010 at 6:06pm
|
Wow, you must have an engineering degree. You could probably make a lot of $ with the talents you have, or at least make someone else a lot of Money. Very cool thread... ------------- "Noob" |
Posted By: Luckedout
Date Posted: October 22 2010 at 7:54pm
|
Where does the crud end up? Doesn't it just drop into the water?
------------- -Ben 90g Mixed reef www.body-balancechiropractic.com |
Posted By: downhill_biker
Date Posted: October 22 2010 at 8:28pm
|
I'm glad this thread got bumped. I am interested to hear about updates. I want to see this skimmer in action. Maybe a video of it self cleaning?
------------- Make sure you post your best pictures every month in our POTM forum. |
Posted By: CapnMorgan
Date Posted: October 22 2010 at 8:56pm
|
It does drop back down into the foam but it comes right back up and is collected with the skimmate. As slime builds up on the skimmer neck it becomes less efficient and removes lest waste. So a self cleaning head eliminates this and keeps your skimmer running as efficient as possible. ------------- Steve http://utahreefs.com/forum/forum_posts.asp?TID=40637&PID=356246" rel="nofollow - My Old 180G Mixed Reef Currently: 120G Wavefront Mixed 29G Seahorse & Softies Running ReefAngel Plus x2 435-8 |
Posted By: tcfab
Date Posted: October 23 2010 at 12:25am
|
ejcatmul, no I don't have an engineering degree lol, I wish though that would be nice. I somehow have some way of being able to just build stuff I see. As Steve said. The self cleaning head prevents build up inside the neck all together, so there is very little to no crud inside the neck. The wiper will be on a timer to come on 3-4 times a day for a few minutes each. Some skimmers skim really well when they are freshly cleaned, then as days go by and crud starts to build in the neck the performance slowly declines. This is supposted to keep it running great all the time, we will see. I hear great things from people who have self cleaning heads on their skimmers. Curtis, I will try and upload a skimmer video for ya when I get it up and going Their will be some updates pretty soon on my build. I will be ordering all my steel and aluminum next week for my stand and light fixture.
------------- Need custom acrylic work? give me a call, www.Elite-Aquatics.net (801)645-6386 |
Posted By: downhill_biker
Date Posted: October 23 2010 at 12:32pm
|
You a welder? If you need someone with some serious skills for some insane looking welds let me know. I have been said to have some of the better welding skills out there...lol...enough blowing my own horn...I look forward to those updates. This build is killing me with anticipation.
------------- Make sure you post your best pictures every month in our POTM forum. |
Posted By: tcfab
Date Posted: October 23 2010 at 1:55pm
Yeah, I know how to weld. I have been welding for a good 9-10 years Thanks for the offer though Curtis ------------- Need custom acrylic work? give me a call, www.Elite-Aquatics.net (801)645-6386 |
Posted By: smacky
Date Posted: October 23 2010 at 4:26pm
| How do sumps in crawlspaces do here in Utah? How much colder does the water get in the wintertime? |
Posted By: Jeffs_little_ocean
Date Posted: October 23 2010 at 5:57pm
|
Ive decided this is the coolest build thread ever! ------------- Life is good....right? |
Posted By: tcfab
Date Posted: October 23 2010 at 5:59pm
|
My crawlspace is right under my living room. It is all insulated with cement floor. I am framing off a small fish room in there that will also have a heat duct supply warm air to the room. ------------- Need custom acrylic work? give me a call, www.Elite-Aquatics.net (801)645-6386 |
Posted By: Luckedout
Date Posted: October 23 2010 at 6:15pm
|
My house is backwards. I have an old coal boiler converted to gas. That thing keeps the basement hot, middle floor perfect and the upstairs where my bedroom is at is freezing......
------------- -Ben 90g Mixed reef www.body-balancechiropractic.com |
Posted By: tcfab
Date Posted: October 30 2010 at 8:36pm
|
I finally have an update for you guys I got the stand all built today, I am sending it to get powder coated on Monday. I built it out of 1.5" square tubing with a .120 wall. I put shear gussets on all 4 legs.Tacking the metal in a jig. 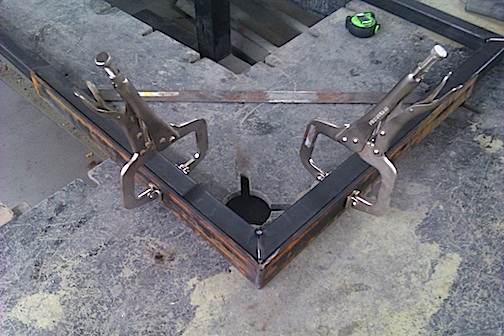 a weld  Shear gusset  and finally the completed stand, now off to powder coating 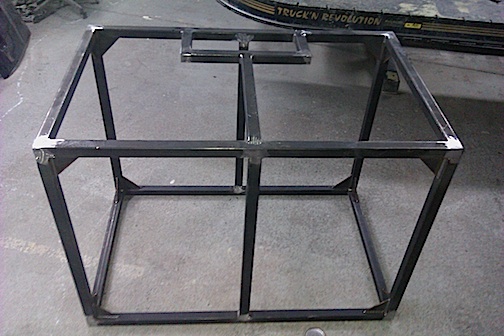 ------------- Need custom acrylic work? give me a call, www.Elite-Aquatics.net (801)645-6386 |
Posted By: Snowsrfr
Date Posted: October 30 2010 at 11:36pm
|
Looking good Tyler. ------------- "A fish tank is not a pet. It's a TV that you gotta feed." - John Caparulo |
Posted By: Nick801
Date Posted: October 31 2010 at 2:50am
|
hopefully you don't take this the wrong way... but if it was me Id take out that front middle leg I love having a steel stand with a fully open front =) either way no matter what you do I know it will be awesome but consider cutting out that front middle leg?
I'm pretty sure you could toss that thing off a 10 story building and it wouldn't do anything to it =)even with out those gusset ------------- http://www.reefinsanity.com" rel="nofollow - www.ReefInsanity.com http://www.facebook.com/ReefInsanity" rel="nofollow - www.Facebook.com/ReefInsanity 801-680-4676 |
Posted By: tcfab
Date Posted: October 31 2010 at 11:09am
|
I over build everything thats just how I am, I can't help it ------------- Need custom acrylic work? give me a call, www.Elite-Aquatics.net (801)645-6386 |
Posted By: downhill_biker
Date Posted: October 31 2010 at 5:06pm
|
Love the stand. It looks very professional and well built. Once it is powder coated it will look great.
------------- Make sure you post your best pictures every month in our POTM forum. |
Posted By: tcfab
Date Posted: October 31 2010 at 6:12pm
|
Thanks Curtis ------------- Need custom acrylic work? give me a call, www.Elite-Aquatics.net (801)645-6386 |
Posted By: kay181
Date Posted: October 31 2010 at 10:28pm
|
wow nice stand ------------- day light scares me im going back under |
Posted By: tcfab
Date Posted: November 01 2010 at 12:04am
|
Kay181, good eye That is a local guys car I just painted in Brigham City. It is a 55 chev post with a small block 350 and Weiand 671 blower sticking out of the hood
------------- Need custom acrylic work? give me a call, www.Elite-Aquatics.net (801)645-6386 |
Posted By: tcfab
Date Posted: November 05 2010 at 8:05pm
|
Just picked up my stand today, the powder coater did an awesome job I am very happy with it. I also picked up my aluminum to build my fixture today, I am using H32 5052 aluminum to make my fixture I should have it built by the end of this next week. Here is a pic of my stand   ------------- Need custom acrylic work? give me a call, www.Elite-Aquatics.net (801)645-6386 |
Posted By: Snowsrfr
Date Posted: November 05 2010 at 10:07pm
|
Purdy! Looks great Tyler. ------------- "A fish tank is not a pet. It's a TV that you gotta feed." - John Caparulo |
Posted By: backwards32
Date Posted: November 06 2010 at 12:50am
| Man all your stuff looks really good. need an apprentice? i have always been interested in building tanks |
Posted By: tcfab
Date Posted: November 10 2010 at 10:19pm
Made some progress on my light fixture housing today. These pics kind of suck, the light in my garage is not very bright at all. I am going to have my buddy tig weld the seams and I will sand the whole thing all the way to 2000 grit and then I will give it the brushed aluminum look and clear coat it. After that I can attach the arm bracket that holds it above the tank and install all the ballast, reflectors, end caps and bulbs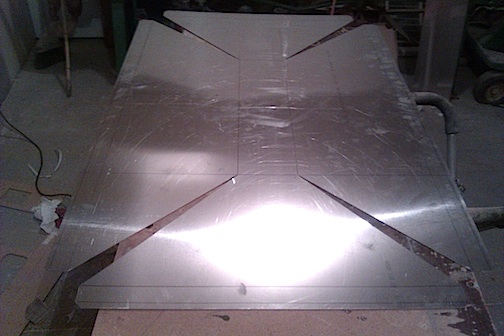  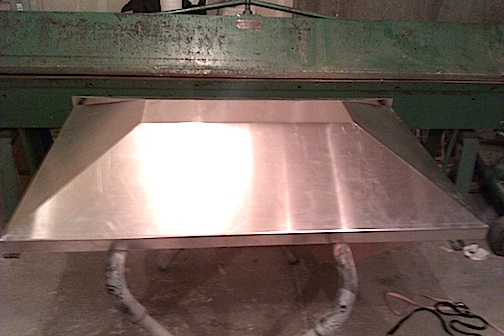 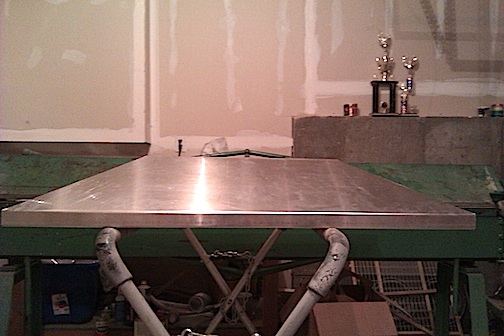 Here it is just setting on my stand to give you an idea of the size. 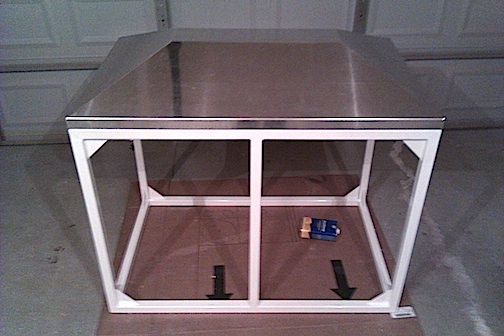 ------------- Need custom acrylic work? give me a call, www.Elite-Aquatics.net (801)645-6386 |
Posted By: Luckedout
Date Posted: November 10 2010 at 11:44pm
|
Looks awesome! You're the king of DIY! What kind of lighting are you putting in it? ------------- -Ben 90g Mixed reef www.body-balancechiropractic.com |
Posted By: tcfab
Date Posted: November 11 2010 at 7:55am
|
Thanks It is either going to be 8x54 watt t5's or 10x54 watt t5's I haven't decided yet. ------------- Need custom acrylic work? give me a call, www.Elite-Aquatics.net (801)645-6386 |
Posted By: jcom
Date Posted: November 11 2010 at 1:52pm
|
That's some masterful work right there. Excited to see the duct suspension system!
Guess I should get my build thread going eh, you're making me look lazy?
|
Posted By: tcfab
Date Posted: November 11 2010 at 7:48pm
|
Lol, yes you do need to get your thread going Jake I am excited to see it. ------------- Need custom acrylic work? give me a call, www.Elite-Aquatics.net (801)645-6386 |
Posted By: tcfab
Date Posted: December 04 2010 at 11:40pm
|
Did some tile work for the tank today and I should have the stand, tank and light in the house shortly. I will also be building my new sump shortly and can start plumbing it, I am excited for that part, my new sump and all the plumbing is going to match my skimmer its going to have a bubble king theme going on ------------- Need custom acrylic work? give me a call, www.Elite-Aquatics.net (801)645-6386 |
Posted By: tcfab
Date Posted: December 11 2010 at 3:10pm
Here is a sneak peak at what I have been doing lately Finally finished my tile in my house so I could start putting the tank up. I used 3/4" plywood for the top of my stand for the tank to sit on. I sealed it with automotive primer, sanded it and painted bright white to help brighten it up under my stand. Also I used 3/8" thick closed cell foam on top of the wood between the tank and wood. Now I will start building my sump and plumbing Finally finished my tile in my house so I could start putting the tank up. I used 3/4" plywood for the top of my stand for the tank to sit on. I sealed it with automotive primer, sanded it and painted bright white to help brighten it up under my stand. Also I used 3/8" thick closed cell foam on top of the wood between the tank and wood. Now I will start building my sump and plumbing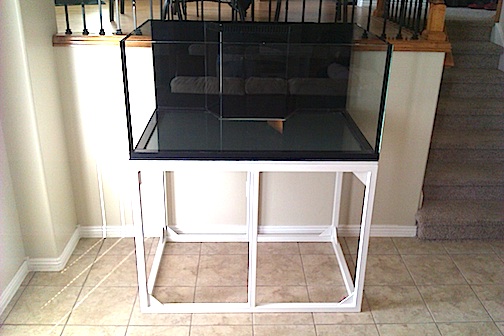 This pic you can see the blue edge of the Starphire glass 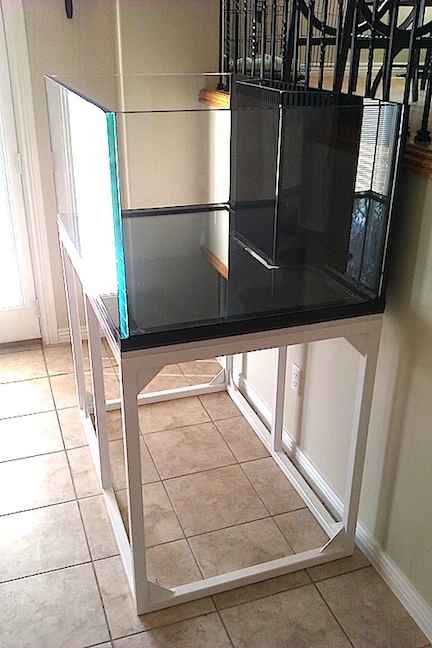 Wood under the tank 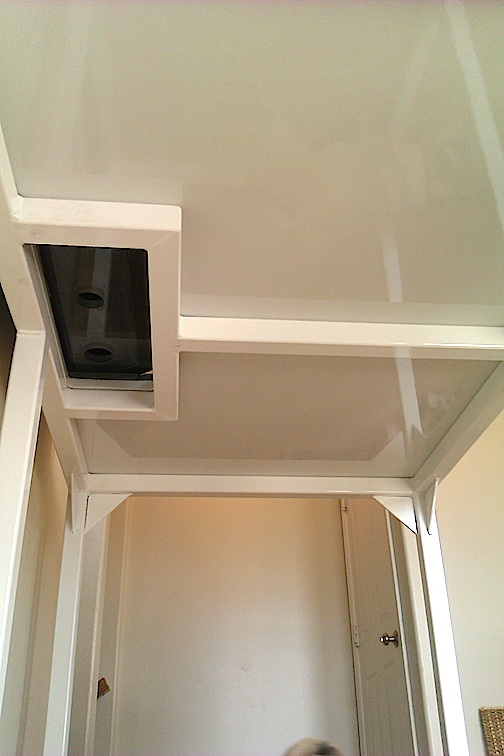 ------------- Need custom acrylic work? give me a call, www.Elite-Aquatics.net (801)645-6386 |
Posted By: jcom
Date Posted: December 13 2010 at 9:40pm
|
Lookin sweet Tyler! |
Posted By: tcfab
Date Posted: December 13 2010 at 9:53pm
|
Thanks Jake, its getting there slowly but I am starting to get excited about it ------------- Need custom acrylic work? give me a call, www.Elite-Aquatics.net (801)645-6386 |
Posted By: tileman
Date Posted: December 13 2010 at 9:59pm
|
Looks great Tyler. A tilesetter too. Fantastic. ------------- 335G Reef TOTM. http://www.advancedaquarist.com/2015/2/aquarium ReefKeepers TOTM Feb. 2012 http://reefkeeping.com/joomla/index....k-of-the-month & |
Posted By: vadryn
Date Posted: December 14 2010 at 8:40am
|
I didn't see if anyone else asked or it has been addressed. I have questions about:
"sump is going to be located in my crawlspace"
This sounded really weird to me. Maybe I have a limited understanding of crawl spaces... One's I am familar with are 2'-3' tall, difficult to access, and would be very cold in the winter.
Is the sump going to be insulated? How will you keep things running smoothly if you aren't able to take a quick visual assessment? I have a tank I could "potentially" plumb a sump into the garage from, but I wouldn't dare for so many reasons, including the ones listed above. I hope this doesn't sound condescending. I trust you - just want to know how this is working for you.
Thanks!
|
Posted By: tcfab
Date Posted: December 14 2010 at 9:27am
|
Vadryn, I have actually changed where the sump is going. I am in the process of building a new sump right now that is going to be placed under my stand. After much thought I decided not to put my sump in my crawl space. I have a 40 gallon frag tank that is setup in the lower level of my home which is where my crawl space is and my frag tanks heater runs pretty much all the time. I had plans of heating and venting my crawlspace for my sump but putting it under my stand will be much more simple and cost effective. My lighting system and under my stand will still be vented for humidity issues though. ------------- Need custom acrylic work? give me a call, www.Elite-Aquatics.net (801)645-6386 |
Posted By: tcfab
Date Posted: December 14 2010 at 9:53pm
 
 ------------- Need custom acrylic work? give me a call, www.Elite-Aquatics.net (801)645-6386 |
Posted By: tcfab
Date Posted: December 14 2010 at 9:55pm
|
a few quick skethes of the new sump ------------- Need custom acrylic work? give me a call, www.Elite-Aquatics.net (801)645-6386 |
Posted By: vadryn
Date Posted: December 14 2010 at 10:57pm
|
I really like that layout... simple yet spacious. If you don't mind, I'd be interested to know what it would cost to replicate it after you finish it.
I'm guessing the left area is for a DSB and Macro with the big chamber meant to house the skimmer - the baffles leading to the return pump. Correct? The baffles will keep the water level consistent for the skimmer? An ATO would need to go behind the baffles in the same area as the return pump, right?
|
Posted By: Nick801
Date Posted: December 14 2010 at 11:26pm
|
alright... explain the holes =) the one to the refugium makes sense, the one to the filter sock makes sense the third? ------------- http://www.reefinsanity.com" rel="nofollow - www.ReefInsanity.com http://www.facebook.com/ReefInsanity" rel="nofollow - www.Facebook.com/ReefInsanity 801-680-4676 |
Posted By: tcfab
Date Posted: December 15 2010 at 12:15am
|
Vadryn, yup you are correct on the layout on the sump. The bubble trap keeps the level consistant for the skimmer. I run auto top offs on all my sumps, I think they are the only way to go I will pm you a price on the sump.
Nick, I actually missed a hole now that I think about it. There will be 4 holes total. I like to hard mount all my plumbing to the sump. The hole on the far left is for the fuge ( its water supply comes from a manifold off the return pump) second one from the left is the main drain line going to the filter sock, third hole from the left is for a hard mount for my return line going to the tank and the forth hole is my emergency drain line for the herbie drain system this will just drop off into the return section. ------------- Need custom acrylic work? give me a call, www.Elite-Aquatics.net (801)645-6386 |
Posted By: Haley'sfish
Date Posted: December 18 2010 at 11:11pm
| What is a baffle, and how do you keep the sump level perfect for the skimmer? I've noticed that with my new tank, the level fluctuates because I don't have my ATO set up yet and it messes with the skimmer.... Curious by the way, what do you do for a living? |