My 90g Build Thread
Printed From: Utah Reefs
Category: Specialized Discussion
Forum Name: DIY
Forum Description: Do it Yourself
URL: http://www.utahreefs.com/forum/forum_posts.asp?TID=37395
Printed Date: April 29 2025 at 6:01am
Software Version: Web Wiz Forums 12.03 - http://www.webwizforums.com
Topic: My 90g Build Thread
Posted By: Luckedout
Subject: My 90g Build Thread
Date Posted: December 22 2009 at 11:14pm
|
I recently purchased a used 90g tank with a single overflow. I love the look of my 54gallon, but I want a tank that can be used in my office for my patients to see. I set my corner tank up unsure of whether I would be able to even keep a saltwater tank, so now that it's been up and running for a while I'd like to try my hand at something bigger that people coming to my office can see and enjoy. So I found this good deal. It came with a stand and even some VHO's in the hood with an icecap ballast. The tank was only a few months old (the guy bought it to store some fish until his 92g corner was done  ). The stand however was fairly beat up. It looked like at one time it must've been a nice stand, but it's just worn out. ). The stand however was fairly beat up. It looked like at one time it must've been a nice stand, but it's just worn out. This tank is going into my office, so I am going to redo the stand. I have built an addition to make the stand taller and also to give me a step for maintenance. I am also completely rebuilding the hood to give me more space and to accomodate some MH's. I am also re-finishing the stand and staining it a red mahogany to match the decore in the office. I have a few pictures that I'll post in a few min. ------------- -Ben 90g Mixed reef www.body-balancechiropractic.com |
Replies:
Posted By: Luckedout
Date Posted: December 22 2009 at 11:18pm
|
Ok time for some pics. It's my first time so be patient if I don't get it right Here is the stand after using some paint stripper to get the paint off. It must've had a couple different coats because it took a lot of work and sanding to get this paint to budge. 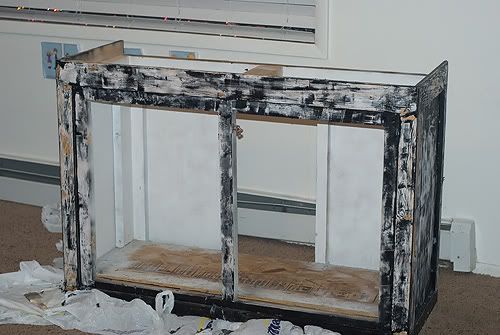 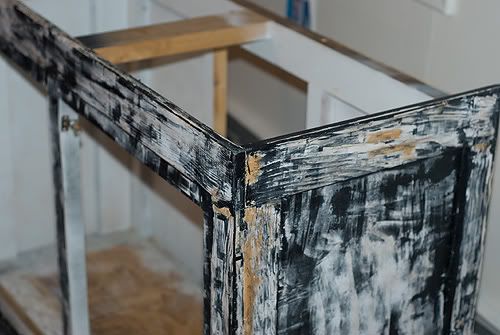 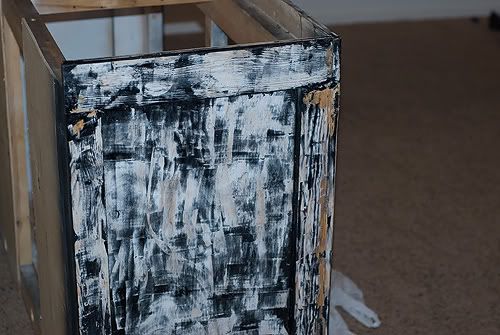 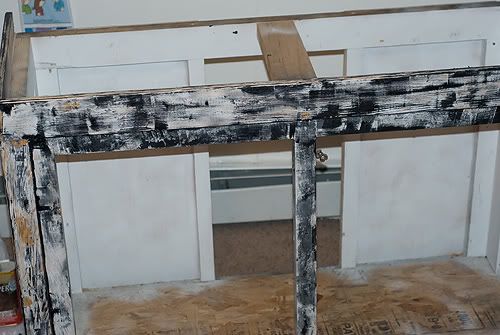 ------------- -Ben 90g Mixed reef www.body-balancechiropractic.com |
Posted By: Luckedout
Date Posted: December 22 2009 at 11:22pm
Here it is finally sanded down and I'm starting to apply the first coat of stain.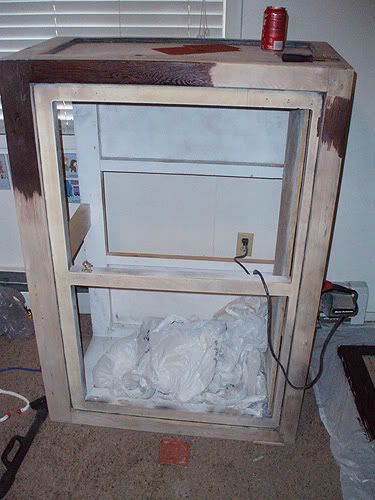 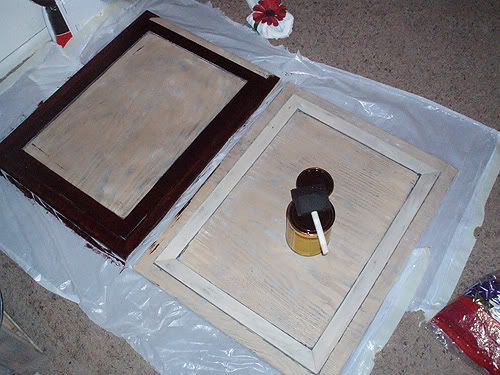 Daddy's helper. 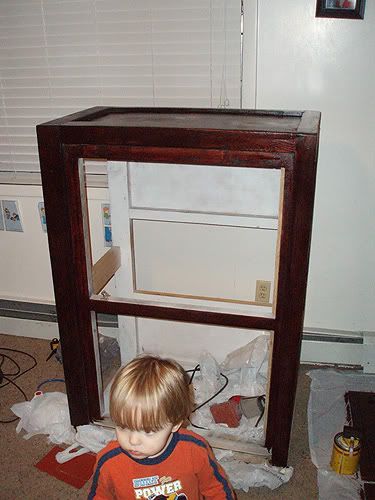 ------------- -Ben 90g Mixed reef www.body-balancechiropractic.com |
Posted By: Luckedout
Date Posted: December 22 2009 at 11:25pm
And here we are with the stain on.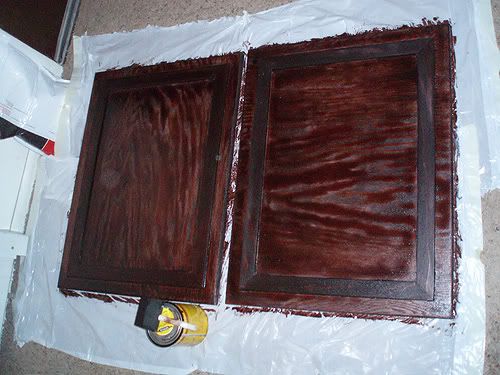 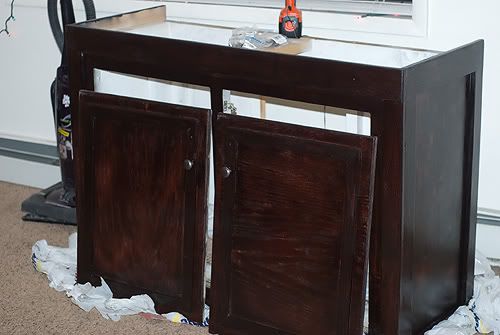 And with the doors now attached, it's ready to be moved to my office, much to the delight of my wife. 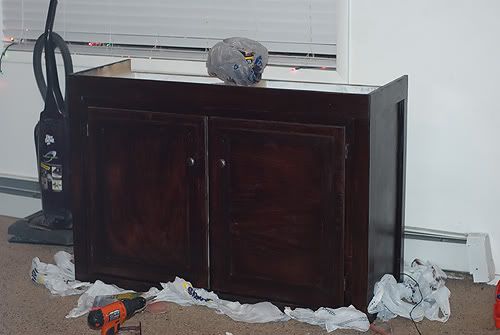 The extension to the stand is almost finished. I'm also halfway through the hood. I don't have pictures of them yet, but I'll get some on here soon. Let me know what you think! p.s. Still have to do a little finish work around the stand but overall I'm happy with how it's coming along. Also, I'm not sure how I'm going to plumb this thing, so I'll need help with that. I'm planning on a refugium underneath, but I also want an auto top-off because I can't keep lugging water around my office. ------------- -Ben 90g Mixed reef www.body-balancechiropractic.com |
Posted By: jwoo
Date Posted: December 22 2009 at 11:34pm
|
That looks great! I love build threads - I'll be sure to follow!
------------- None at the moment Soon: 72 Gallon Bowfront |
Posted By: ksmart
Date Posted: December 24 2009 at 5:56pm
|
Looking good, cant wait to see more! ------------- |
Posted By: skimace7
Date Posted: December 28 2009 at 1:52pm
| Well done!. |
Posted By: Luckedout
Date Posted: December 28 2009 at 11:44pm
|
It's coming along nicely. My brother was here on vacation from Basic Training so I grabbed him to help me move the tank and get things set up. I wish I had more pictures, but I forgot my camera so these are from my phone. Here is the tank in place. You can see the stand has been secured to the base that I built for it. I added the step to just make it easier to get into the tank. You can see the hood on top, which isn't finished yet. 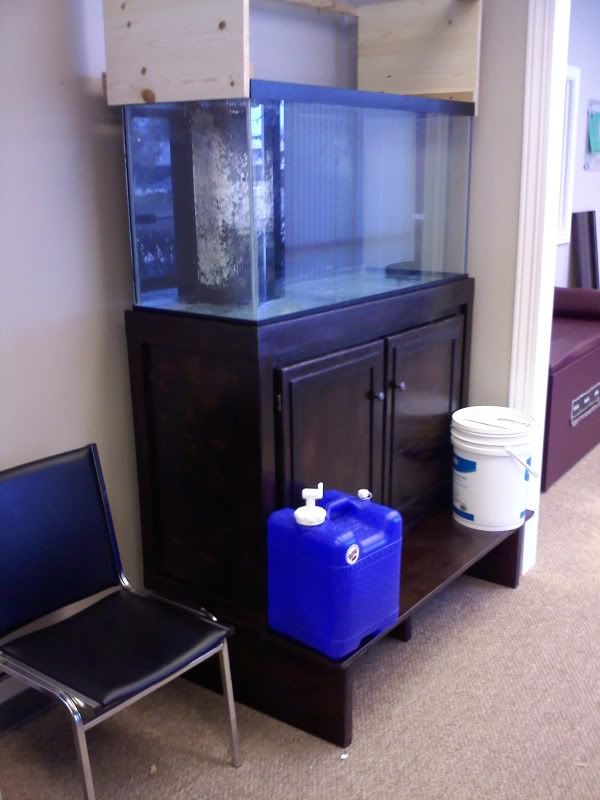 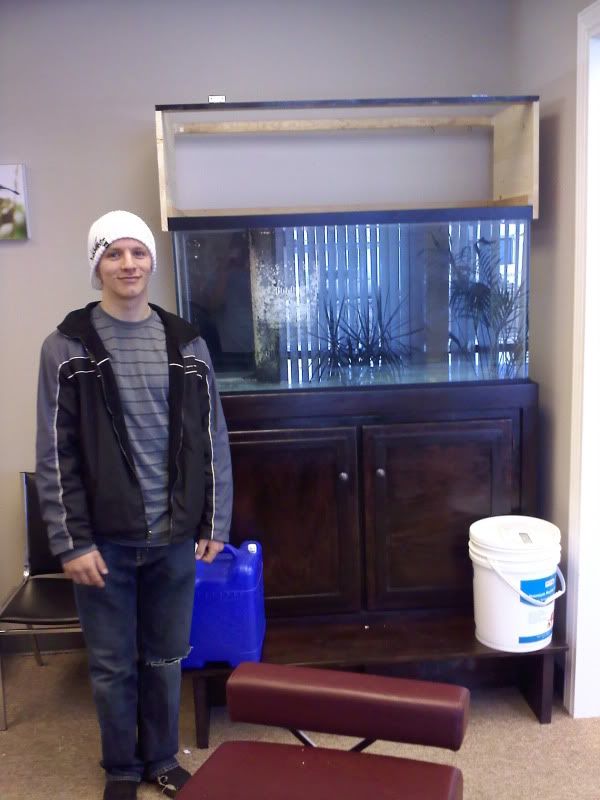 My brother is about 5' 11' so I'm pretty happy with the height of the tank. You won't have to stoop to look at it. I'll try to get some pictures of the sump and finish up the hood. I also have to start figuring out my plumbing. ------------- -Ben 90g Mixed reef www.body-balancechiropractic.com |
Posted By: Mike Savage
Date Posted: December 29 2009 at 8:53am
|
It's looking good!
Mike -------------  |
Posted By: Mike Savage
Date Posted: December 29 2009 at 8:54am
|
I would paint the inside of the hood white to help reflect light and protect the inside of the hood from salt spray.
Mike ------------- |
Posted By: Luckedout
Date Posted: December 29 2009 at 10:23am
|
Ahh that's a good idea. i was debating on painting, staining or just sealing it and leaving it the natural wood color on the inside.
------------- -Ben 90g Mixed reef www.body-balancechiropractic.com |
Posted By: Desertreef
Date Posted: December 29 2009 at 9:22pm
| That is great. I like the step. It will help short persons, like kids, see in better and give taller people a differnt view. |
Posted By: Luckedout
Date Posted: December 29 2009 at 9:33pm
|
yeah that was my thought since it's in my office and a lot of kids come through there. Thanks!
------------- -Ben 90g Mixed reef www.body-balancechiropractic.com |
Posted By: tileman
Date Posted: December 29 2009 at 10:47pm
|
Its looking real good. I really like the height of the tank. Will you be able to run a waterline through the wall for your auto topoff? ------------- 335G Reef TOTM. http://www.advancedaquarist.com/2015/2/aquarium ReefKeepers TOTM Feb. 2012 http://reefkeeping.com/joomla/index....k-of-the-month & |
Posted By: Luckedout
Date Posted: December 29 2009 at 11:24pm
|
I'm tempted to run one through the drop ceiling and into my utility closet.. but I have to consult with someone who has actually done a top off to show me if it would work. ------------- -Ben 90g Mixed reef www.body-balancechiropractic.com |
Posted By: Luckedout
Date Posted: December 30 2009 at 12:27am
When I raised the tank up, I also took out the bottom of the stand to give myself a bit of room. I put in a larger sump then what came with the tank. I'm also thinking about putting in a small shelf to store some equipment, but that might happen later down the road. 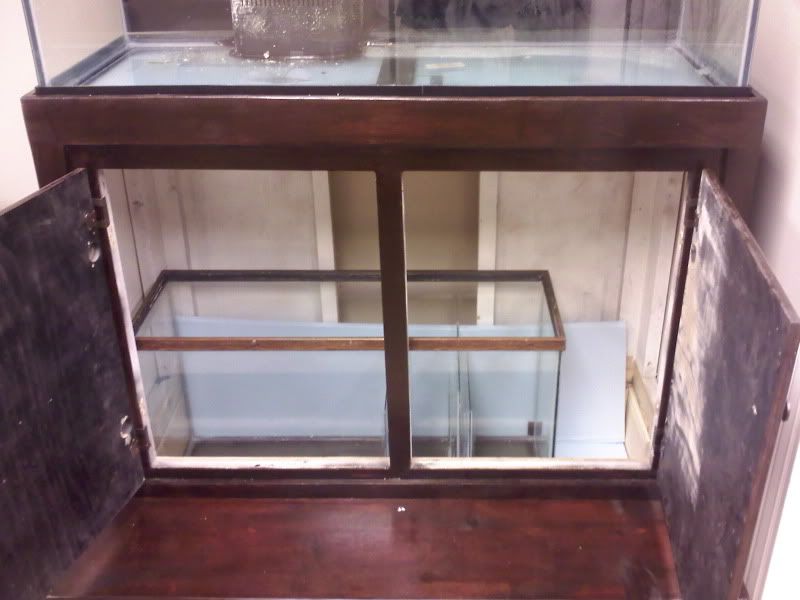 Jeff Morrill built the sump for me. Instead of putting the refugium space in the middle I had him put it to the side. I'm going to T off my return so I can control the flow in my refugium a little better. I saw a similar concept on skimace's refugium and really liked it. So kudos to him for the idea.  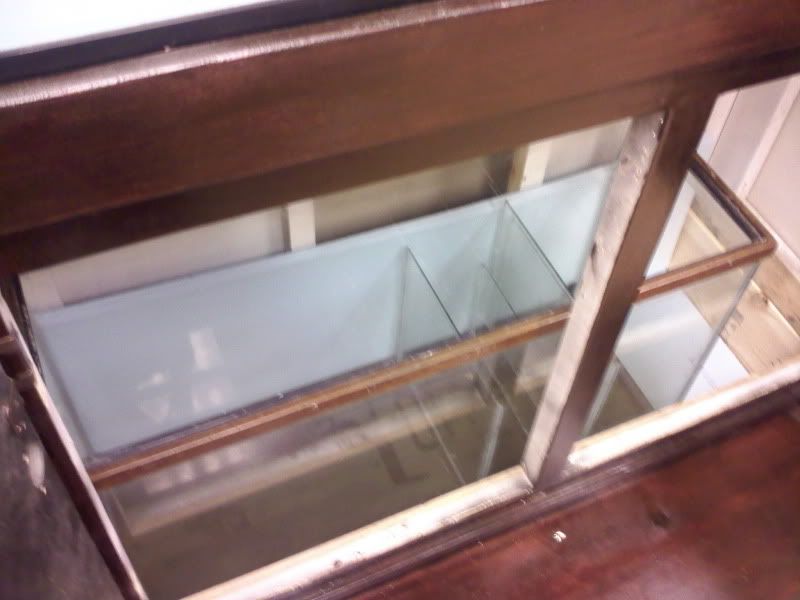 That sump is 40ish gallons so this pic gives you an idea of how much more room I have by lowering the floor in the stand, 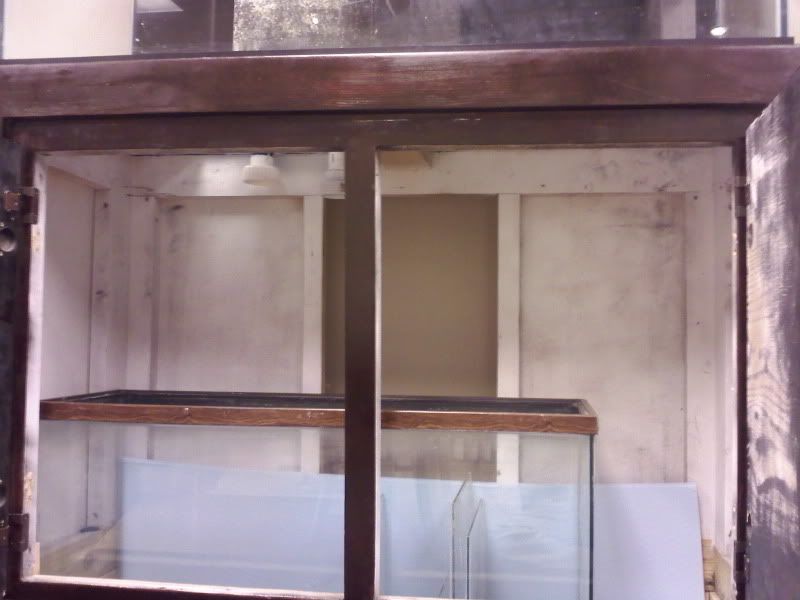 ------------- -Ben 90g Mixed reef www.body-balancechiropractic.com |
Posted By: Jeffs_little_ocean
Date Posted: December 30 2009 at 8:53am
|
Thats awesome. I love following build threads like this. On a side note, my first sump was deisgned with the fuge to the side like that and it was in that end where all the gunk from the system would settle. I had to vaccume it out or I would get nitrate spikes. Just an fyi. You could always just add a little maxijet or small pump to make sure you have good water circulation there. ------------- Life is good....right? |
Posted By: Luckedout
Date Posted: December 30 2009 at 12:01pm
|
Yeah, that is my main concern with it. On skimace's tank he has his return coming up under the water level to bubble and create some movement. I'm leaning toward trying that and then if I notice a buildup I have a little maxijet 600 I can put in there.
------------- -Ben 90g Mixed reef www.body-balancechiropractic.com |
Posted By: Desertreef
Date Posted: December 30 2009 at 8:40pm
| I think it looks like a fun project. I can't wait to see what you put in it. |
Posted By: Luckedout
Date Posted: January 04 2010 at 9:39pm
|
Ok. I finally mocked set up my plumbing. It took me a while to get here because I was thinking of adding a small frag tank to the setup, but I decided against it at the 11th hour because it was going to make plumbing the tank a LOT more difficult. Plus, the tank is at my office and I don't want it to be too cluttered, so I want this build to be pretty clean. Forgive me for the crappy phone pics Overall picture. The overflow is draining into the line on the left and the return flow is on the right. 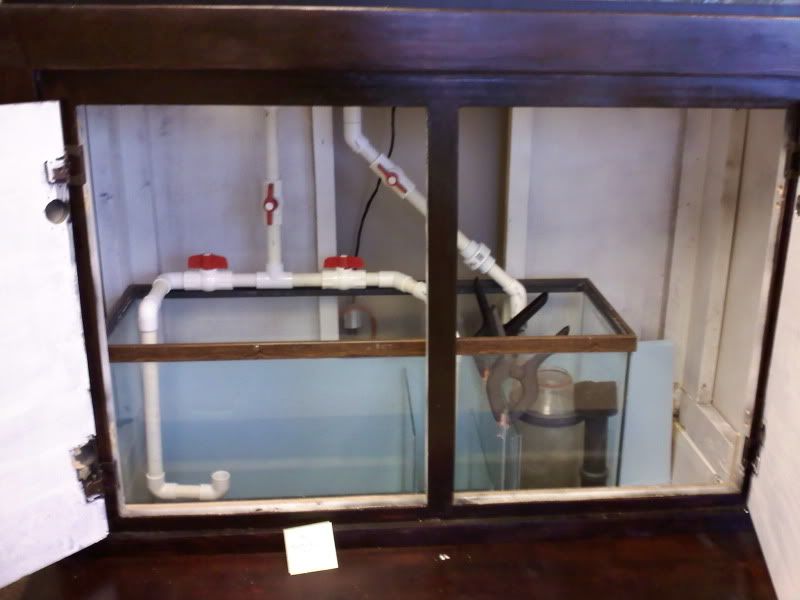 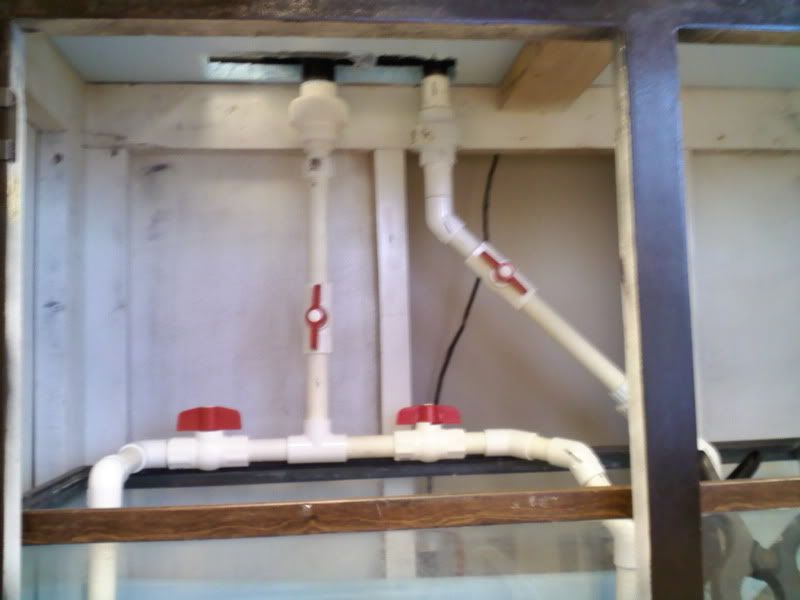 Here is the refugium line. I made it like this hoping for it to bubble up into the refugium. I think this will be better for oxygen exchange and to create water movement. I won't glue these pieces just in case it doesn't work how I'd like it. What do you think? 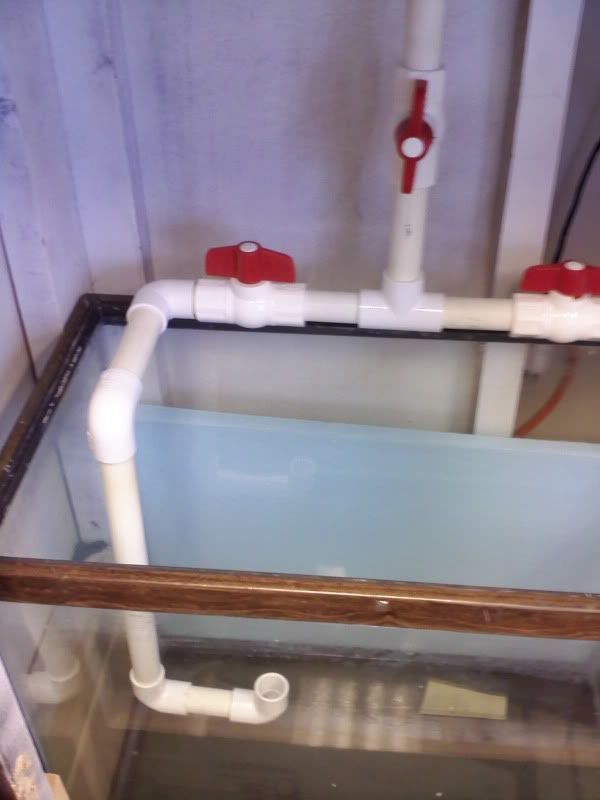 Here is the other overflow return line. Since my sump doesn't have a comb next to the refugium I put in a little shelf and I'm going to add eggcrate to keep macro algae or whatnot from getting out. I might buy a 90 deg elbow to clean up the look, but for some reason I didn't have another 90 deg but I had 2 45's so that works. 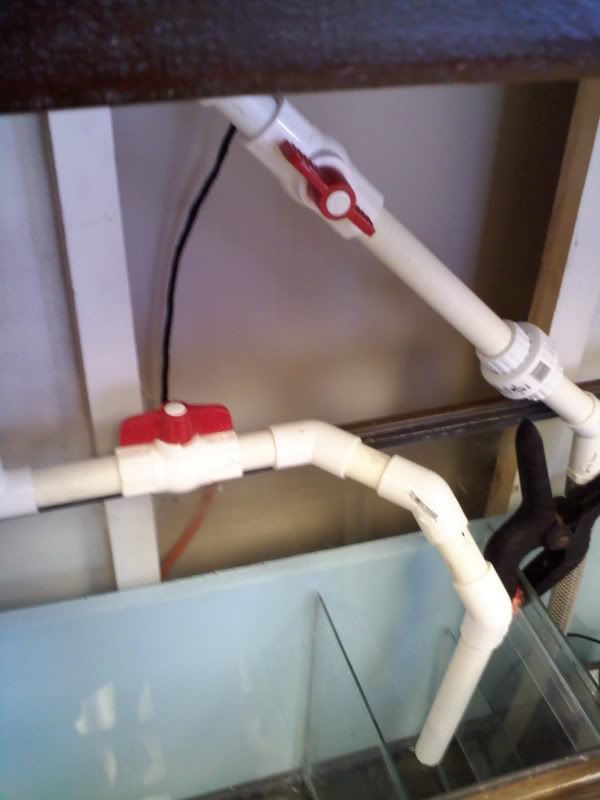 Here's the area for the return pump and skimmer. This skimmer might be too big for the area I have, but we'll see if it works. I used the braided flex tubing to attach to the return pump. I heard that it will minimize vibration noise from your pump, so we'll give it a shot. 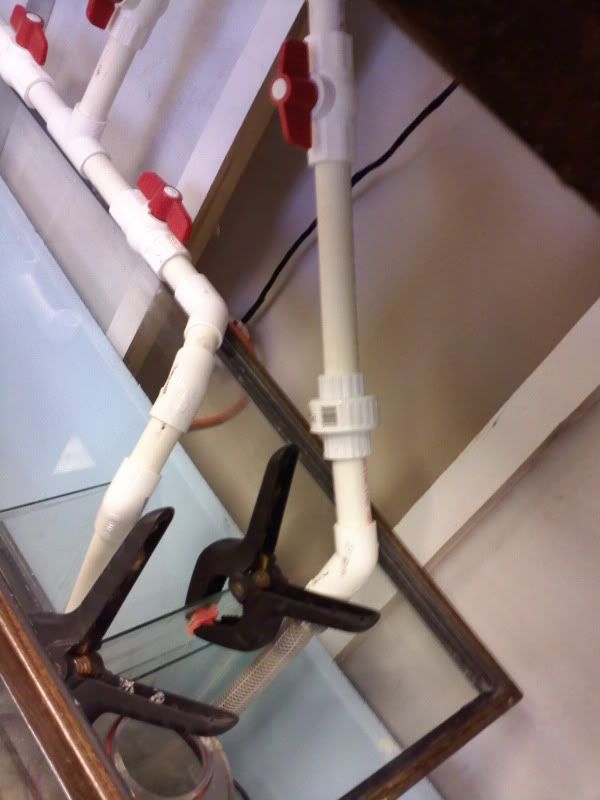 Dursa return on the left. Water coming back in on the right. This was how it was set up by it's previous owner. It only has a single return line into the tank. I'm thinking adding a second one, but not too sure if it's necessary. What do you think? 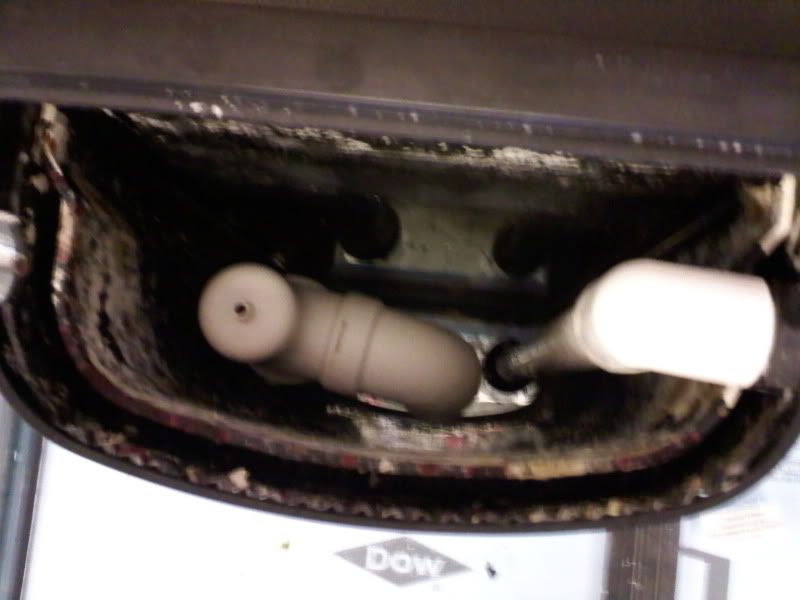 Here's FTS with the new hood that I built. The hood isn't finished how I'd like it, but this tank has to get up and running soon so I'll fix it up a bit more later on. Overall I'm pretty happy with the look considering I'm not very handy and I only have very basic tools to do the job. 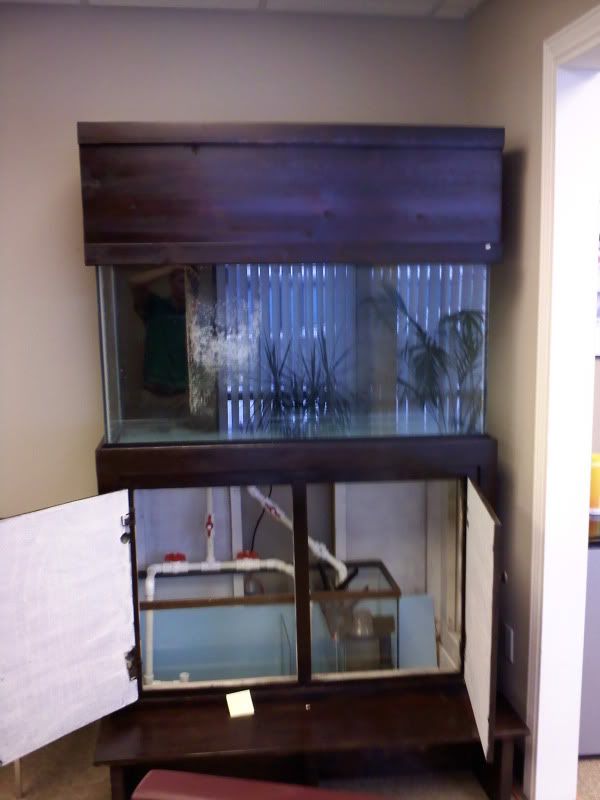 Let me know what you think of the plumbing. I haven't glued anything yet so I can change it up if you think something would work better. Thanks for looking! -Ben ------------- -Ben 90g Mixed reef www.body-balancechiropractic.com |
Posted By: jwoo
Date Posted: January 04 2010 at 11:42pm
|
Are you planning on running filter socks? It might be hard putting socks in with the return coming into the sump on the left like that. I'd also suggest putting some sort of container on the right for the skimmer to sit in with holes on the top. Then run that return into it so that the water stays constant. This way you do not need to constantly adjust your skimmer. It will also keep macro away from the skimmer pump. You can look in Bobs build thread to get an idea of what I mean. ------------- None at the moment Soon: 72 Gallon Bowfront |
Posted By: jwoo
Date Posted: January 04 2010 at 11:53pm
|
Found it for you: http://www.utahreefs.com/forum/forum_posts.asp?TID=24146&KW=bob&PN=21 You can see the original setup he had for his sump here. Notice the tote in tote - basically you could do something very similar to this depending on how much room you have - and of course on a smaller scale. ------------- None at the moment Soon: 72 Gallon Bowfront |
Posted By: Luckedout
Date Posted: January 05 2010 at 1:21am
|
I"m not sure how I'd be able to do that with the skimmer considering the sump is already divided into sections and there isn't really room for any kind of tote. Maybe I'm just not picturing it right? I plan on running a filter sock on the return going into the middle only, not on the far left. That return will have a lot more water moving through it since the left will be the refugium. Thanks for the input! ------------- -Ben 90g Mixed reef www.body-balancechiropractic.com |
Posted By: thefu
Date Posted: January 05 2010 at 7:35am
|
Love the height. I still cannot understand why most tank stands are built so low. Low is fine if you plan on watching a tank most of the time from a sitting position across the room (works fine for fish only). But for Reef tanks, it seems that much of the viewing pleasure is up close and personal and that is usually standing. The only negative is the need for a step stool, but I think it is more than worth the hassle. Did you put reflectors in the hood? What lights are you running?Did you paint the underside of the hood white - Mikes suggestion will up your PAR considerably. FYI, the union in the plumbing below will make for quite a bit of restriction depending on what type it is. Definitely run a filter sock...I know this is a controversial subject, but this is where I stand. As far as compartments in the sump, I prefer this order Input->Filtersock->(skimmer,carbon(if using reactor or canister))->(refugium)-(bubble trap)->(heater,top-off valve,return) Keep the thread alive!
|
Posted By: bfessler
Date Posted: January 05 2010 at 9:08am
|
It's looking great. I also like the higher tank.
A agree with Terrance the return pump should be at the other end. If you put it in the same compartment as the skimmer you are going to loose the benefit of feeding your tank from the refugium. Pods and such will be collected by the skimmer before they reach your tank. Run your supply into the skimmer compartment. That way you will be removing the waste before it gets to the fuge. Then you could use either another divider on the far left to put the return pump in or just build a wall out of live rock between the refugium and the return pump, I believe Mark has a picture of a fuge set up this way. That will allow you to feed your tank with pods from the fuge when you stir it up and harvest your cheato. ------------- Burt An equal opportunity reefer, I support all hobbyists and organizations involved in Marine Aquarium Keeping. [email protected] |
Posted By: Luckedout
Date Posted: January 05 2010 at 11:28am
|
For the hood I did pain the interior white. I am going to use the 3 VHO's that came with it and 2 150w MH lights as well. I'm quite happy with the height of the tank as well. It makes it much easier to see. The step makes it easy to reach into the tank without having to grab a step ladder. I am frustrated with the skimmer. I might re-work the sump to the more traditional 3 compartments. Just hate to tear it apart and start over. ------------- -Ben 90g Mixed reef www.body-balancechiropractic.com |
Posted By: bfessler
Date Posted: January 05 2010 at 12:05pm
|
You don't have to start over. You could just stick some egg-crate down on the left side to create a spot for the return pump and set the return on a low shelf to keep it up out of the sand. If you haven't glued up the PVC rerouting the supply and return lines shouldn't be to hard, and you'll have more room for the skimmer with the return pump out of there. Overall I think you'll be much happier with the setup. ------------- Burt An equal opportunity reefer, I support all hobbyists and organizations involved in Marine Aquarium Keeping. [email protected] |
Posted By: Luckedout
Date Posted: January 05 2010 at 1:59pm
|
Well I removed the far left panel and was going to place it to the left for the more traditional type refugium. Unfortunately the panel broke while removing it and took a good chunk of my skin with it. I was told the panels were acrylic, but they were actually glass. That's usually good to know before hand. Oh well. So now I'm thinking I'll either buy another piece of acrylic to fit in the sump or just do a tote within the sump type setup like bob had his. I kind of like the idea of having something removable so I can adjust it easily. But i'm worried about detritus getting stuck down along the sides and back. Also I'd like it to have a cleaner look. Any suggestions? ------------- -Ben 90g Mixed reef www.body-balancechiropractic.com |
Posted By: bfessler
Date Posted: January 05 2010 at 2:35pm
|
Ouch! Sorry to hear about the broken glass panel and the loss of skin.
If you use acrylic for the new panels just make sure to cut it 1/4" short as the acrylic will expand as it absorbs water. Also clean the edges of the acrylic well with MEK or alcohol to remove any oils or contaminants. Silicone doesn't stick well to acrylic if it has any oils on it at all. If you use glass again just go for a slightly loose fit clean the glass and silicone it in.
Since the sump is empty I would use acrylic or glass panels instead of the tote for ease of cleaning and a cleaner appearance.
From the pictures it looks like now you have a large Fuge area with no center section. You also have a nice 3 panel bubble trap coming from the skimmer location to the fuge. A small center chamber isn't necessary but could make a good place to put some carbon or phosban if you want. If you opt to make a center chamber I wouldn't make it any larger than I needed to for occasional chemical filtration.
For the return section on the left I would make it just a little larger than the pump you're going to use for ease of access and just in case you decide to go with a bigger pump. I would also incorporate a 2 panel bubble trap to prevent air bubbles from getting into the return pump intake and making micro bubbles that could enter the display. Keep as much room for the Fuge section as you can and get that thing going.
Good Luck, ------------- Burt An equal opportunity reefer, I support all hobbyists and organizations involved in Marine Aquarium Keeping. [email protected] |
Posted By: Luckedout
Date Posted: January 05 2010 at 6:00pm
|
I'll see what I can find tonight. I did have another question. I'm transferring everything from my 54g corner to this tank. What's the easiest and quickest way to do that? Thanks! ------------- -Ben 90g Mixed reef www.body-balancechiropractic.com |
Posted By: bfessler
Date Posted: January 05 2010 at 6:11pm
|
I'd get a bunch of rubber-maid totes or 5 Gallon buckets, Empty the water from the 54 into the totes then move the rock and coral into them. Drain off the rest of the water and scoop the sand into the new tank, put any new sand over the old then reverse the process till your done.
Now I'm tired just thinking about the work involved. ------------- Burt An equal opportunity reefer, I support all hobbyists and organizations involved in Marine Aquarium Keeping. [email protected] |
Posted By: Luckedout
Date Posted: January 06 2010 at 12:20am
|
Doesn't sound too bad. I have some rock curing right now to add to the 90, so between that and what's in the 54 I should be set. I'm going to have to find a bit of sand but that shouldn't be too hard. I'm aiming to get this set up by saturday. Not sure how realistic that is, but we'll see.
------------- -Ben 90g Mixed reef www.body-balancechiropractic.com |
Posted By: bfessler
Date Posted: January 06 2010 at 12:23am
|
Keep us posted. I'm looking forward to seeing how the new tanks looks when you get it set up. ------------- Burt An equal opportunity reefer, I support all hobbyists and organizations involved in Marine Aquarium Keeping. [email protected] |
Posted By: Luckedout
Date Posted: January 06 2010 at 12:45pm
|
Ok. I mocked the sump plumbing up again, but I don't have pics that I can post till I get home, but I'd like some input because I really want to get this glued and finished. I went and bought another glass panel (cheap, easy to have it cut right there). My thought is this and you can reference the pictures on the previous page. I'm going to place the skimmer to the far left of the sump. I'm going to have 1 pipe draining into the area where the skimmer is. I will have the skimmer there and probably a modded reactor to house carbon. That section will drain to the center where I will have macroalgae and LR rubble. I will probably have a DSB as well. To the right I have the bubble trap and that is where my return pump will be located. I will have another pipe draining into that area from the overflow just so I can regulate how much flow is going through my refugium. Does that make sense? I will possibly add a 2 panel bubble trap on the right as well instead of just a single panel. Thoughts? ------------- -Ben 90g Mixed reef www.body-balancechiropractic.com |
Posted By: bfessler
Date Posted: January 06 2010 at 2:22pm
|
Hi Ben,
Here is an image that I hope will clear up the placement of the panels in the fuge.
 Fuge 1 is your fuge as it sits. Panel C sets the height that must be overcome to allow water to flow. As you can see this leaves little room for additional water to return to the sump in case of a power failure. Panel A is nearly useless
Figure 2 is how the return panels should be set up. Panel A sets the height of the water in the fuge, Panel B creates the bubble trap and panel C directs water upward after passing through the trap.
Figure 3 is a complete fuge set up the way you described the fuge should work.
Panel a forces water to pass through the entire chamber. This helps if you want to place a bag of carbon or phosban in this section.
Panel b sets the water height in this section for the skimmer. Water will not flow until it raises higher than panel b
Panel c sets the height of the water in the fuge, water will not flow through the fuge until it passes over this panel.
Panel d creates the bubble trap.
Panel e directs any bubbles that might make it through the trap toward the surface so they are not sucked into the return pump. in this setup the top off level is set in the return chamber. as panels b and c create a constant level for the skimmer and fuge.
Supply should go into the far left chamber and the return is at the far right side. You can control flow through the fuge by putting a T and ball valve on the supply and directing flow directly to the return but this water directed here will likely create bubbles that would be sucked into the return pump so I wouldn't recommend that. I would recommend running all water through the fuge.
Hope this helps or at least gives you an idea how each panel in the sump will affect the flow of water through the sump.
------------- Burt An equal opportunity reefer, I support all hobbyists and organizations involved in Marine Aquarium Keeping. [email protected] |
Posted By: Luckedout
Date Posted: January 06 2010 at 2:53pm
|
ok. Burt that really helped. Thanks! I think how it was originally set up is that the overflow return lines would be coming into the sump from the 2 far sides. The far right would be for the skimmer and the far left for the refugium with the center being set up for the return pump. Water would be returning to the return pump from both sides. I think I can live with that. It' just made my plumbing work a bit more interesting. It wasn't how I originally intended it, but that's my fault for trying to explain things by text message. Oh well! ------------- -Ben 90g Mixed reef www.body-balancechiropractic.com |
Posted By: bfessler
Date Posted: January 06 2010 at 3:19pm
|
Ya I started to try to discribe what I was thinking without a drawing and it didn't even make sense to me. ------------- Burt An equal opportunity reefer, I support all hobbyists and organizations involved in Marine Aquarium Keeping. [email protected] |
Posted By: MadReefer
Date Posted: January 06 2010 at 3:44pm
| Your plan for the sump sounds good. It's very close to what I have but I don't split the return because I want max flow through fuge. I drop all the water to area near my mangrove bucket and skimmer pumps. The next section is all fuge with return pumps on the far end. |
Posted By: Luckedout
Date Posted: January 06 2010 at 4:07pm
|
I've heard that you want less flow through your refugium because your macro and pods like to have less flow. So my thought was to have the refugium separated and have a ball valve so that I can control the flow of water through the area. I'm not going to have mangroves so maybe we're talking about 2 different things. But really I'm not sure if that makes a difference. I'm going to have chaeto and try to keep a fairly healthy pods population in the refugium for food. Madreefer did you ever post picks of your overflow on your tank thread? I'm really curious with what you did there. Thanks for the input! ------------- -Ben 90g Mixed reef www.body-balancechiropractic.com |
Posted By: bfessler
Date Posted: January 06 2010 at 4:51pm
|
Ben, How much flow are you going to be pushing through the sump and fuge? The way water flows through the sump is different than when it is directed from the discharge of a pump or power head. Because the water flows through the baffles that are deep and wide you can get a lot of flow going without an extreme current. ------------- Burt An equal opportunity reefer, I support all hobbyists and organizations involved in Marine Aquarium Keeping. [email protected] |
Posted By: Luckedout
Date Posted: January 06 2010 at 7:38pm
|
The pump is pushing about 700gph. It's not extreme by any means. I think overall it'll be ok. I just like having the ball valves in place if I need to adjust things. I didn't have that option with my current tank and it's something that has really irked me.
------------- -Ben 90g Mixed reef www.body-balancechiropractic.com |
Posted By: bfessler
Date Posted: January 06 2010 at 7:48pm
|
Well an $8 ball valve and a little PVC is cheep peace of mind. You can also use it to do water changes and diverting water for other uses that might come up. ------------- Burt An equal opportunity reefer, I support all hobbyists and organizations involved in Marine Aquarium Keeping. [email protected] |
Posted By: Luckedout
Date Posted: January 07 2010 at 7:01pm
|
Plumbing is glued and the sump is finished. Finally! Again I apologize for camera phone picks, but when it's up and running I'll steal my wife's SLR and take some good shots. As you can see, I returned the sump to it's original design. I figured it's something different so I'll give it a shot. The Overflow return pipes come down and drain at the 2 far ends of the sump. The far right will house the skimmer and a small carbon reactor. The far left will house the refugium with DSB, rock rubble and chaeto. 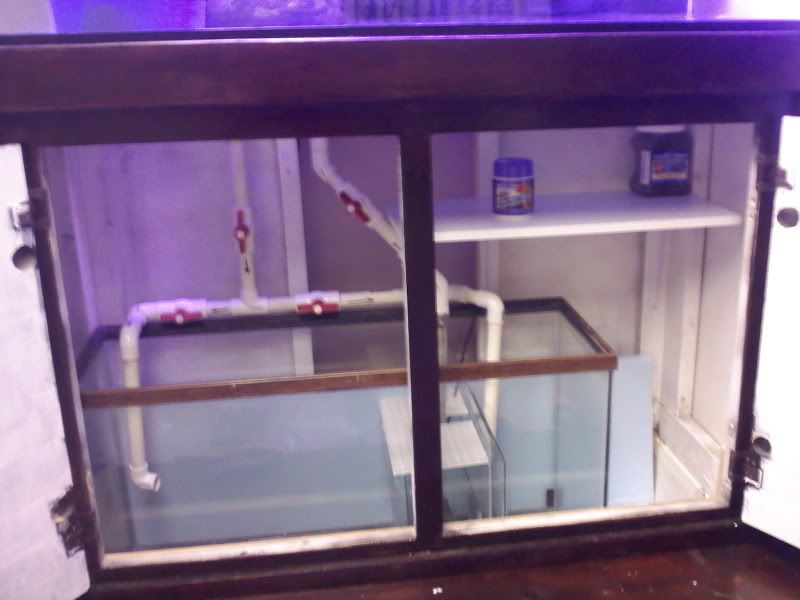 The far end tube was not glued going down into the refugium. I decided to leave it this way and built a second 6 foot long pipe. This way I can do water changes a little bit easier. We'll see how it works. I personally don't do large water changes since it's in my office, so I think it will handle the smaller water changes just fine. 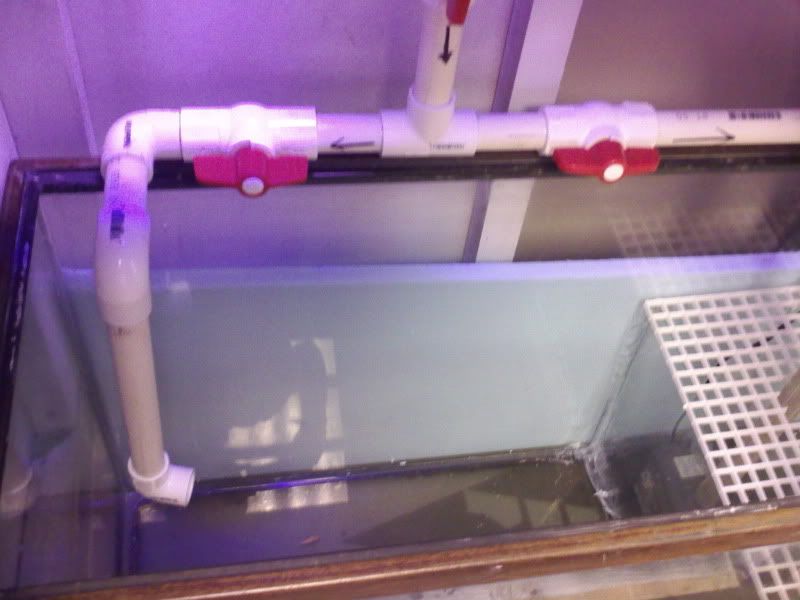 Skimmer and return pump area. Egg crate helps keep big stuff from getting out of the refugium. 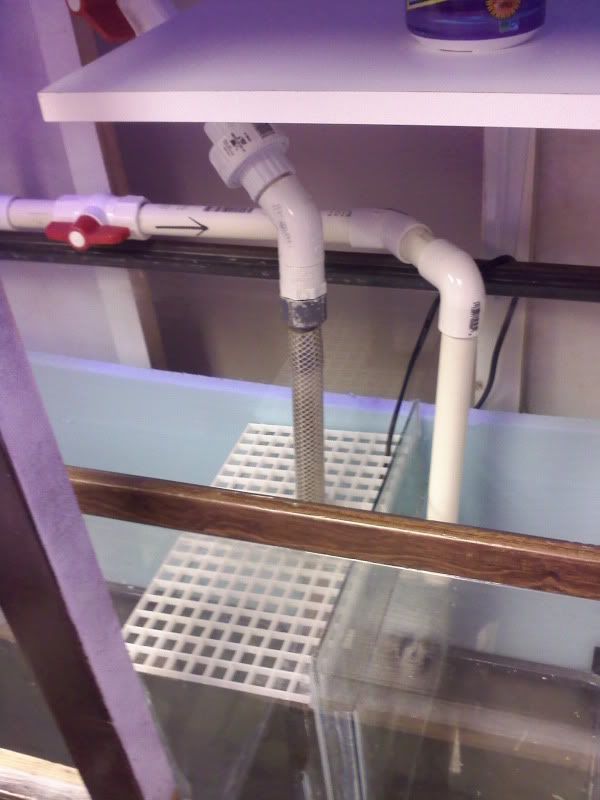 I installed a small shelf to hold my stuff. My tank has been just a big cluttered area with everything, so this will help keep it neat. 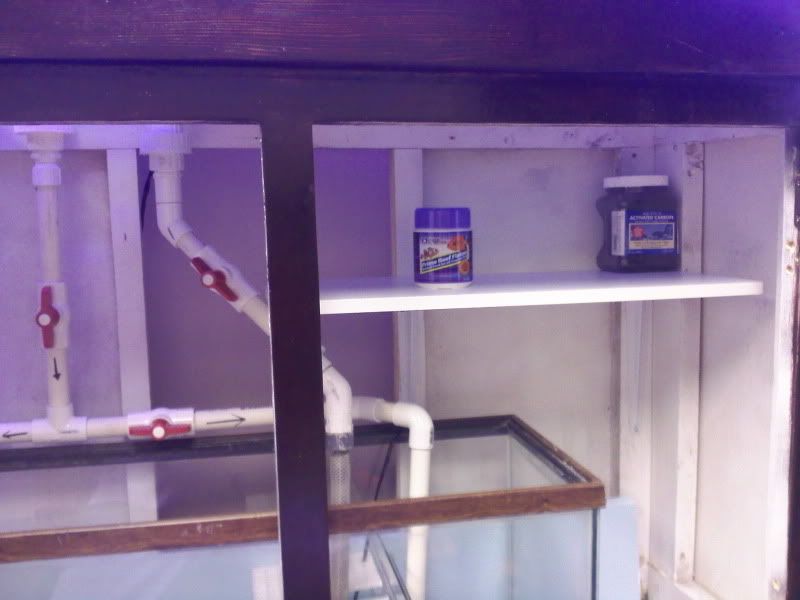 I set up the 3 VHO bulbs that the tank came with. I purchased an acitinic bulb to get a bluish tint. I will also have 2 150w MH pendants. Initially I'm going to use a 10k and 20k bulb, but if I don't like the color I'll switch it out for a Phoenix 14k. 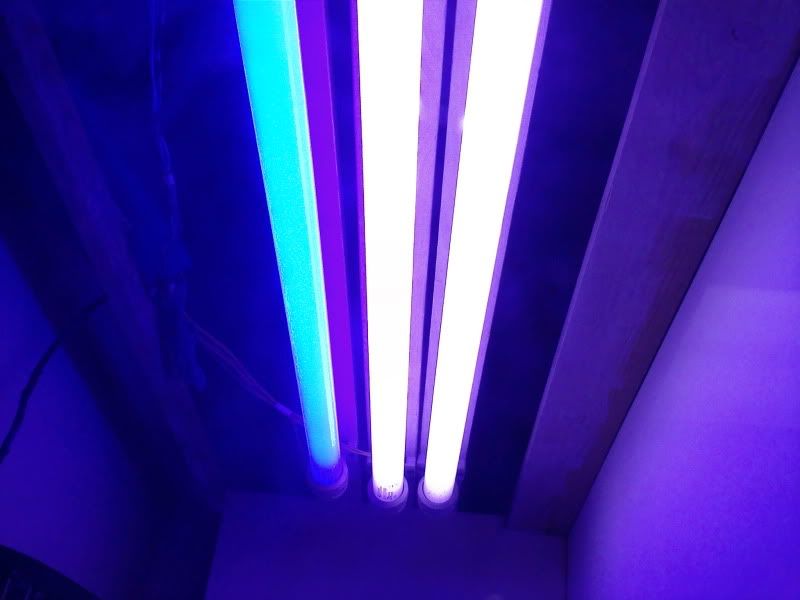 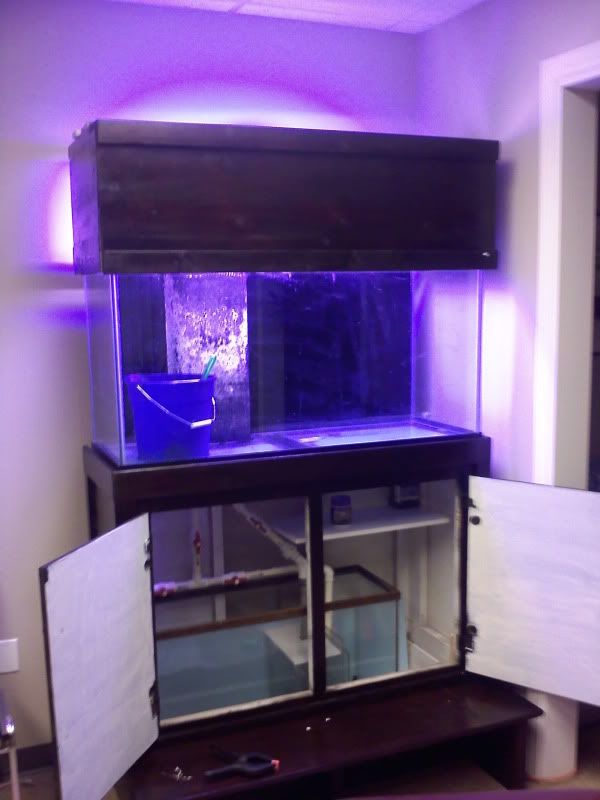 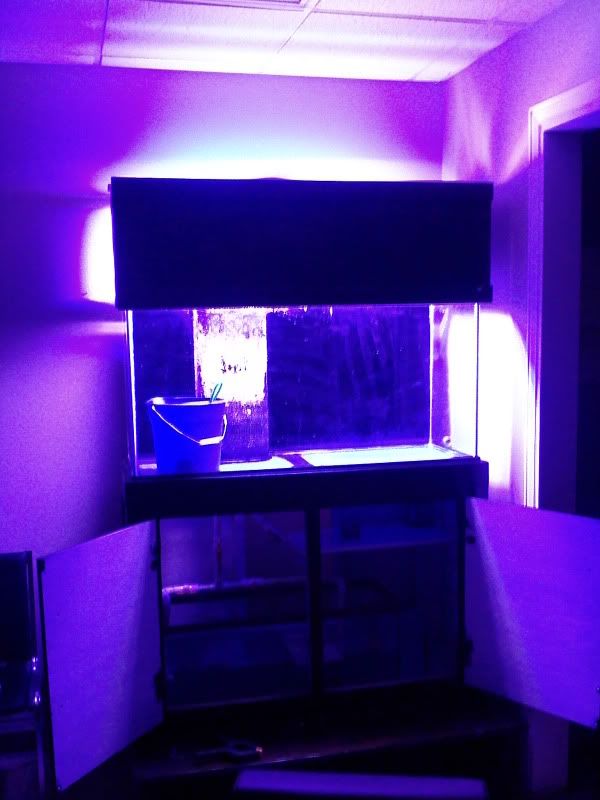 I'm actually pretty impressed with the amount of light put out by the VHO's. I was thinking that the 150w's wouldn't be enough for the 90g but with those VHO's and the 150's I think I'll be just fine. ------------- -Ben 90g Mixed reef www.body-balancechiropractic.com |
Posted By: tileman
Date Posted: January 07 2010 at 7:08pm
|
Looks great, I think you will have plenty of light also. Phoenix bulbs ------------- 335G Reef TOTM. http://www.advancedaquarist.com/2015/2/aquarium ReefKeepers TOTM Feb. 2012 http://reefkeeping.com/joomla/index....k-of-the-month & |
Posted By: jwoo
Date Posted: January 07 2010 at 10:50pm
|
Plumbing looks good. It's very neat which I dig!
------------- None at the moment Soon: 72 Gallon Bowfront |
Posted By: bfessler
Date Posted: January 07 2010 at 10:54pm
|
Glad to see you got it all set up. Now the fun starts. ------------- Burt An equal opportunity reefer, I support all hobbyists and organizations involved in Marine Aquarium Keeping. [email protected] |
Posted By: Luckedout
Date Posted: January 08 2010 at 12:00am
|
Tomorrow I'm going to put in some water and I need to design my rocks. I'm thinking of doing a tower in front of the overflow and a small pile to the right. I want to keep some open spaces, but at the same time have something very unique. We'll see what I can come up with. I really only have LBTR to work with which doesn't have fancy shapes as most.... ------------- -Ben 90g Mixed reef www.body-balancechiropractic.com |
Posted By: Luckedout
Date Posted: January 09 2010 at 8:19pm
Today was the move. I moved my fish and corals into a container and swapped out water and sand. My lawnmower blenny decided to hop out of the large cup I was moving him with and landed on the floor. I managed to scoop him right up and put him in, so I hope he's ok. Darwin I guess if he doesn't. Stupid fish should know better.  Everything was still super murky so I put a filter sock on and turned on the pump.... and the pump didn't work. Pulled it out and took it apart, it had gotten a little sand in it somehow, so I cleaned it and it fired right up. I also hooked up a small skimmer and left it. I'm about to head back and see if it's cleared up enough to place the rocks/corals/fish etc. It's been about 5 hours, so it won't be crystal clear, but I'd like to get the fish out of the bucket asap. I'll take some picks and post later tonight. ------------- -Ben 90g Mixed reef www.body-balancechiropractic.com |
Posted By: Luckedout
Date Posted: January 11 2010 at 10:05pm
|
Ok. I totally underestimated the amount of work it was going to take to move my livestock and everything over. Granted I spent too much time on my rock work, but also some of my fish decided that moving was not for them. Apparently there was a lot of complaining about making new friends and being at a different church... Anyhow. Moving your livestock and corals from a 54g corner to a 90g tank makes your realize how much you don't have. This tank is looking bare right now, but hopefully it will start to fill out in the months ahead. I added fresh oolitic sand and then put in some crushed coral and finished it off with live oolitic sand from my tank. I'm assuming the finer sand will make it's way through the crushed coral to the other sand bed and hopefully leave some good bugs and stuff on it's way. Here's my tank with the sand in and my rock formations. 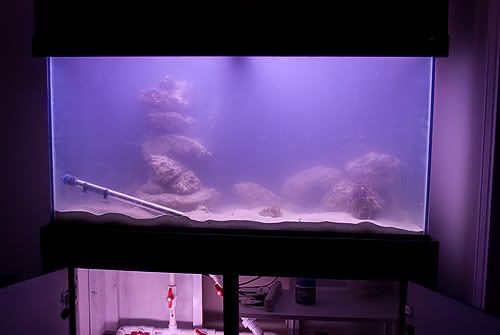 Ok. So initially I was going to build 2 towers of rocks, but then I decided that just one was needed to cover the overflow. I took a 1/2" drill and drilled through all the rocks. I used a 3/8" acrylic rod to brace the rocks in the stack. I then placed 3 small rocks at the base with just a little sand underneath. I then have the base stone on top of these. It worked well because even though it looks like it's on the the sand my hermits and starfish were going back and forth underneath it. I like how it turned out. It took me about an hour just to get this how I wanted it and make sure that it's stable enough. It's not going anywhere. 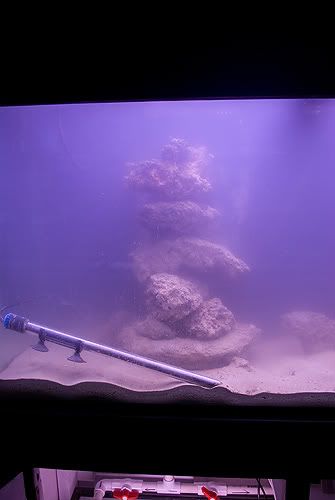  I decided to leave the other side fairly open. I want lots of room for fish and coral growth, but it also leaves me room to upgrade the structure if I see a need. 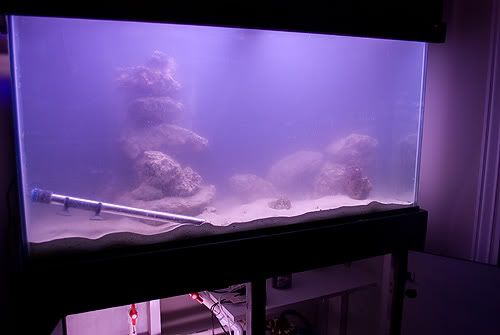 My sump. I noticed today I'm getting micro bubbles so I'm going to have to figure out where they're coming from.  Tank today with it's new inhabitants. As you can see.... lot's of empty space! We'll see how my frags start to grow out, but I'm in need of some fish too. 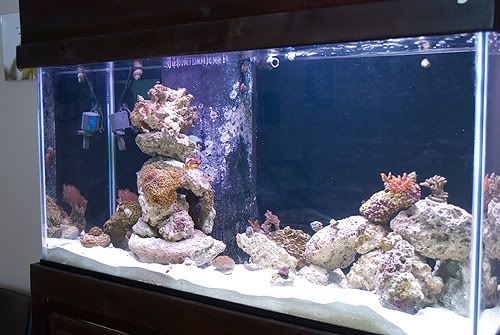 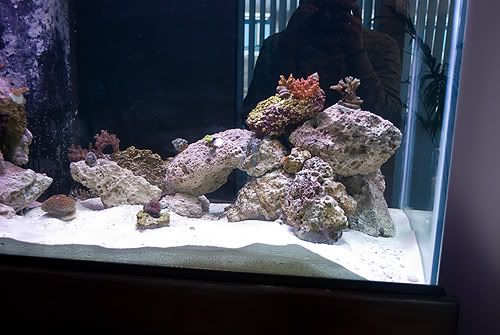 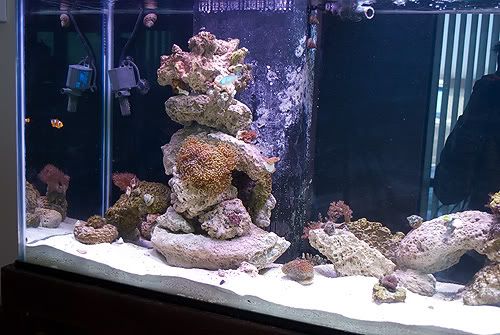 I also divided up my tank slightly. Softies will dominate the left side of the tank. This I will keep more shaded. The right side of the tower and the right rock formation will be a mixture of LPS and SPS. Nemo's just happy his frogspawn made it over. 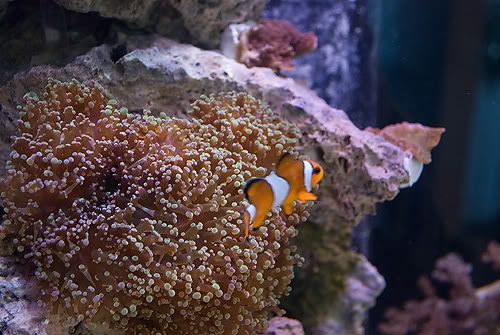 I'll share more equipment photos later. I'm just happy to have everything moved over. The only thing I lost was my royal gramma. Otherwise it was a pretty successful move! I like the tank a lot better and I've been getting a lot of good comments on it from my patients! Let me know what you think! ------------- -Ben 90g Mixed reef www.body-balancechiropractic.com |
Posted By: bfessler
Date Posted: January 12 2010 at 9:27am
|
Looks great Ben. I like all the open space. It makes it hard to wait till I can set up a bigger tank. ------------- Burt An equal opportunity reefer, I support all hobbyists and organizations involved in Marine Aquarium Keeping. [email protected] |
Posted By: Luckedout
Date Posted: January 12 2010 at 11:50am
|
Thanks! My next goal is to set up an auto-top off. I have a lot more lights on this tank so I lose a lot more water to evaporation. I'm looking around at various DIY auto top offs... seeing what works.
------------- -Ben 90g Mixed reef www.body-balancechiropractic.com |
Posted By: bfessler
Date Posted: January 12 2010 at 6:30pm
|
Do you have a RO unit in your office? Looking at your stand it doesn't look like you have much room for storage of top off water inside near the sump.
I use 3 different ATO's, 1 is a JBJ ATO you can but at most any fish store or on-line, I also have a DIY setup that uses float valves and a relay that powers an Aqualifter pump to deliver Top Off water to my Clown Tank and the third unit is a DIY gravity fed unit that I made from a 7 Gallon Poultry Waterer. The one you will want to use will depend on where the Top Off water is coming from.
I get nervous about floods while I am away so I store my Top Off water in 5 Gallon buckets and pump it to the tank with aqualifter pumps. They are cheap and deliver a slow steady stream of water. Because I store the water in 5 gallon buckets I will never have more than 5 gallons pumped into the tanks should the pump stick in the on position for any reason.
Here is a link to a place you can order both types of float valve types http://www.aquahub.com/store/autotopoffcomp.html - http://www.aquahub.com/store/autotopoffcomp.html . The DIY units are about $40.00 and the JBJ unit is about twice that but it is a much nicer unit. ------------- Burt An equal opportunity reefer, I support all hobbyists and organizations involved in Marine Aquarium Keeping. [email protected] |
Posted By: Luckedout
Date Posted: January 12 2010 at 6:34pm
|
Yeah I have an RO unit in my office. I'm tempted to just run a line through the drop ceiling over to the tank and just use a small plastic toilet float valve to turn it on and off. I think the simpler I can keep it the better. Do you see any problem with setting it up like that?
------------- -Ben 90g Mixed reef www.body-balancechiropractic.com |
Posted By: bfessler
Date Posted: January 12 2010 at 6:37pm
|
If you have a RO unit in your office you might be interested in a Level Loc ATO. You simply connect the output of your RODI unit to the ATO and set it up in your sump. http://www.bulkreefsupply.com/store/level-loc-auto-top-off-unit-for-ro-systems.html - http://www.bulkreefsupply.com/store/level-loc-auto-top-off-unit-for-ro-systems.html ------------- Burt An equal opportunity reefer, I support all hobbyists and organizations involved in Marine Aquarium Keeping. [email protected] |
Posted By: bfessler
Date Posted: January 12 2010 at 6:46pm
|
This could work OK but occasionally those valves start to leak which could be a problem. Also mounting the toilet valve in your sump could be difficult. For a sump mounted ATO connected directly to your RO unit I like the ones like the Level-Loc unit. It's simple and has backup safety features built in. ------------- Burt An equal opportunity reefer, I support all hobbyists and organizations involved in Marine Aquarium Keeping. [email protected] |
Posted By: Luckedout
Date Posted: January 12 2010 at 7:37pm
|
The big problem there is cost. Telling my wife I'm buying a hundred dollar glorified toilet float valve would not fly after setting up the new tank.... so if I could get away with setting up something simple until things settle down, that would be ideal. Also, why do they have trouble leaking? Algae? ------------- -Ben 90g Mixed reef www.body-balancechiropractic.com |
Posted By: bfessler
Date Posted: January 12 2010 at 8:00pm
|
I don't have any experience using a toilet flush valve as an ATO but I have had many of them leak in my home and at my business which causes water to slowly fill the tank till it runs down the overflow tube. I would assume the same situation would exist in a reef tank.
You could use a simple float valve for RO Storage container in your sump. Essentially it will do the same thing as a toilet valve but it is designed to work with a RO unit. Here is a link to BRS Float Valve. It would also be much easier to mount than a toilet valve. http://www.bulkreefsupply.com/store/products/reverse-osmosis-filters-and-systems/ro-di-accessories/adjustable-float-valve-for-reverse-osmosis-systems.html - http://www.bulkreefsupply.com/store/products/reverse-osmosis-filters-and-systems/ro-di-accessories/adjustable-float-valve-for-reverse-osmosis-systems.html
All you need to do is get a piece of acrylic and drill a hole in it to mount the valve then position it in your sump at the appropriate level, Connect the 1/4" tubing to it and your done. ------------- Burt An equal opportunity reefer, I support all hobbyists and organizations involved in Marine Aquarium Keeping. [email protected] |
Posted By: fishoutawater
Date Posted: January 12 2010 at 8:44pm
| I would also recommend using a container to limit the amount of water that can be topped off is something goes wrong, sooner or later something will. A friend of mine plumbed his ro line directly to his sump with a float valve. For about 3 years he had no problems. Then one night a snail or something got stuck in the valve and it flooded his sump and front room. |
Posted By: Luckedout
Date Posted: January 12 2010 at 9:22pm
|
Burt, would a regular drill bit work ok on thin acrylic if I go slow?
------------- -Ben 90g Mixed reef www.body-balancechiropractic.com |
Posted By: bfessler
Date Posted: January 13 2010 at 5:44am
|
Yes a regular drill bit will work or you can use a spade bit. If using a spade bit you still want to drill at high speed.
I agree with Fishoutawater, especially for float valves placed directly in the sump. I use one on my RO Reservoir but there are no critters to bother the valve and I have an overflow plumbed into a floor drain. That $40 - $100 for a ATO with additional safety features is cheap compared to dealing with a flood.
If your RO is upstairs then the aqualifter and electronic float switches isn't an option. The water will siphon through the aqualifter even after it shuts off. You would be better off with a unit like the Level-Loc that has a float valve and a solenoid to stop flow and make sure to clean and test the system frequently as part of regular tank maintenance.
Before I put in my overflow to the floor drain I had a piece of tubing that stopped the float valve from shutting completely. It flooded the basement for most of a day before I found it. Fortunately the basement isn't finished and the floor drain limited the flood to about 1/4" over a 100 square foot area but it would be a real mess in a finished office.
If you're going to go with the float valve only, I would recommend you create a box around it with small holes for the water to escape but that will keep snails and such out and consider a better ATO when you can afford it. Floods aren't fun.
Oh and I wouldn't connect the tubing straight to the RO unit. Use a 5 to 10 gallon container and an Aqualifter to start the siphon. Then if you do have a flood it will be small, in fact the sump may contain most of the water if the float valve fails. Not only will this contain the flood it will also prevent your water from being overly diluted. ------------- Burt An equal opportunity reefer, I support all hobbyists and organizations involved in Marine Aquarium Keeping. [email protected] |
Posted By: Luckedout
Date Posted: January 13 2010 at 10:40am
|
Yeah. I like the look of setting up a reservoir and a small pump. I'll have to shop around a bit to find a container that would fit in my stand. I figured that I lose just a little under 2 gallons in a 24 hour period. so I would like to find something that could hold about 15-20 gallons if that's possible. ------------- -Ben 90g Mixed reef www.body-balancechiropractic.com |
Posted By: bfessler
Date Posted: January 13 2010 at 10:53am
|
You can keep the reservoir just about anywhere. If there is room near the RO unit that would be ideal, especially if the tank is on a lower floor, just run 1/4" tubing down to the sump. Once the siphon is started you really don't need a pump just a float valve or a unit like the Level-loc. The siphon will keep water supplied to the float valve which will control the water level in the sump.
------------- Burt An equal opportunity reefer, I support all hobbyists and organizations involved in Marine Aquarium Keeping. [email protected] |
Posted By: Luckedout
Date Posted: January 13 2010 at 11:14am
|
The office just has a single floor. So it's all on the same level. My RO unit is in my utility closet and I was thinking about just leaving the container in there, then taking the tubing up and through the drop ceiling and dropping it down into the sump. So a small pump might be necessary. If that doesn't work I could just find something smaller and stick it next to the sump. ------------- -Ben 90g Mixed reef www.body-balancechiropractic.com |
Posted By: bfessler
Date Posted: January 13 2010 at 2:09pm
|
OK for some reason I thought it was going down from an upper floor. In that case you will need a pump that is strong enough to push the water up through your ceiling. I would recommend a system that uses electronic float switches. Ideally you would use 3 float switches. Switch 1 goes in the sump at the level you want to maintain. Switch 2 goes slightly above switch 1 and will shut off the pump if switch 1 fails. Switch 3 goes in the bottom of the reservoir and shuts off the pump if the container runs dry. They are all connected in series through a simple relay the powers the pump. Switch 1 and 2 are set to open when the water level raises and switch 3 is set to open when water level drops. I got my DIY retrofit kit complete with the instructions switches, relay, transformer and project box from aquahub.com for about $40.00. The kit will power any pump you choose to use. There is also a 2 switch version but for just a little more its nice to have the redundency of 2 switches in the sump. ------------- Burt An equal opportunity reefer, I support all hobbyists and organizations involved in Marine Aquarium Keeping. [email protected] |
Posted By: Luckedout
Date Posted: January 14 2010 at 12:51am
|
I think I will just manually fill the reservoir(tough to spell that word). If I have a large enough one then I can just do it once a week or so and it wouldn't be a big deal. Now if I was able to maintain water pressure in the line, would I really need that big of a pump?? Obviously if the line drained empty every time then I would, but just moving water through a line wouldn't need a lot of back pressure on a 1/4" line would it? I was also reading an article on a DIY that a guy put on a strong pump and it kept overfilling his sump. I'm following Vadryn's post as well to see what he comes up with. ------------- -Ben 90g Mixed reef www.body-balancechiropractic.com |
Posted By: Luckedout
Date Posted: February 17 2010 at 10:00pm
|
I've had a few changes, but not a ton. I've added a bit of livestock. A couple of tangs, cleaner shrimp, diamond goby and a sixline wrasse. I'll probably look at adding a bit more life over the next couple of weeks. Everything has survived and thrived with almost no pickup in my skimmer. Coral-wise I've added a LOT of frags. I haven't stuck to any one type of coral, I'm hoping for a good mix with variety and so I'm pretty much buying up what catches my fancy. Maybe as the corals start to grow out I'll become a little more picky on what I put in the tank and what I want to do look wise. Future projects for this tank include an ATO. I want to redo my lights so they are closer to the water and get better growth. I also need to replace my protein skimmer pump. I decided to run skimmer-less tonight and tomorrow to see if it's making much of a difference. Time for pics! These were all taken right after feeding so the water was stirred up a bit. Candy cane eating some mysis. This started out as a half dead frag and is now starting to split and grow! 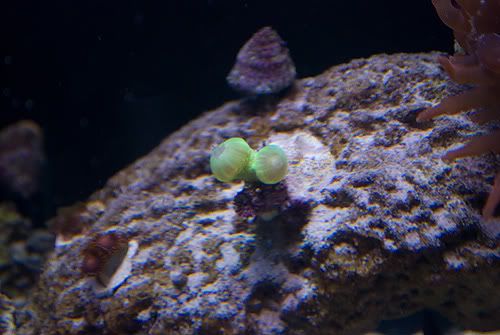 Keeping the sand white and burying my frags in the process. He inspired me to build a frag rack. 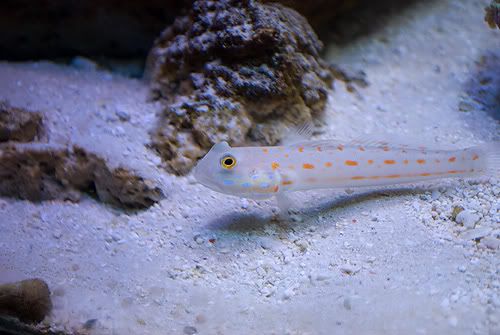 Frag rack made with a mag float, egg crate and plastic corner protectors. 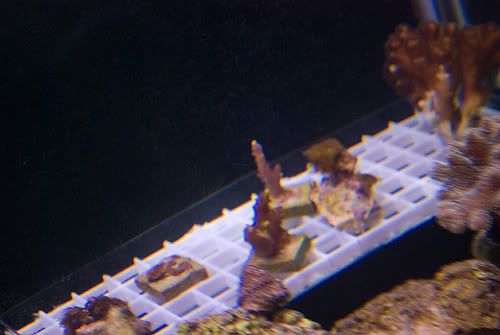 Known as the "Old Man" 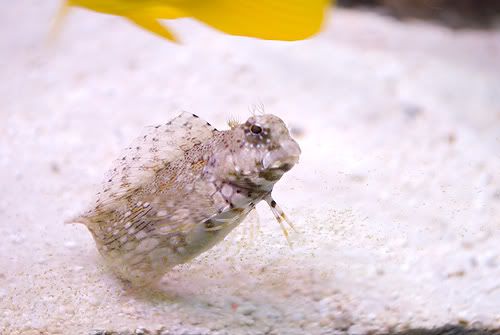 More Frags. I'll be adding a lot more rock to this area as things start to grow out.  New frags: Blasto, Armor of God, Start Polyps. 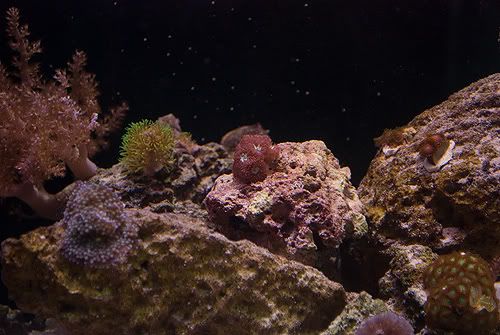 Rock Tower starting to show some coral growth. 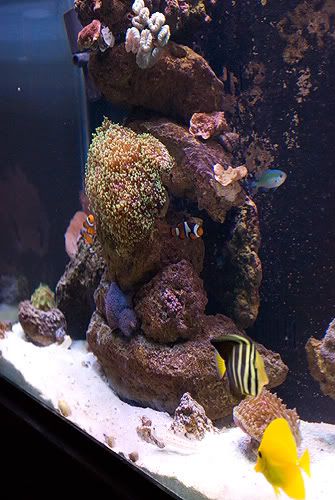 Pretty much it for now. I haven't done much work on the tank itself. I've mostly just been trying to fill it up!! Too much space and I'm not patient waiting for corals to grow. I'll be changing out some of my bulbs as well to get more blue. It looks ok, but still just a little too bright for my taste. Let me know what you think and what I can do better! ------------- -Ben 90g Mixed reef www.body-balancechiropractic.com |